Select how to control the clock
There are three options for how to control the clock – iOS app that can run on any iPhone or iPad, Android app, and finally browser app that runs in any browser.
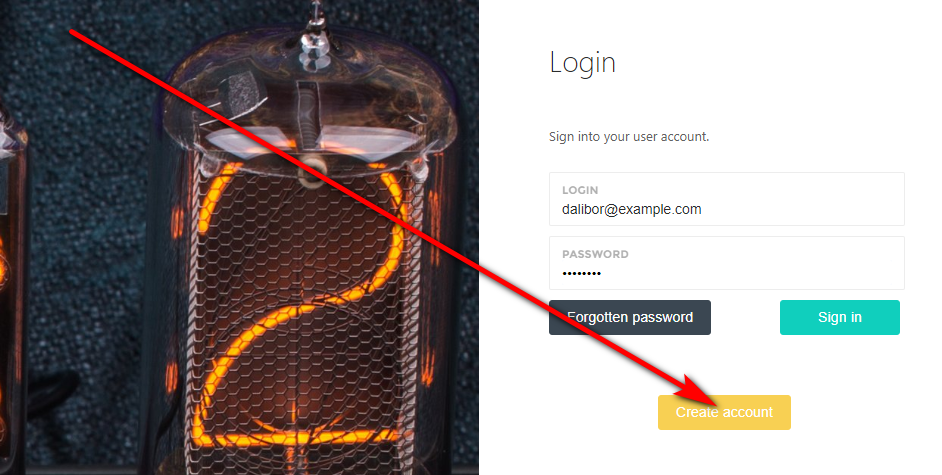
Log in
First, register with your email address, login, and continue to the connection process of your clock. We respect your privacy – your email address is used only for sending a link to reset the password if you ask for it.
Connect the clock to your wifi network
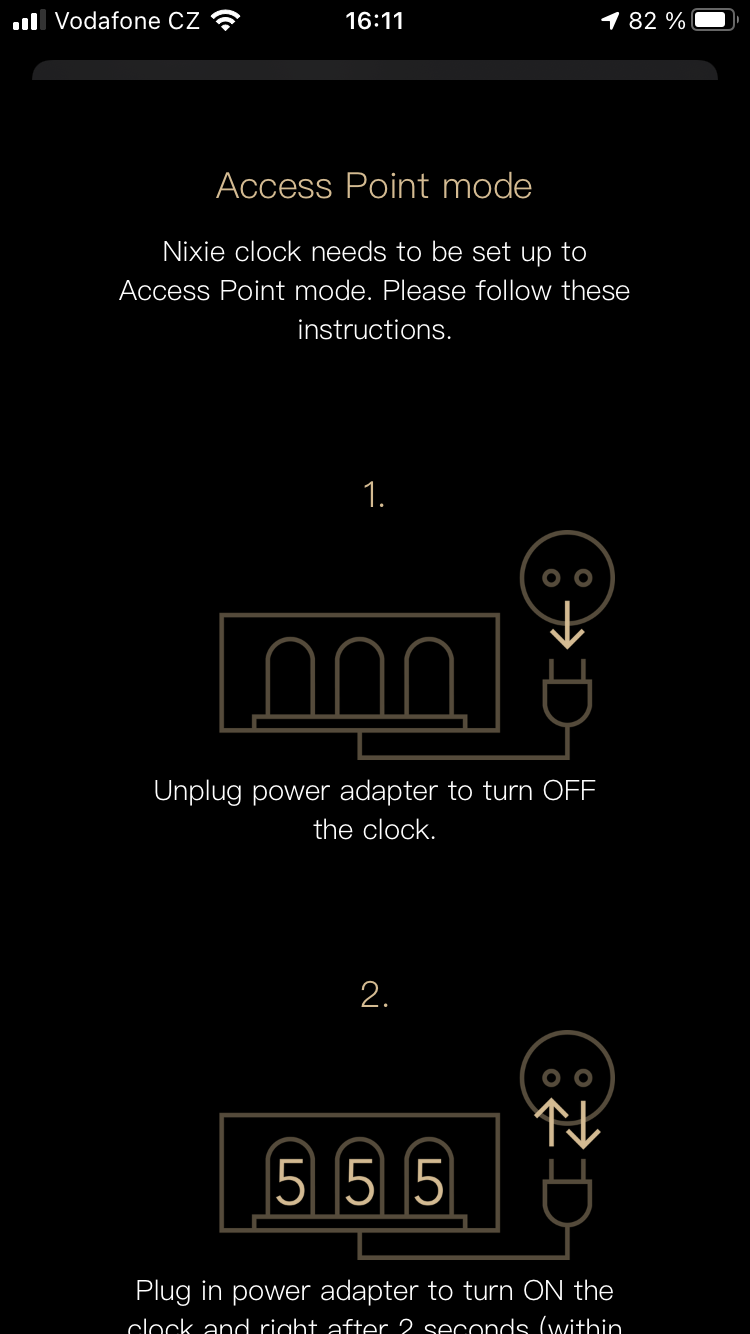
The clock needs to know the wifi credentials so that it can connect to your wifi router. So first, the clock needs to be switched to listening mode (unplug the adapter during the startup sequence, then plug it back in). Next, you connect to it over wifi with the app, scan for your wifi network, enter the password for the wifi and confirm the connection. The clock will now connect to the internet and will be assigned to your account.
Configure the clock
Once the clock knows the wifi credentials, you can see it in the app and access its configuration parameters. You are done!
Using the clock offline, independent of the internet
Select how to control the clock
There are two options for controlling the clock – iOS app that can run on any iPhone or iPad, Android app. Unfortunately, the Configuration website doesn’t support Direct connect yet.
Connect to your clock directly over wifi
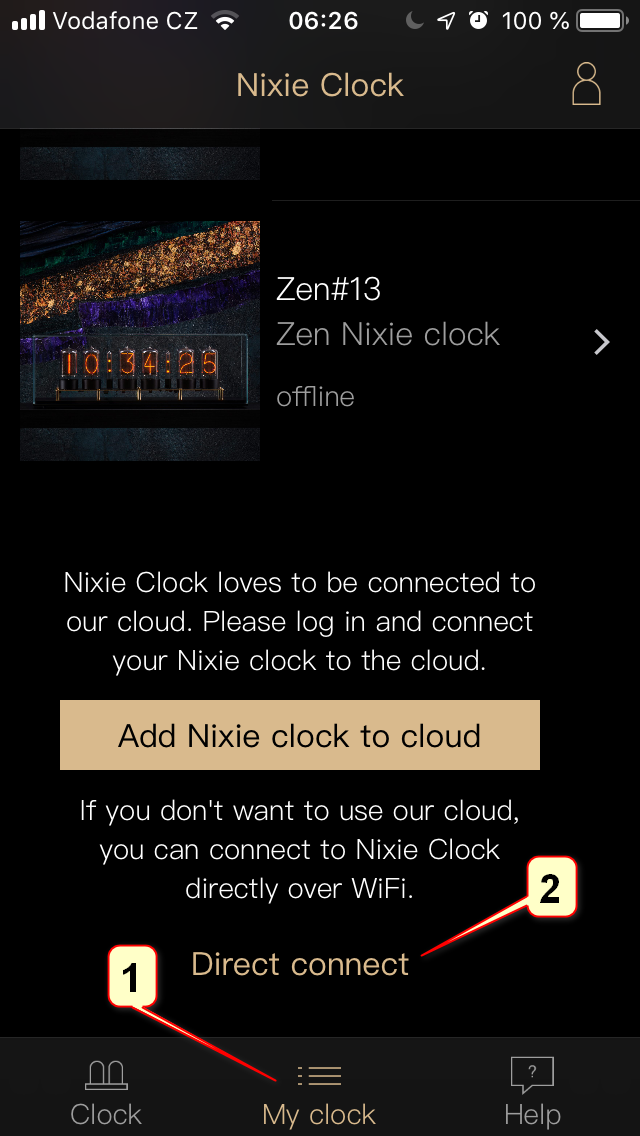
First, the clock needs to be switched to listening mode (unplug the adapter during the startup sequence, then plug it back). Next, you connect to it over wifi with the app, and select Direct connect option.
Configure the clock
The communication is now done directly from your device to the clock without needing an internet connection. Set all configuration parameters as you wish, and you are done!
Synchronize the time manually
From time to time, you will need to synchronize the time manually from the app using Direct Connect.
Using the clock
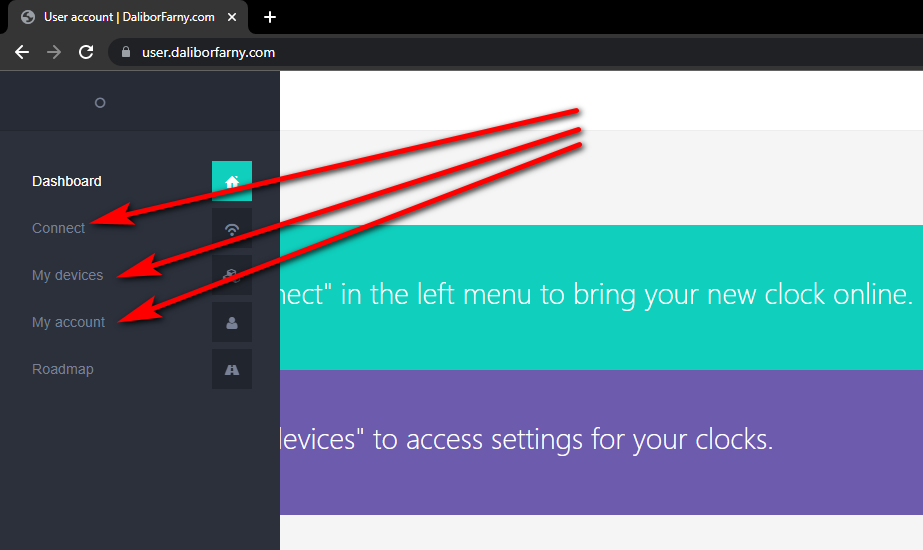
Please select one of the topics in the left menu.
Online mode
The online mode is the preferred mode of operation is a WiFi network is around.
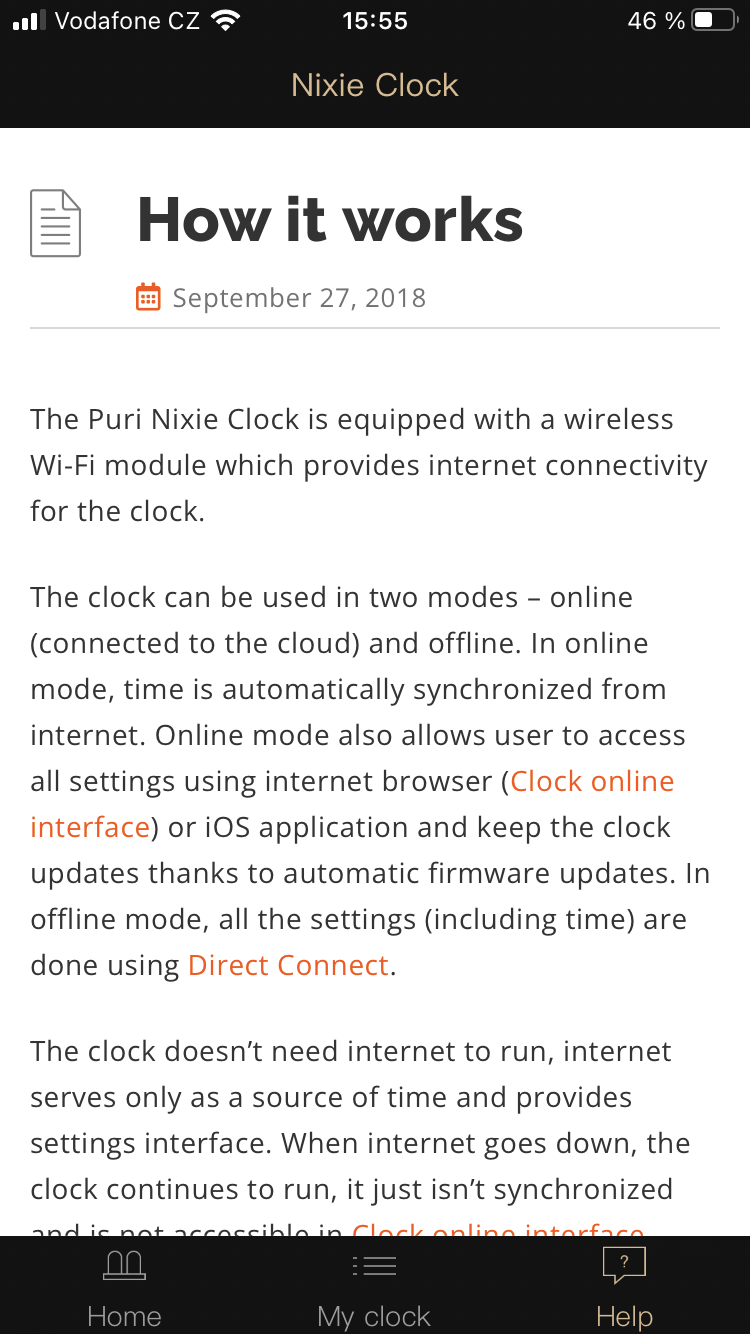
In online mode, the clock is connected to the internet directly via a WiFi router, all the communication between the configuration device (your phone with the installed app or a computer with the opened website) and the clock is done over the internet. There is no direct connection between the configuration device and the clock. The only exception is the connection process, during which is the clock for a while connected directly to the configuration device.
The clock doesn’t need the internet to operate, the internet serves only as a source of time and provides a settings interface. When the internet goes down, the clock continues to run, it just isn’t synchronized and is not accessible in the configuration apps. Once the internet is available again, the clock reconnects to our cloud and continues in time sync as usual.
Offline mode
If there is no internet connection available around the clock, the clock can operate in Offline mode without connection to the internet.
In the Offline mode, the clock works as a WiFi access point. To configure the clock in Offline mode, you will need a phone with our app installed. That phone will then connect directly to the clock’s WiFi network and send commands directly to the clock. Read more about the direct connection to the clock under Direct connect section.
The clock in Offline mode needs to have its time synchronized manually from time to time – this is done via the app.
Tip
If the clock is in the Offline mode, it has the Wi-Fi access point with its name on all the time, you can connect to it anytime without switching it to listening mode.
Now fill in your email address, choose your password and click on the green Create Account button. This action will create your account and log you in – now you can start using the app.
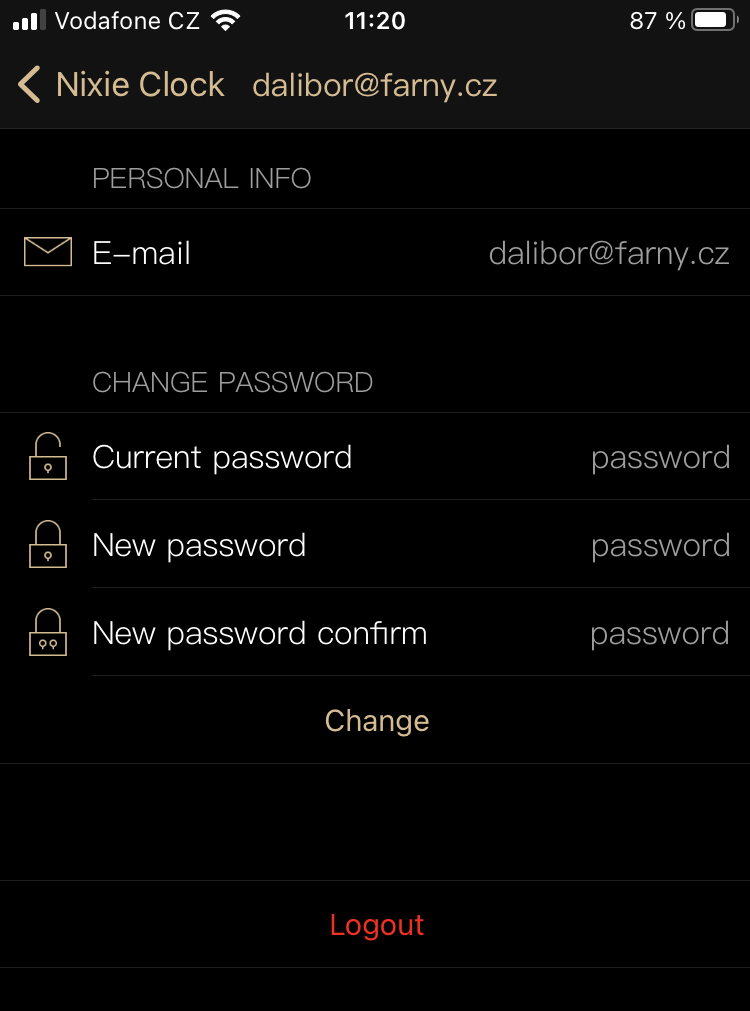
Tap the “My clock” icon on the bottom of the screen to access the login/register page. Now fill in your email, the app will recognize that there is no such email registered yet and will offer two boxes for the password. Choose your password and tap on the Register button. This action will create your account and log you in – now you can start using the app.
How to access the clock
All the settings are done wirelessly over WiFi from your device, some configuration parameters are accessible via the rotary encoder.
Choose the way how you want to control the Zen Nixie Clock:
iOS app – iOS app for iPhones, iPads and some other Apple devices.
Configuration website – app that runs in a browser without installation of any extensions. Just log in and start using it.
Cloud API – you can control the clock programmatically over our Cloud API.
Configuration website
The clock can be controlled from a browser regular computer without installing anything to your computer or any apps to a mobile phone. The computer only needs to have a wifi interface and browser. It can be a laptop, PC, iMac, or even a mobile phone with a browser.
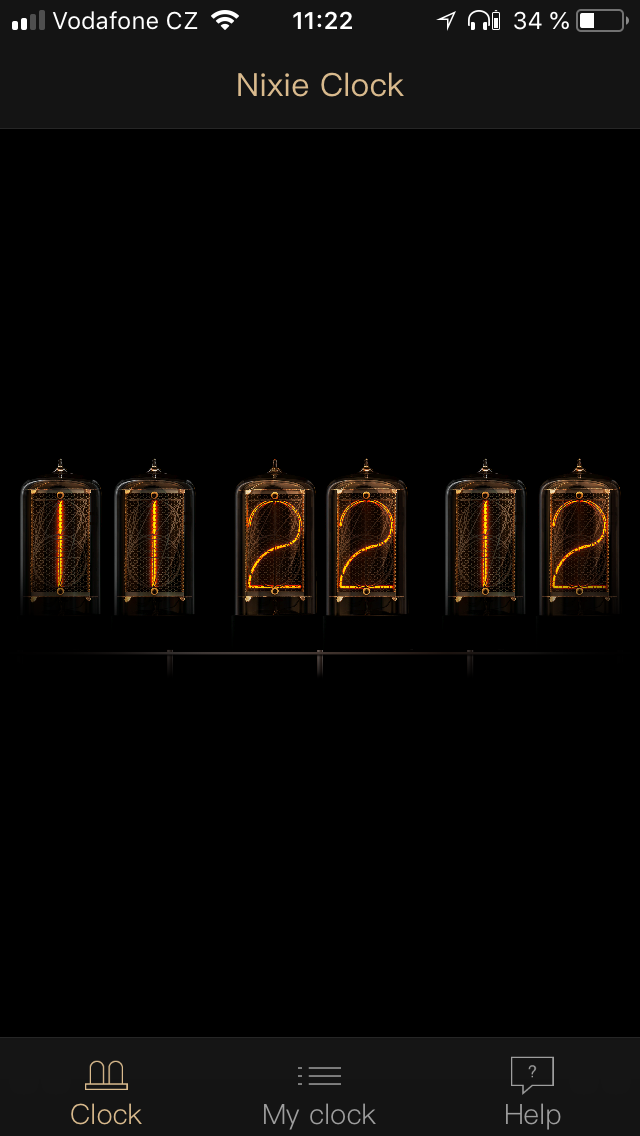
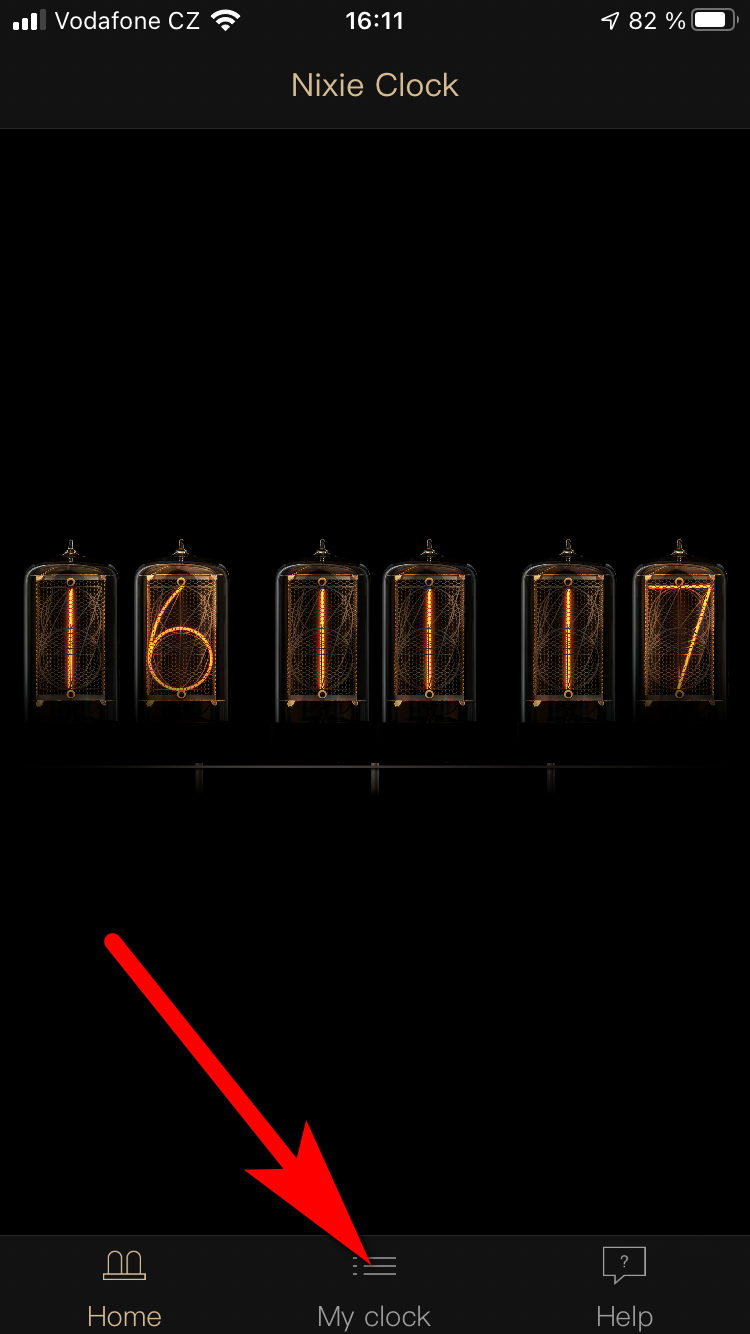
When you start the app, you are situated on a home screen. In portrait mode, there are three tabs on the bottom of the screen – Home, My Clock, and Help. The Home button brings you back to the home screen. My clock button moves you to clock settings and connection. The help button opens our web-based documentation. The home screen displays actual time using nixie tubes graphics.
Portrait modeLandscape mode
My Clock
The second tab is called My Clock and it provides the main functionality of the app. It will get you through the connection process of the clock as well as the configuration of the clock.
We have an Android application that allows our customers to fully control our clocks. Some Android phones disconnect from the clock during the connection process and reconnect back to the WiFi router. This makes the connection process almost impossible to make – if you encounter such behavior, please use either another Android phone or some other platform. This issue applies only to the connection process, once the clock is connected and online, it can be controlled from that phone normally.
To download the application, please follow this link:
When you start the app, you are situated on a home screen. In portrait mode, there are three tabs on the bottom of the screen – Home, My Clock, and Help. The Home button brings you back to the home screen. My clock button moves you to clock settings and connection. The help button opens our web-based documentation. The home screen displays actual time using nixie tubes graphics.
Portrait modeLandscape mode
My Clock
The second tab is called My Clock and it provides the main functionality of the app. It will get you through the connection process of the clock as well as the configuration of the clock.
Some of our nixie clocks can be controlled programmatically over REST API. This feature offers possibilities to display custom numbers or control brightness over the clock as you wish. Individual API calls are sent to our cloud server that communicates with the clock. The clock must be connected to the internet to make the API calls work properly.
Authentication
You will need to know or get the following variables for communication with our clocks:
EMAIL, PASSWORD – use the same credentials as for our web or mobile app
ACCESS_TOKEN – you will get one after successful login. Every other API call must be authorized using this token. Session token has an expiration time of 1 year.
CLOCK_ID – See the table below in section Clock IDs.
Each clock model has a certain product ID, Zen clocks 2, 4-tube Puri 6, etc. This is not a serial number that is unique for each clock.
Clock Name
Clock ID
Zen Nixie Clock
2
Puri Nixie Clock (4-tube)
6
Puri Nixie Clock (6-tube)
15
Nixie Machine II
3
Nixie Machine III
9
NX.2
4
Obtaining the ACCESS_TOKEN
Use your EMAIL and PASSWORD to obtain ACCESS_TOKEN. Replace EMAIL and PASSWORD with the actual credentials you are using on https://user.daliborfarny.com/ or in the mobile app.
API call specification:
Request type – POST
Endpoint URL – /oauth/token
Request body – client_id=3rdparty&client_secret=ws7TQHXp5W6444t4&grant_type=password&username=EMAIL&password=PASSWORD
Example API call using curl:
$ curl -X POST https://api.daliborfarny.com/oauth/token -d "client_id=3rdparty&client_secret=ws7TQHXp5W6444t4&grant_type=password&username=EMAIL&password=PASSWORD"
The server responds with a JSON containing the access_token:
You can test this step manually from the command line:
Getting a list of your clocks
The next step is to get a list of clocks that are paired to your account. The pairing is done automatically during the process of connecting the clock to the internet. Replace the ACCESS_TOKEN with the access token you received in the previous step.
$ curl -X GET "https://api.daliborfarny.com/v1/devices?client_id=3rdparty&access_token=62dd89362a635ff8692a590456e8a8118e61d9902&client_secret=ws7TQHXp5W6444t4"
$ curl -X GET "https://api.daliborfarny.com/v1/devices/320029000147373336323320/online?client_id=3rdparty&access_token=62dd89362a635ff8692a590456e8a8118e61d9902&client_secret=ws7TQHXp5W6444t4"
All the configuration parameters are stored in the clock itself, we can read them by sending API calls according to the specification below. The PARAMETER is to be replaced by the actual parameter name that we want to read from the clock.
Example API call to retrieve the value of “transition” parameter using curl:
$ curl -X GET "https://api.daliborfarny.com/v1/devices/320029000147373336323320/transition?client_id=3rdparty&access_token=62dd89362a635ff8692a590456e8a8118e61d9902&client_secret=ws7TQHXp5W6444t4"
The JSON response returned by the cloud server, the parameter value in this example is “2”.
{
   "ok":true,
   "status":200,
   "data":{
      "value":2
   }
}
Sending the configuration parameters
All the configuration parameters are stored in the clock itself, to change the particular parameter, we need to do an API call as below. The PARAMETER is to be replaced by the actual parameter name that we want to set. The VALUE is the actual value we want to set the PARAMETER to.
API call specification:
Request type – POST
Endpoint URL – /v1/devices/CLOCK_ID/PARAMETER
Request body – access_token=ACCESS_TOKEN&arg=VALUE&client_secret=ws7TQHXp5W6444t4&client_id=3rdparty
Example API call using curl – this way we can set parameter “transition” to value 3.
$ curl -X POST "https://api.daliborfarny.com/v1/devices/320029000147373336323320/transition" -d "access_token=62dd89362a635ff8692a590456e8a8118e61d9902&arg=3&client_id=3rdparty&client_secret=ws7TQHXp5W6444t4"
The JSON response returned by the cloud server:
{
   "ok":true,
   "status":200,
   "data":{
      "value":2
   }
}
Configuration parameters
Parameter
Zen
NixieMachineII
NixieMachineIII
NX2
PURI4
PURI6
Parameter keyword
Read/Write
Clock ID
2
3
9
4
6
15
Permissible values
Time format
12, 24
format
RW
Leading Zero
1, 2
leadingzero
RW
Daylight Saving
1, 2, 3
dst
RW
Time Zone
timezone
RW
Date Display
1, 2, 3, 4, 5
datedisplay
RW
Digits Transition
1, 2, 3, 4
transition
RW
Cathode Cleaning Interval
1, 10, 30, 98
slotmachineperiod
RW
System LED mode
1, 2, 3
photonled
RW
Underlight Mode
1,2
–
–
–
–
–
underlightmode
RW
Underlight Mode
1, 2, 4, 6
–
–
–
–
–
underlightsegments
RW
Underlight Color
1 – 2^32
–
–
–
–
–
underlightsolidcolor
RW
Brightness in day mode
1, 6, 71, 126, 201, 256
brightnessday
RW
Brightness in night mode
1, 6, 71, 126, 201, 256
brightnessnight
RW
Schedule
nmstr
W
Colon Mode
1, 2, 3
–
–
–
1, 2, 3
1, 2, 3
colonmode
RW
Power Light
–
1, 2
1, 2
–
–
–
powerlight
RW
Connectivity Mode
1, 2
connectivitymode
RW
Time
1, 2
time
RW
Custom data
XXXXXXXX
customdata
W
Custom data timeout
0-255
customdatatimeout
RW
Start countdown
1-359999
startcountdown
W
Switch to time mode
1
switchtotimemode
W
Slotmachine mode
1,2
slotmachinemode
RW
Restart the clock
1
reset
W
Homekit reset
1
homekitreset
W
RTC calibration
rtccalibration
RW
System firmware
systemfirmware
R
Firmware version
firmware
R
Wifi signal strength
rssi
R
Watchdog restarts
watchdogevents
R
Clock ID
productid
R
Serial number of the clock
0-99999
serialnumber
RW
Homekit connections
hkconnectionsnumber
R
Largest free memory block
largestfreeblockheap
R
Free memory
freememory
R
Currently displayed value
currentdisplayedvalue
R
Last NTP sync difference
lastntpsyncmillis
R
OTA updates
otaenabled
R
MAC Address
macaddr
R
Explanation of the individual configuration parameters
Time Format
12 = 12h format, 24 = 24h format
Leading Zero
1 = OFF, 2 = ON
Daylight Saving
1 = OFF, 2 = ON, 3 = Auto
Time Zone
Name
Value
(UTC-12:00) International Date Line West
0
(UTC-11:00) Coordinated Universal Time -11
1
(UTC-10:00) Hawaii
2
(UTC-09:00) Alaska
3
(UTC-08:00) Pacific Time (US and Canada)
4
(UTC-08:00) Baja California
5
(UTC-07:00) Mountain Time (US and Canada)
6
(UTC-07:00) Chihuahua, La Paz, Mazatlan
7
(UTC-07:00) Arizona
8
(UTC-06:00) Saskatchewan
9
(UTC-06:00) Central America
10
(UTC-06:00) Central Time (US and Canada)
11
(UTC-06:00) Guadalajara, Mexico City, Monterrey
12
(UTC-05:00) Eastern Time (US and Canada)
13
(UTC-05:00) Bogota, Lima, Quito
14
(UTC-05:00) Indiana (East)
15
(UTC-04:30) Caracas
16
(UTC-04:00) Atlantic Time (Canada)
17
(UTC-04:00) Cuiaba
18
(UTC-04:00) Santiago
19
(UTC-04:00) Georgetown, La Paz, Manaus, San Juan
20
(UTC-04:00) Asuncion
21
(UTC-03:30) Newfoundland
22
(UTC-03:00) Brasilia
23
(UTC-03:00) Greenland
24
(UTC-03:00) Montevideo
25
(UTC-03:00) Cayenne, Fortaleza
26
(UTC-03:00) Buenos Aires
27
(UTC-02:00) Mid-Atlantic
28
(UTC-02:00) Coordinated Universal Time -02
29
(UTC-01:00) Azores
30
(UTC-01:00) Cabo Verde Is.
31
(UTC) Dublin, Edinburgh, Lisbon, London
32
(UTC) Monrovia, Reykjavik
33
(UTC) Casablanca
34
(UTC) Coordinated Universal Time
35
(UTC+01:00) Belgrade, Bratislava, Budapest, Ljubljana, Prague
36
(UTC+01:00) Sarajevo, Skopje, Warsaw, Zagreb
37
(UTC+01:00) Brussels, Copenhagen, Madrid, Paris
38
(UTC+01:00) West Central Africa
39
(UTC+01:00) Amsterdam, Berlin, Bern, Rome, Stockholm, Vienna
40
(UTC+01:00) Windhoek
41
(UTC+02:00) Minsk
42
(UTC+02:00) Cairo
43
(UTC+02:00) Helsinki, Kyiv, Riga, Sofia, Tallinn, Vilnius
1 = Always On, 2 = Off when online, 3 = Always Off
Cathode Cleaning Interval
1 = Every minute, 10 = Every 10 minutes, 30 = Every 30 minutes, 98 = Once a day at 3:00 AM
Underlight Mode
1 = OFF, 2 = Solid Color
Underlight Segments
1 = All Off, 2 = Bottom Only, 4 = Top Only, 6 = All On
Underlight Color
32 bit value, 0b00000000BBBBBBBBGGGGGGGGRRRRRRRR
Colon Mode
1 = OFF, 2 = Solid, 3 = Fading
Power Light
1 = ON, 2 = OFF
Connectivity Mode
1 = Online, 2 = Offline
Time
Unix Timestamp (UTC+0) in seconds, works in offline mode only (it is overwritten in online mode).
Custom data
8 characters representing 6 tubes and 2 colon tubes (two tubes and one colon are not displayed on Puri-4).
Special characters:
“_” blanking the position (works both for colon and numerical tube)
“:” both dots activated, for colon tube only
“.” lower dot activated, for colon tube only
“;” upper dot activated, for colon tube only
String examples:
“12_34_56” displays 123456 on nixie tubes while blanking colon tubes
“_____.25” displays 25 on the right pair of tubes and a lower dot on the right colon tube
“;15;” blanks all tubes except the middle pair, both colons display upper dot
Custom data timeout
This parameter tells the clock after what time it must switch back to time mode (displaying time) after custom data were received. The actual period is calculated as a square of the value you send to give a better resolution. If you send the value “5”, the period of timeout will be 25 seconds (5 × 5 = 25).
Start countdown
This call starts a countdown timer, the parameter is the desired period in seconds. If you want to start a countdown timer for 3 minutes, call it with parameter 180 (3*60).
Switch to time mode
Call this parameter to switch the clock to time mode (e.g. from custom data mode, from slot machine mode, or countdown timer).
Slotmachine mode
1 = activate, 2 = deactivate
Homekit reset
Call this parameter to delete the current Homekit pairing and reset it to default.
The serial number is set at our side once the clock is manufactured, so please don’t change it.
Homekit connections
The number of clients (iPhones, iPads) that are currently connected to the clock via Homekit.
Largest free memory block
The biggest free allocable memory block on the memory heap in bytes.
Free memory
Total free memory on the heap in bytes.
Currently displayed value
Currently displayed number on the tube display, colons are not taken into account.
Last NTP sync difference
How many milliseconds was the system time adjusted at the last NTP synchronization?
OTA updates
Are the Over The Air updates enabled? 1 = enabled, 0 = disabled
MAC address
Returns MAC address of the device
Local API
Local HTTP API
The clock exposes a REST API over WiFi on the local network. This lets you read and write all clock settings without going through the cloud.
The local API uses the same parameter names, value ranges, and conventions as the Cloud API — this document covers only what is different or specific to the local interface. For the full parameter reference (names, allowed values, descriptions), refer to the Cloud API documentation.
Connection
The clock starts an HTTP server on port 88 as soon as it has a WiFi connection. No authentication is required.
http://CLOCK_IP:88/
To find the clock’s IP address, check your router’s DHCP client list, or look it up in the mobile app.
REST Endpoints
All settings are accessible via a single URL pattern:
http://CLOCK_IP:88/v1/parameter
Method
Action
GET
Read current value
POST
Write new value
Read a setting
GET http://CLOCK_IP:88/v1/parameter
Example:
curl http://192.168.1.100:88/v1/transition
Response:
{"ok": true, "status": 200, "value": 2}
Write a setting
Send the new value as the request body. Both plain integers and JSON are accepted.
Plain value:
curl -X POST http://192.168.1.100:88/v1/transition -d '3'
Wrong method (reading write-only or writing read-only parameter)
400
Failed to set value
Parameters
The full parameter list is documented in the Cloud API reference. The local API supports the same parameters with the same access levels (read-only, write-only, read-write).
Brightness Values
The brightness parameters use a non-linear scale. The API accepts and returns the following discrete values:
API value
Label
1
Off
6
Very Low
71
Low
126
Medium
201
High
256
Full
This applies to both brightnessday and brightnessnight.
Connecting the clock to the internet
The clock can connect to the internet via a Wi-Fi router, but to do so, it needs to know the name and password (credentials). Once you successfully transfer the credentials to the clock, it will remember it forever and there is no reason to go through that connection process again. The clock can remember up to 5 different recently set wifi networks. The only reason to repeat the process with the same clock is when you change the Wi-Fi name or password or when you move the clock to a completely different Wi-Fi network.
Connecting the clock via mobile app
Open the iOS or Android app and follow the instructions below. I used iOS app for the illustrations:
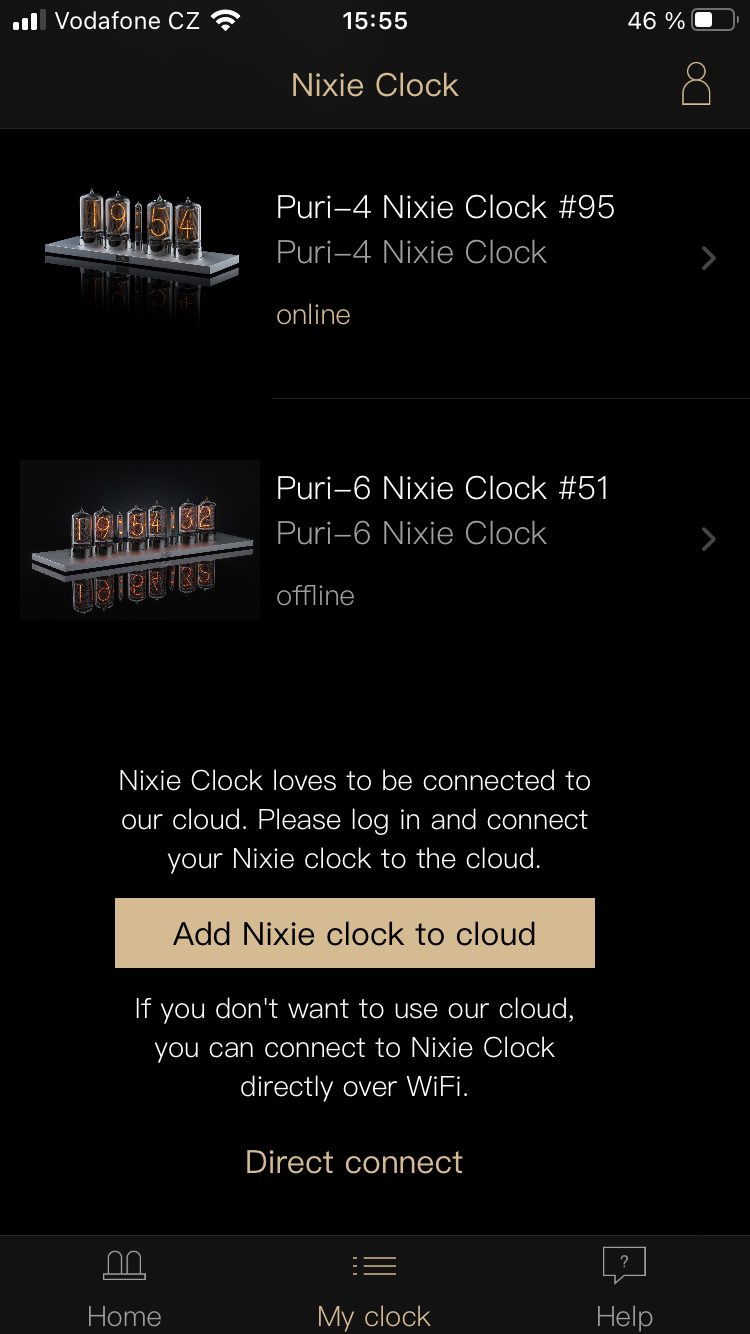
Click on the My clock tab at the bottom of the screen.
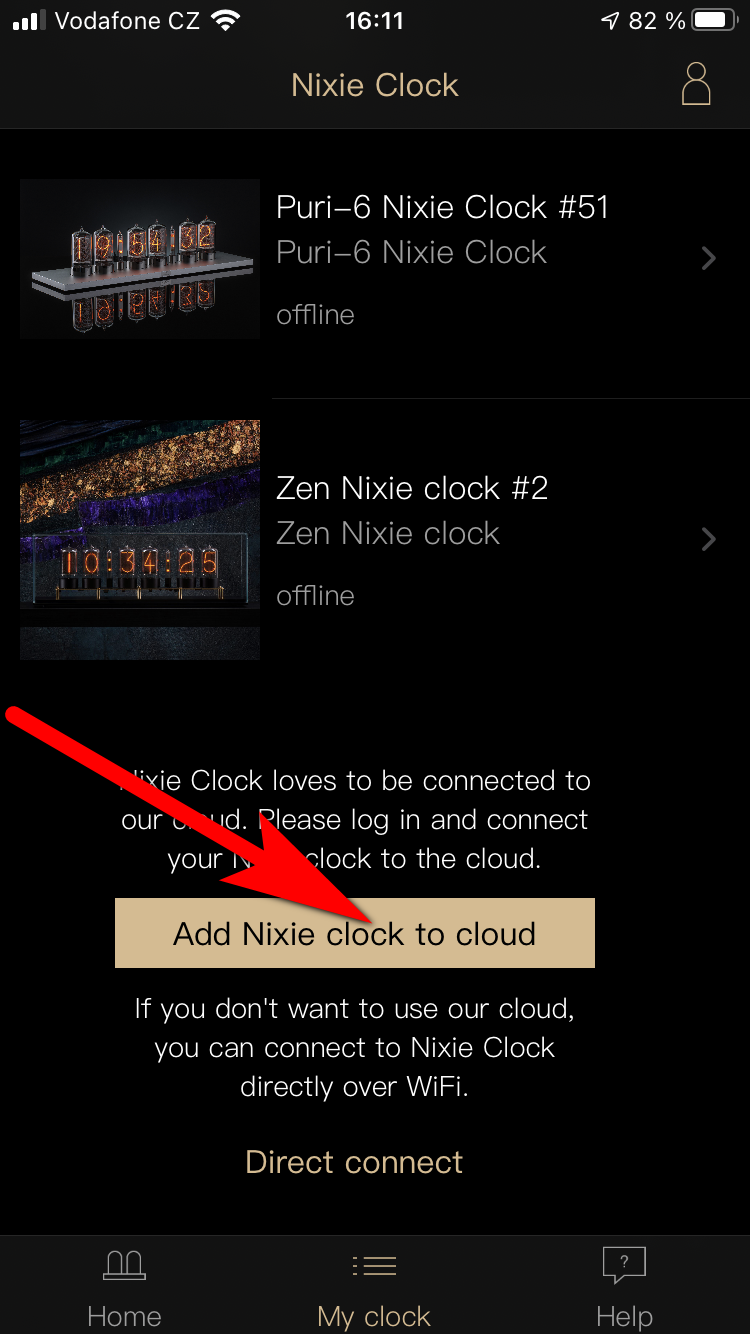
Click on the button Add nixie clock to the cloud.
The app shows the instructions on how to switch the clock into the listening mode.
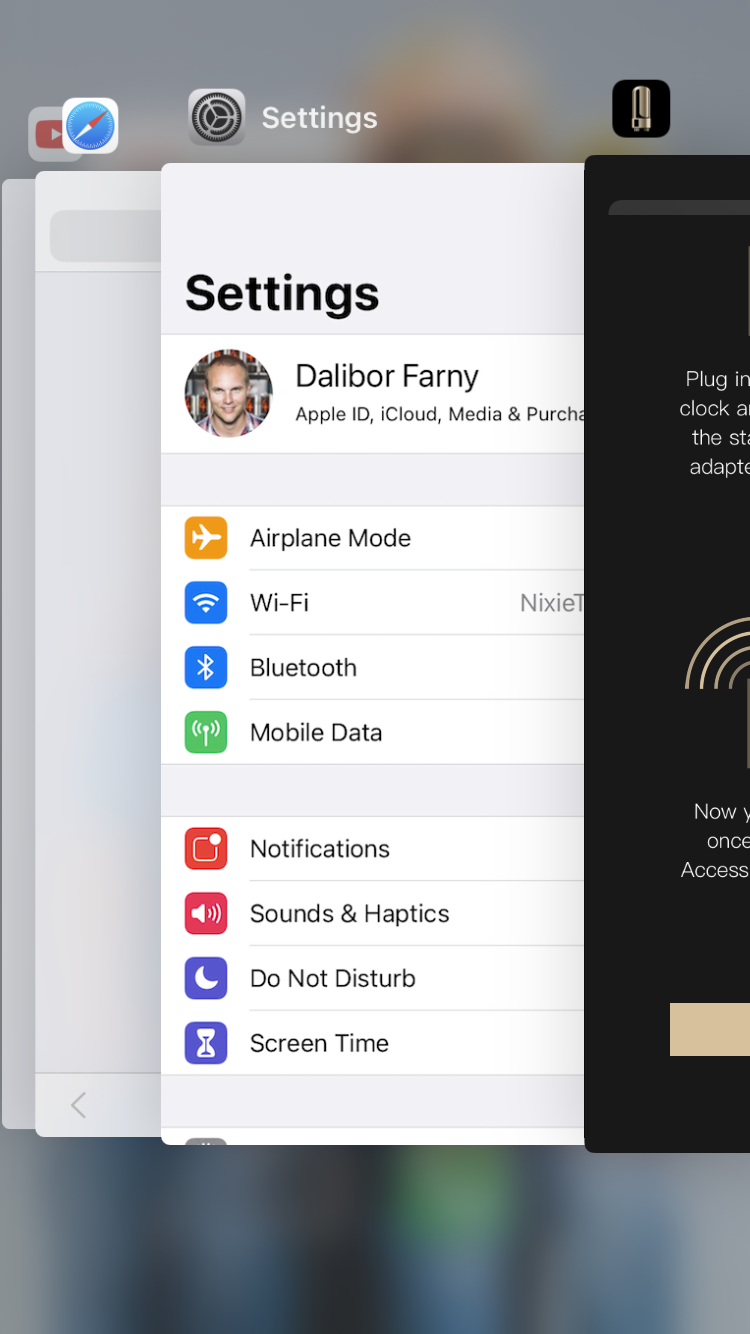
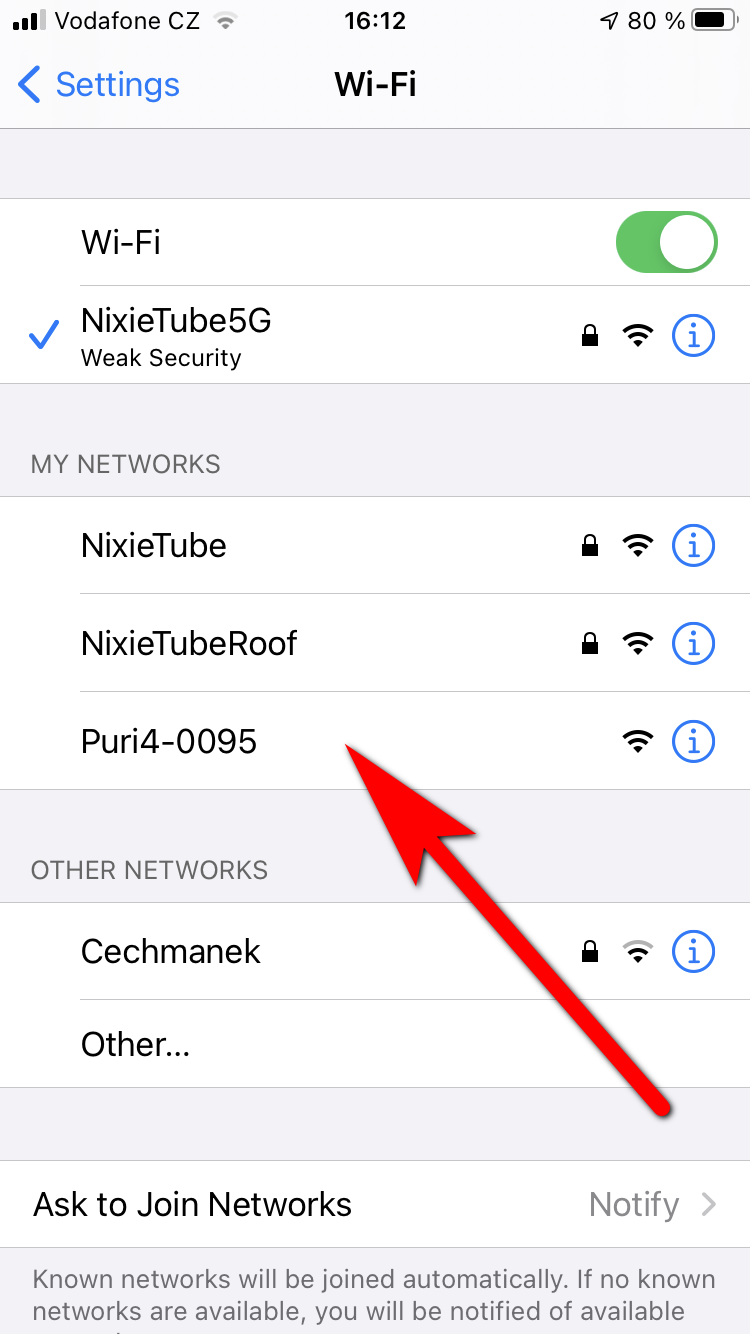
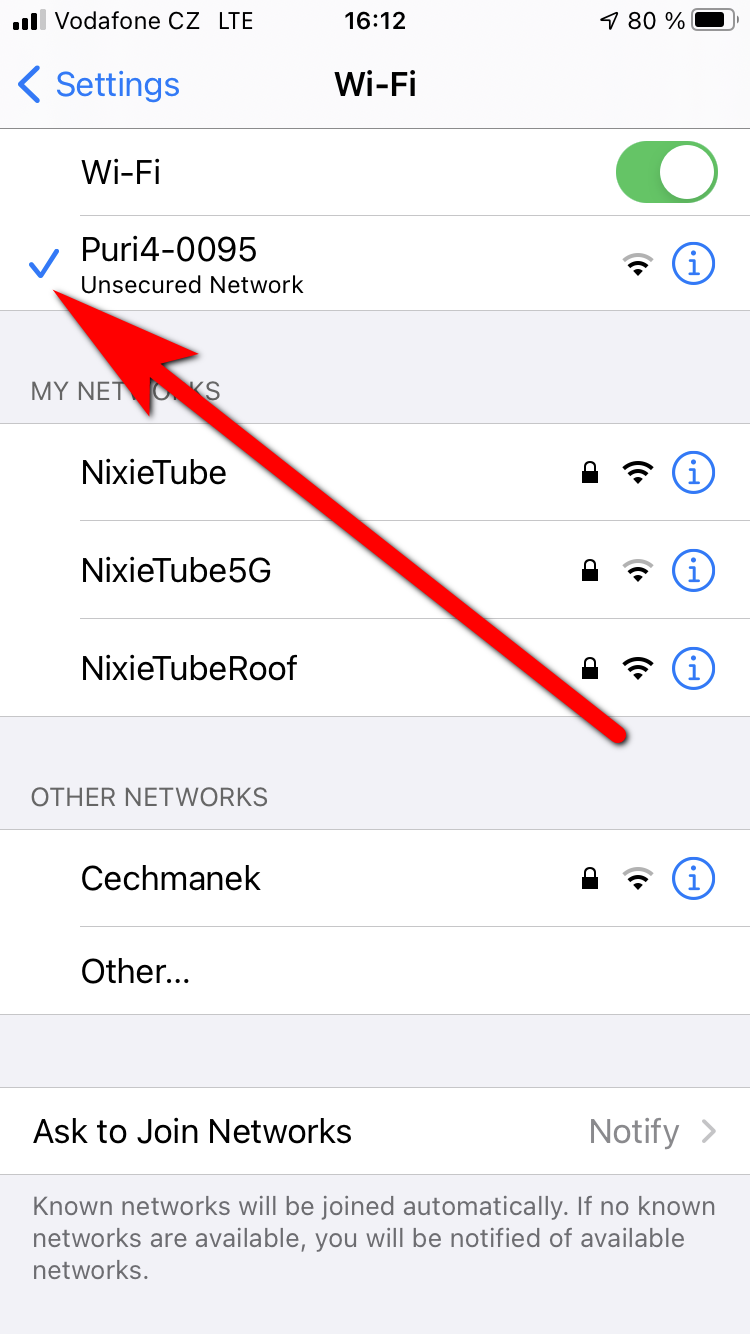
Once the clock is in listening mode, go to the Wi-Fi settings of the phone.
Search for the Wi-Fi network of your clock (ZEN-XXXX) and connect to it.
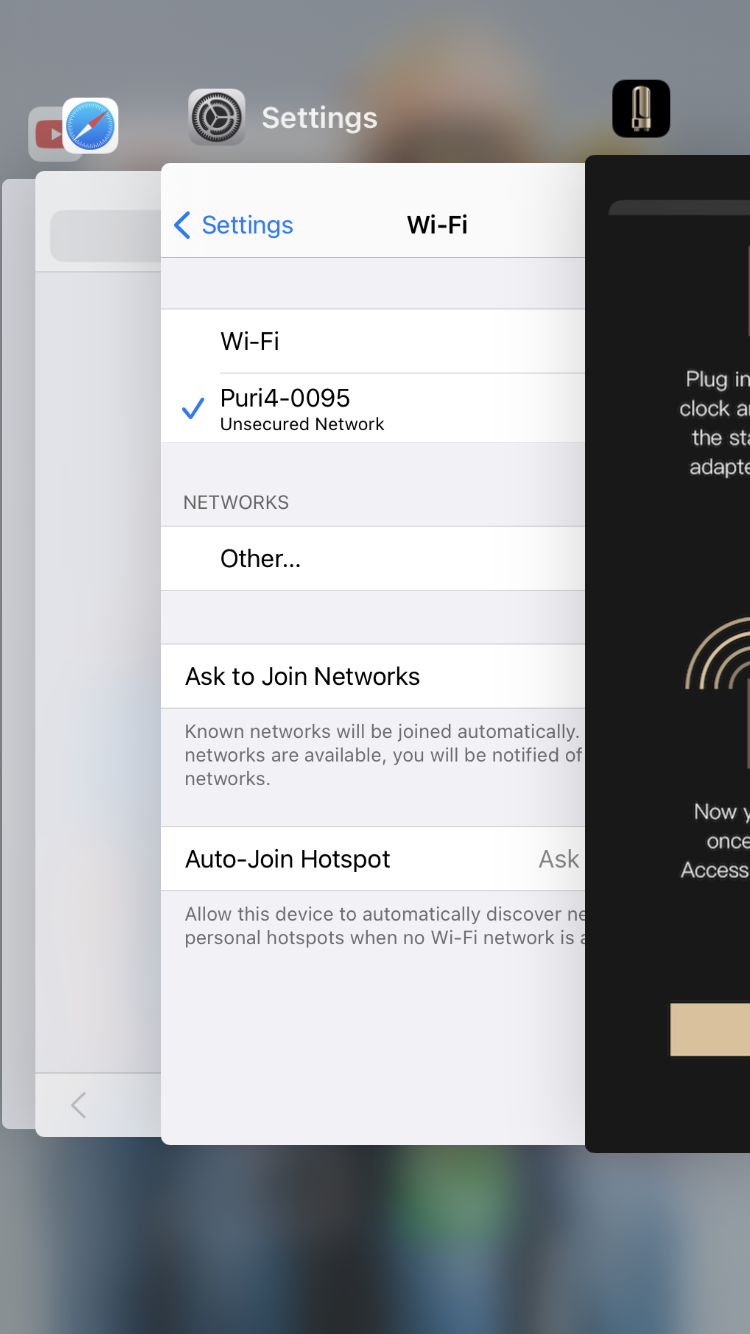
Once the phone is connected to the clock, please switch back to the app.
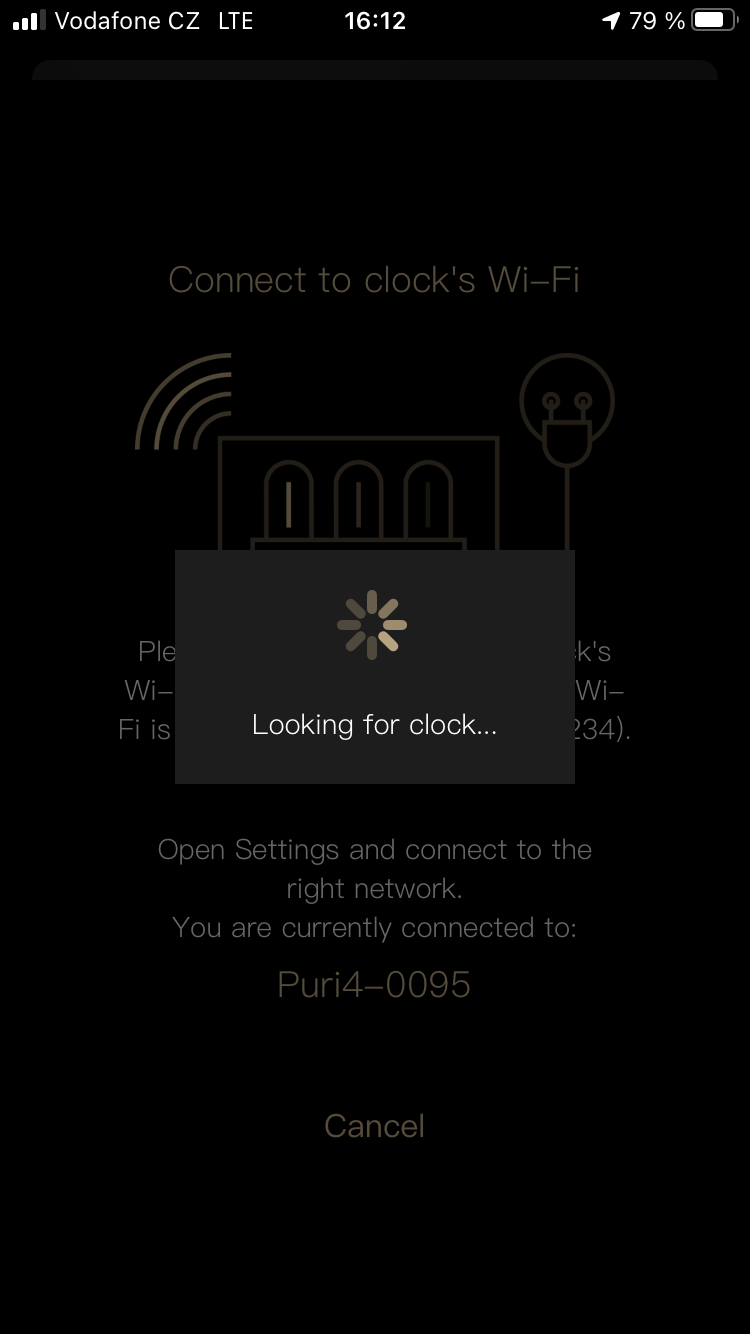
Click the “It’s done, next” button.
The app will establish a connection with the clock.
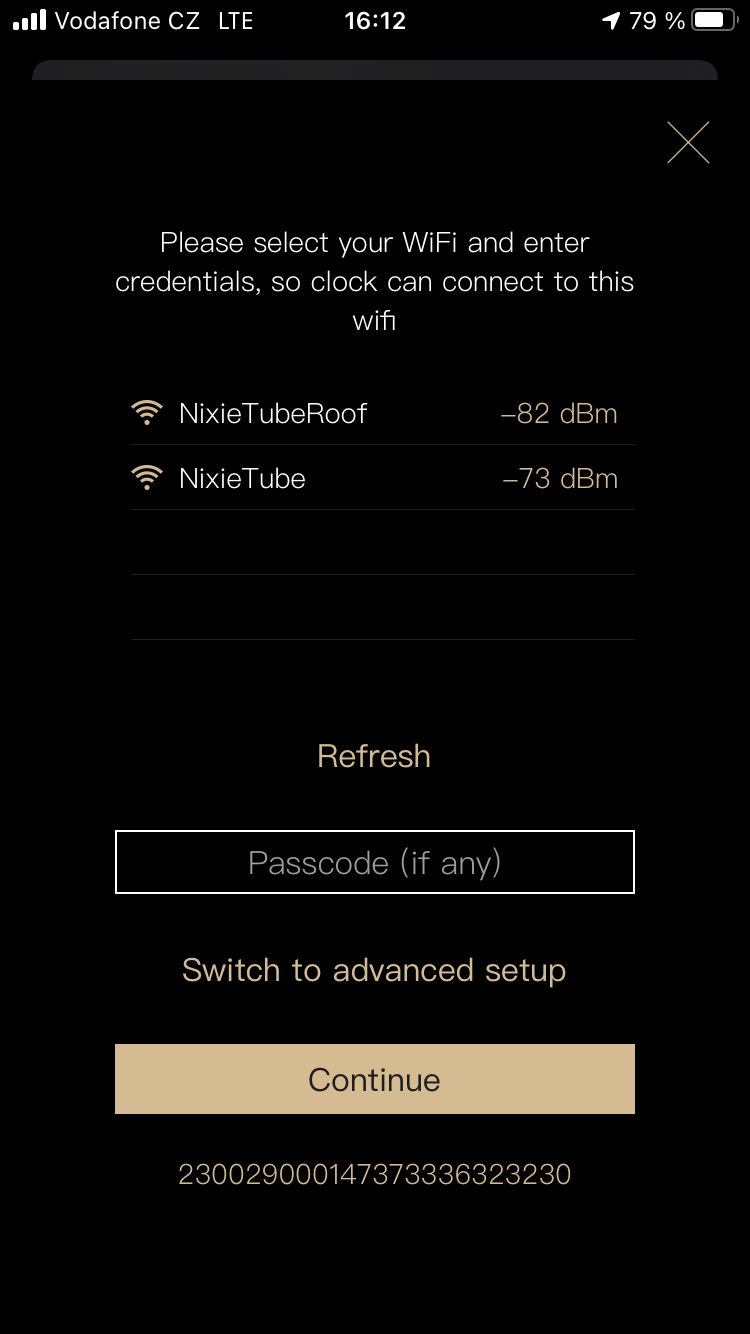
Once the connection is established, the app will scan for nearby Wi-Fi networks and display them.
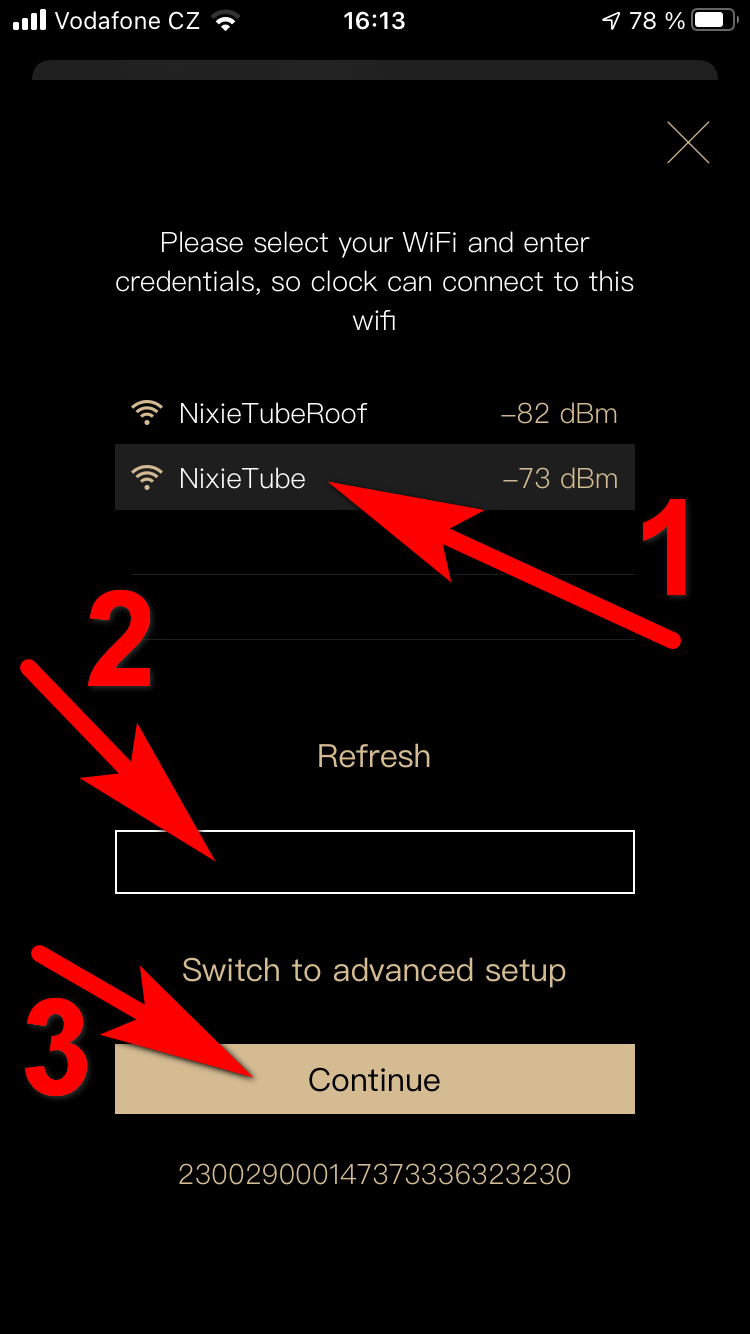
Select your Wi-Fi network to connect the clock to, enter a password for the network and click on the Continue button.
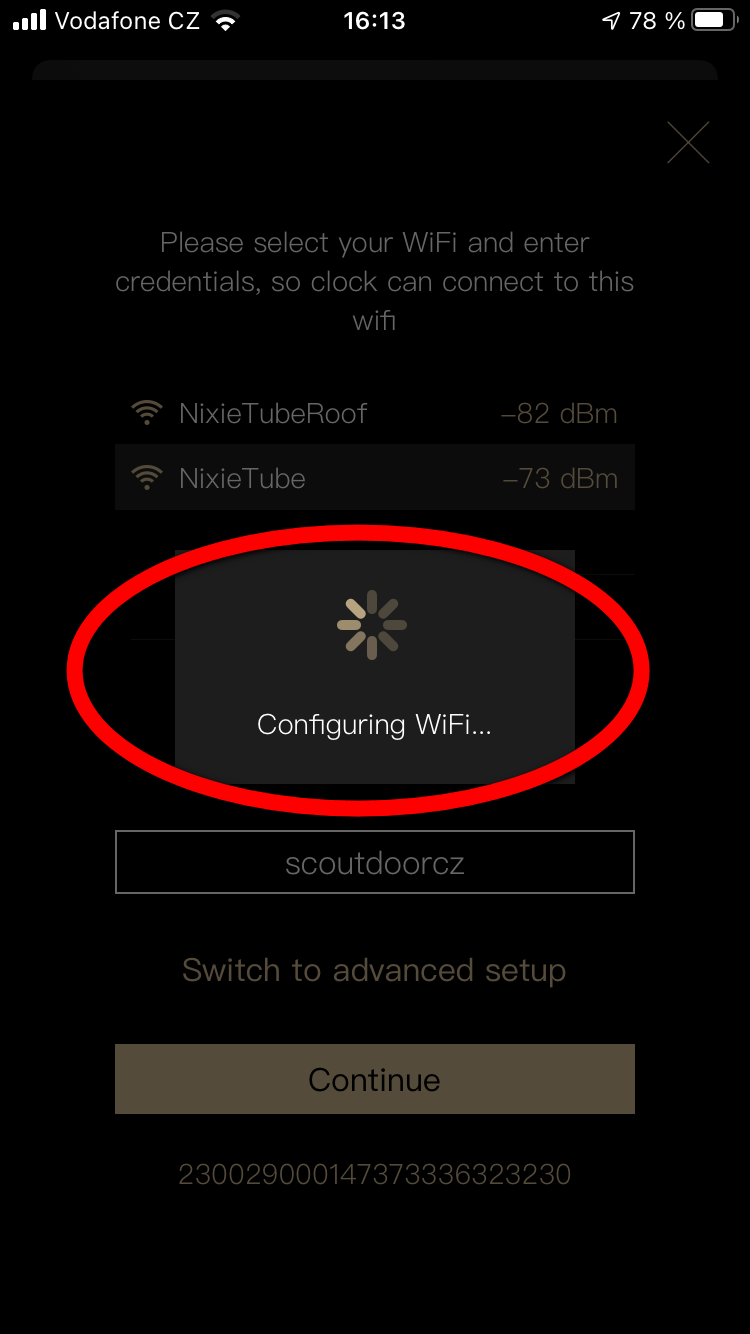
The app will send the credentials to the clock.
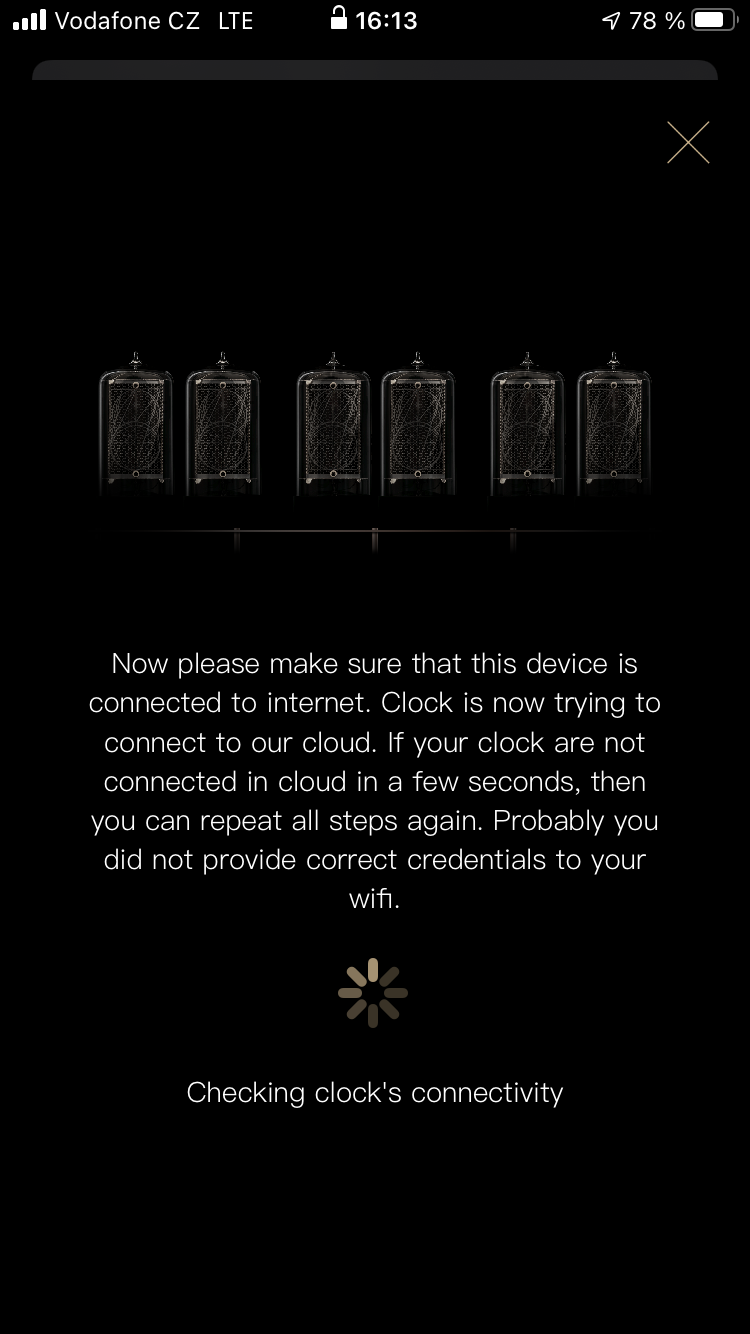
At this moment, the clock will disconnect from the phone and will start connecting to the internet. The phone will connect back to your Wi-Fi router.
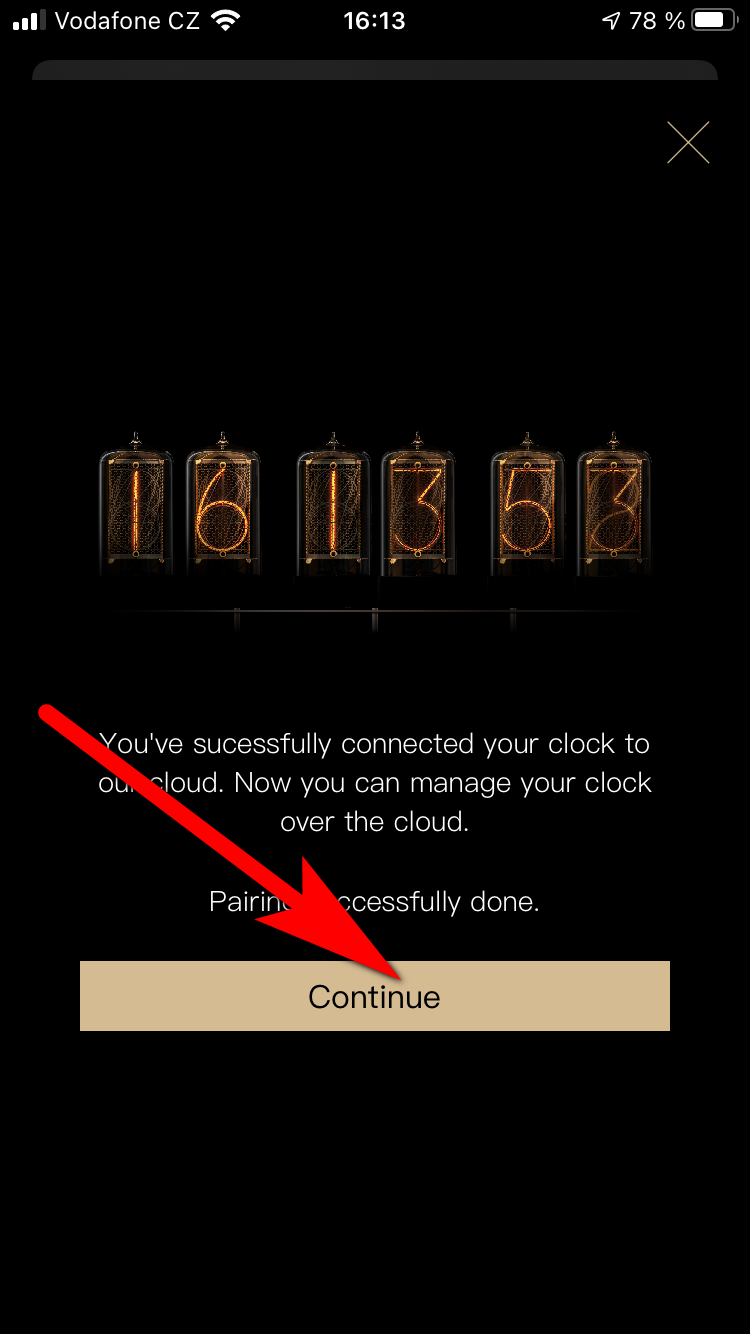
Once the clock is connected to the internet and the phone back at the Wi-Fi, you will see the screen above. Click the Continue button to get to the configuration page of your clock.
The connecting process using the browser is currently suspended, we have developed a new way to connect the clock for customers who don’t want to use mobile apps.
Connecting the clock to a hidden Wi-Fi network
The clock can be connected to a hidden Wi-Fi network (hidden SSID) using iOS or Android app.
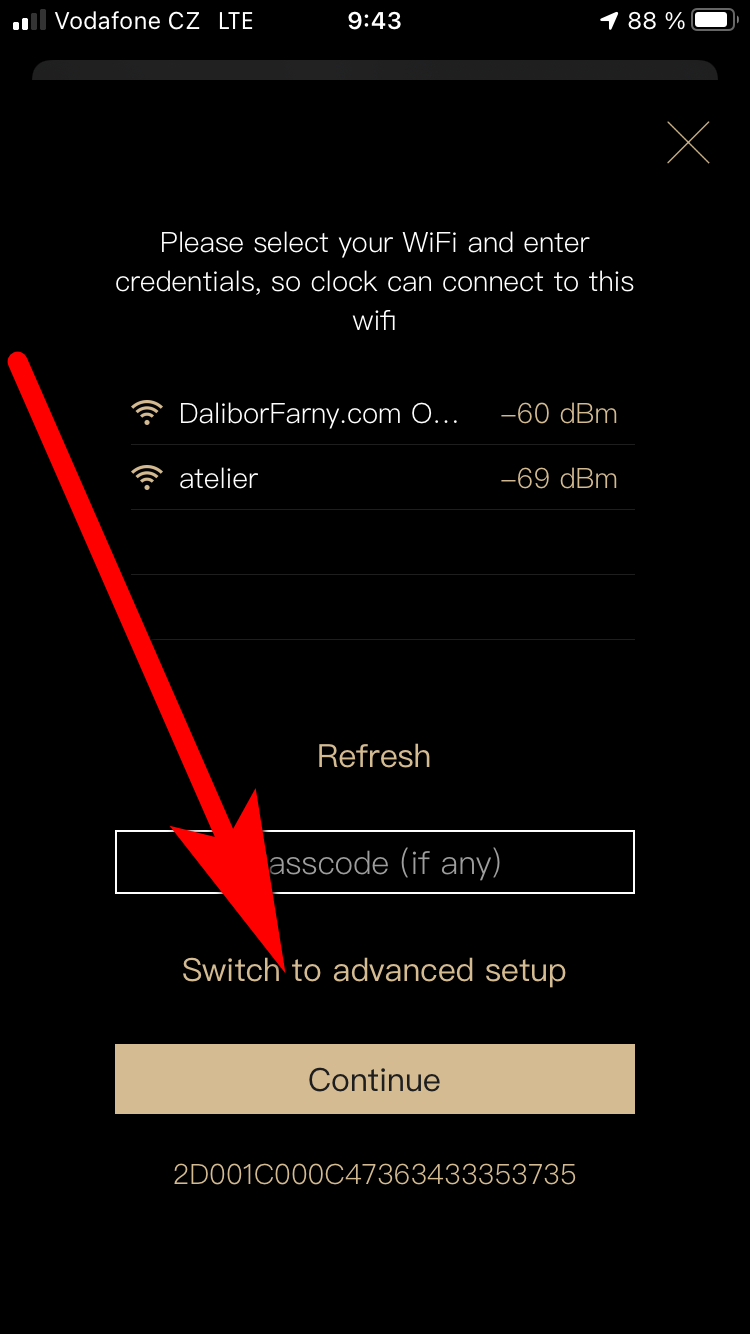
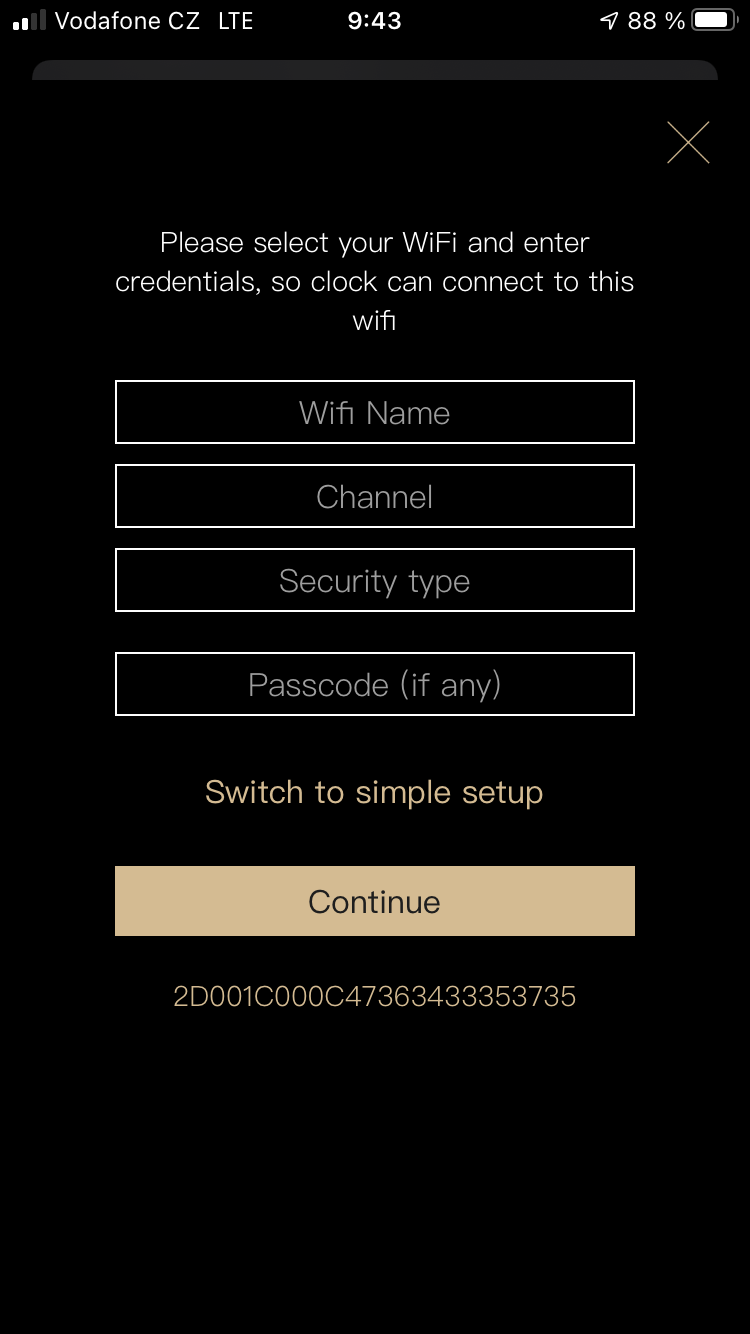
Tap the “Switch to advanced mode” link on the picture below, then fill in the details about your network. Once you tap the Continue button, the selected parameters will be transferred to the clock and it will immediately start connecting to the specified network.
Timekeeping
Features
Real-time clock module (RTC) – RTC is a module that keeps time and serves as a primary source of actual time for the clock. The clock can read the time from the module when it needs to and update the time on the RTC when it receives fresh time from the internet. RTC module keeps running even when the clock is powered off, thanks to the supercapacitor power backup – providing time instantly after startup of the clock before connecting to the internet. The time stored in the RTC module will drift over time, so it needs to be synchronized periodically, otherwise, the time displayed on the clock will not be accurate. This is normally done automatically when the clock syncs the time from the internet. In offline mode, it needs to be done manually.
Supercapacitor power backup – If the clock is powered off, the RTC needs an alternate energy source. For this purpose, the clock uses a supercapacitor that can provide energy for several days, which is enough for common power outages. If the clock is powered off for a longer time, the supercapacitor is eventually drained and the time in the RTC is lost. The supercapacitor is fully charged within a few minutes after the startup of the clock. There is no wear on this part, so it will not deteriorate with use and will never need to be replaced. The supercapacitor provides energy only for the RTC module, not for the nixie tubes or for the main microprocessor – the nixie tubes are off and the clock is reported as offline in the apps when powered off.
The Zen Nixie Clock in online mode periodically synchronizes time from the internet. As long as the internet is available, the clock updates its time. If the internet is not available for a long time (days, weeks), the clock keeps running, but its time will eventually drift. The time is kept for several days even when the clock is powered off thanks to the RTC module with supercapacitor power backup.
It first tries to obtain the current time from its internal real-time clock module (RTC) when the clock starts up. If the time is unavailable (the clock was powered off for more than a couple of days and the supercapacitor backup is discharged), the clock assumes 00:00 and will show zeros at the display. A few seconds after the start, the clock will attempt to connect to a known wifi network. If it succeeds, it sets the time from the internet and stores it also in the RTC. That initial time accuracy is somewhere around 1 second. You can observe that on accurate time sources, e.g. https://time.is. After another 10 seconds, the clock will start NTP time synchronization from an NTP server closest to your location. Using the NTP service, the clock will increase its accuracy to tens of milliseconds off from the actual time. The time is periodically updated via NTP in longer intervals during the operation of the clock.
The clock in offline mode keeps time in RTC as well, the time can only be synchronized via Direct connect from mobile apps (iOS / Android). We are working on adding that feature to the configuration website as well. When you synchronize the time from the mobile device, the clock is supplied with the time from the device.
Tip
If you don’t have internet available at the clock’s location, consider synchronizing it over a mobile hotspot made from your phone.
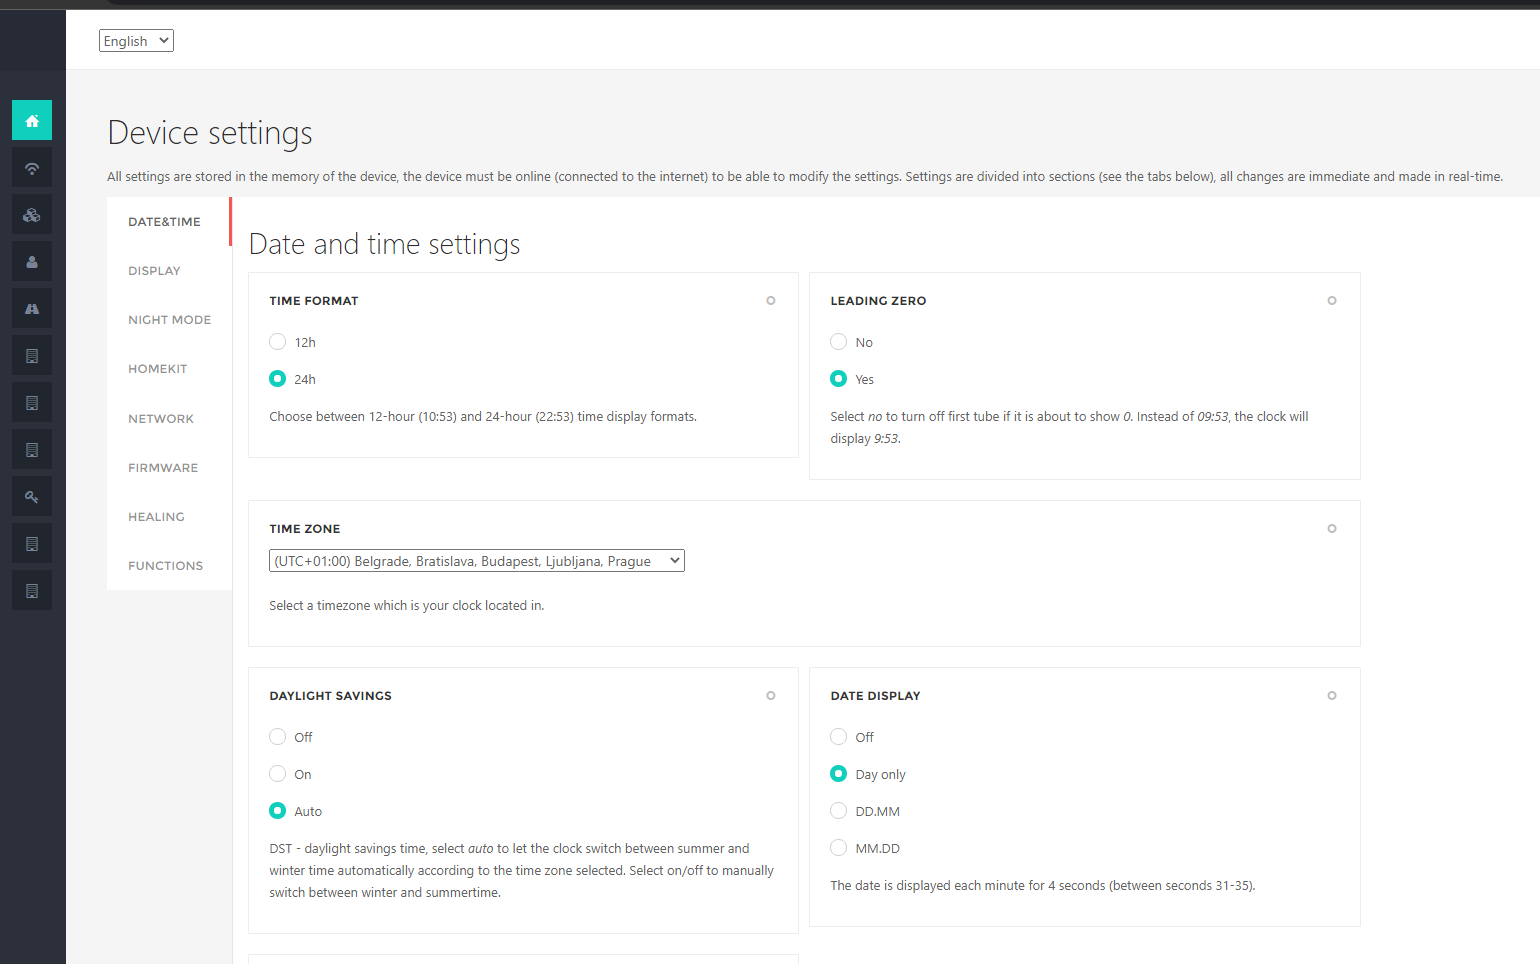
Date and Time configuration
Time Zone
Select the timezone according to where is your clock located. The Time Zone parameter determines the time shift from the Greenwich Mean Time and also contains information about the daylight savings at the particular time zone.
Time Format
The clock can show time in either 12h or 24h format, select the one you are used to.
Daylight Savings
The clock can either switch automatically between summertime and wintertime (when set to Auto) or stay in summertime/wintertime when selecting manually on*/*off. The date of switching is set from the selected timezone.
Date Display
It is possible to show the actual date on the display of the clock. Select the Day only option to display only the number of the day – this way you can recognize the clock switched to date mode just by the peripheral vision. It is also possible to show a full date in DD.MM.YY or MM.DD.YY format. The date is displayed each minute for 4 seconds (between seconds 31-35).
Leading Zero
The leftmost nixie tube can be configured to turn off when showing digit 0. This way, instead of displaying 09:54, it will display 9:54 with the first tube being blanked. To do so, configure the Leading zero parameter to No.
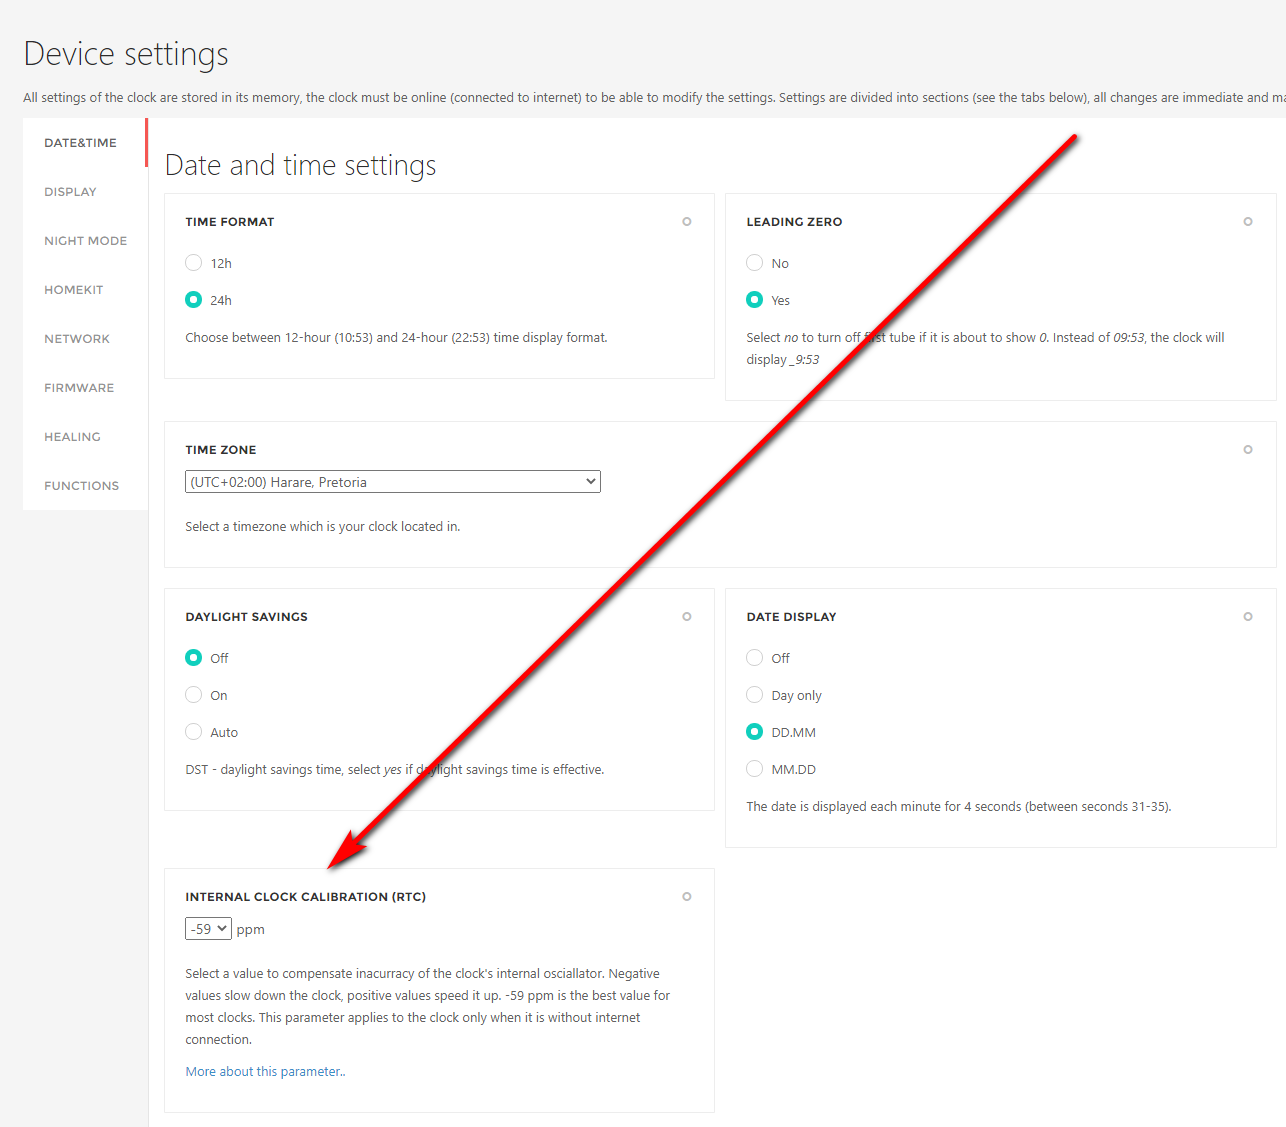
This is a procedure used to make your clock more accurate in case it doesn’t keep the time precisely without an internet connection.
Normally our clocks are synchronized to the internet, so you will not notice any problems.
But if your clock is running offline, or the connection is not stable enough, the clock will not be able to synchronize and after a long enough time it will go out of sync.
This can be solved by keeping the clock online, manually adjusting the time, or calibrating the RTC oscillator.
The calibration values are expressed in ppm (1ppm = 0.0001%).
For example, if the clock is 1ppm too fast, it will add 1 more second every 1 000 000 seconds.
The default calibration value for all clocks is currently fixed at -59ppm.
How to calibrate the clock
First, the clock needs to have the correct time. Either connect it to the internet and let it synchronize or set the time manually.
Then it needs to be switched offline so that it does not synchronize during the test.
You need to measure the time deviation in a certain time frame. The longer the better.
The resulting deviation in ppm equals deviation from actual time in seconds divided by length of the test in seconds times 1 000 000.
If the clock is running too fast, you need to subtract the calculated deviation from the current calibration value. If it is running too slow you need to add it.
For example if I run the test for 30 days and the time on the clock at the end of the test is 10:21:45, while the actual time is 10:22:30 (the clock is 45s slower), the clock will be calibrated like this:
deviation from actual time = 10h 22m 30s – 10h 21m 45s = 45s
length of test = 30days * 24h * 60m * 60s = 2 592 000 s
deviation in ppm = 45s / 2592000s * 10^6 = 17ppm
My clock is running too slow, so I need to add the calculated deviation to the current set deviation.
If the current deviation is the default value of -59ppm, I will set it to -59+17 = -42ppm, which is not in the list, so I need to round to -43 or -41ppm.
If you have a 4 digit clock and cannot see the seconds, you can estimate the deviation by waiting for the clock to roll over to the next minute and reading the current time at that moment. https://time.is is a good reference for the current precise time.
Visual Effects
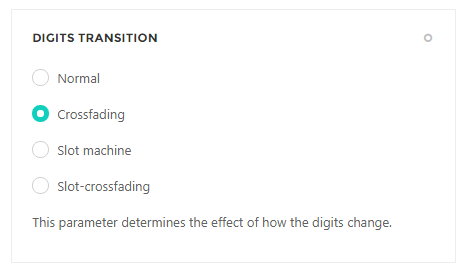
Digits transition
This parameter sets the visual effect of how the digits change when the display is updated.
Normal – there is no transition effect, the new digit is displayed instantly
Crossfading – the old digit slowly fades out while the new digit fades in
Slot machine – the nixie tube runs through all 10 digits quickly before settling on the new digit
Slot-crossfading – the tube shows Crossfading transition for digits 1-9 and Slot machine for change to 0
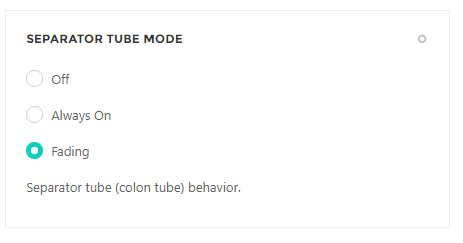
Separator tube mode
This parameter sets the visual style of the separator tube between hours, minutes and seconds nixie tube pairs.
Off – the separator tube is always off
Always On – the separator tube is always on
Fading – the separator tube slowly fades in and out in 2 seconds interval
Nixie Tube Health
Nixie tubes suffer from a specific problem called cathode poisoning. Ideally, all digits (cathodes) in a nixie tube should be used regularly. However, that is not true for a nixie clock. Only even tubes run in this optimal mode, odd tubes use only some digits. For instance, the leftmost tube uses digits 0,1,2 to display tens of hours position. The third tube (tens of minutes position) uses digits 0,1,2,3,4,5. When a particular digit is not used for a long time (e.g., digit 8 on the leftmost tube), that digit is covered by a metal deposit released from the other activated digits. That particular digits will eventually have defects in the glow once you need to use it (e.g., to display custom data).
Problems with the glow can be avoided by regular exercising of all digits in a tube. Just a few minutes per day is enough to keep the tubes healthy. For this purpose, we implemented a routine called Cathode cleaning interval that is regularly activated and keeps the nixie tubes healthy.
If any of the tubes shows a defect of the glow, you can try to Heal it.
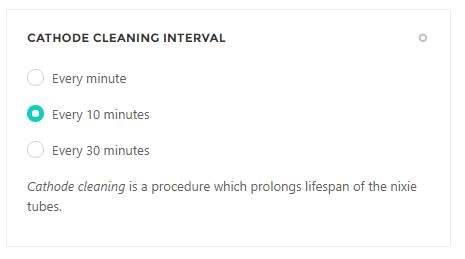
Cathode cleaning interval
The Cathode cleaning interval can be set to the time below. From the lifespan/efficacy point of view, all the options are equal.
Every minute – the cathode cleaning will be activated every minute for duration of 1 second
Every 10 minutes – the cathode cleaning will be activated every 10 minutes for duration of 10 seconds
Every 30 minutes – the cathode cleaning will be activated every 30 minutes for duration of 30 seconds
Once daily at 3:00 AM – the cathode cleaning will be activated only once per day at 3:00 AM for longer interval
Healing of the cathode poisoning
Although the Zen Nixie Clock runs the Cathode cleaning regularly, there is a small chance the nixie tube will develop cathode poisoning over the years of use. Small cathode poisoning is easy to heal using a built-in healing feature, this page explains how to set the healing.
Tip
All our tubes come with 10 years warranty. If you can’t heal the tube yourself, please don’t hesitate to contact us, and we will send you a replacement tube.
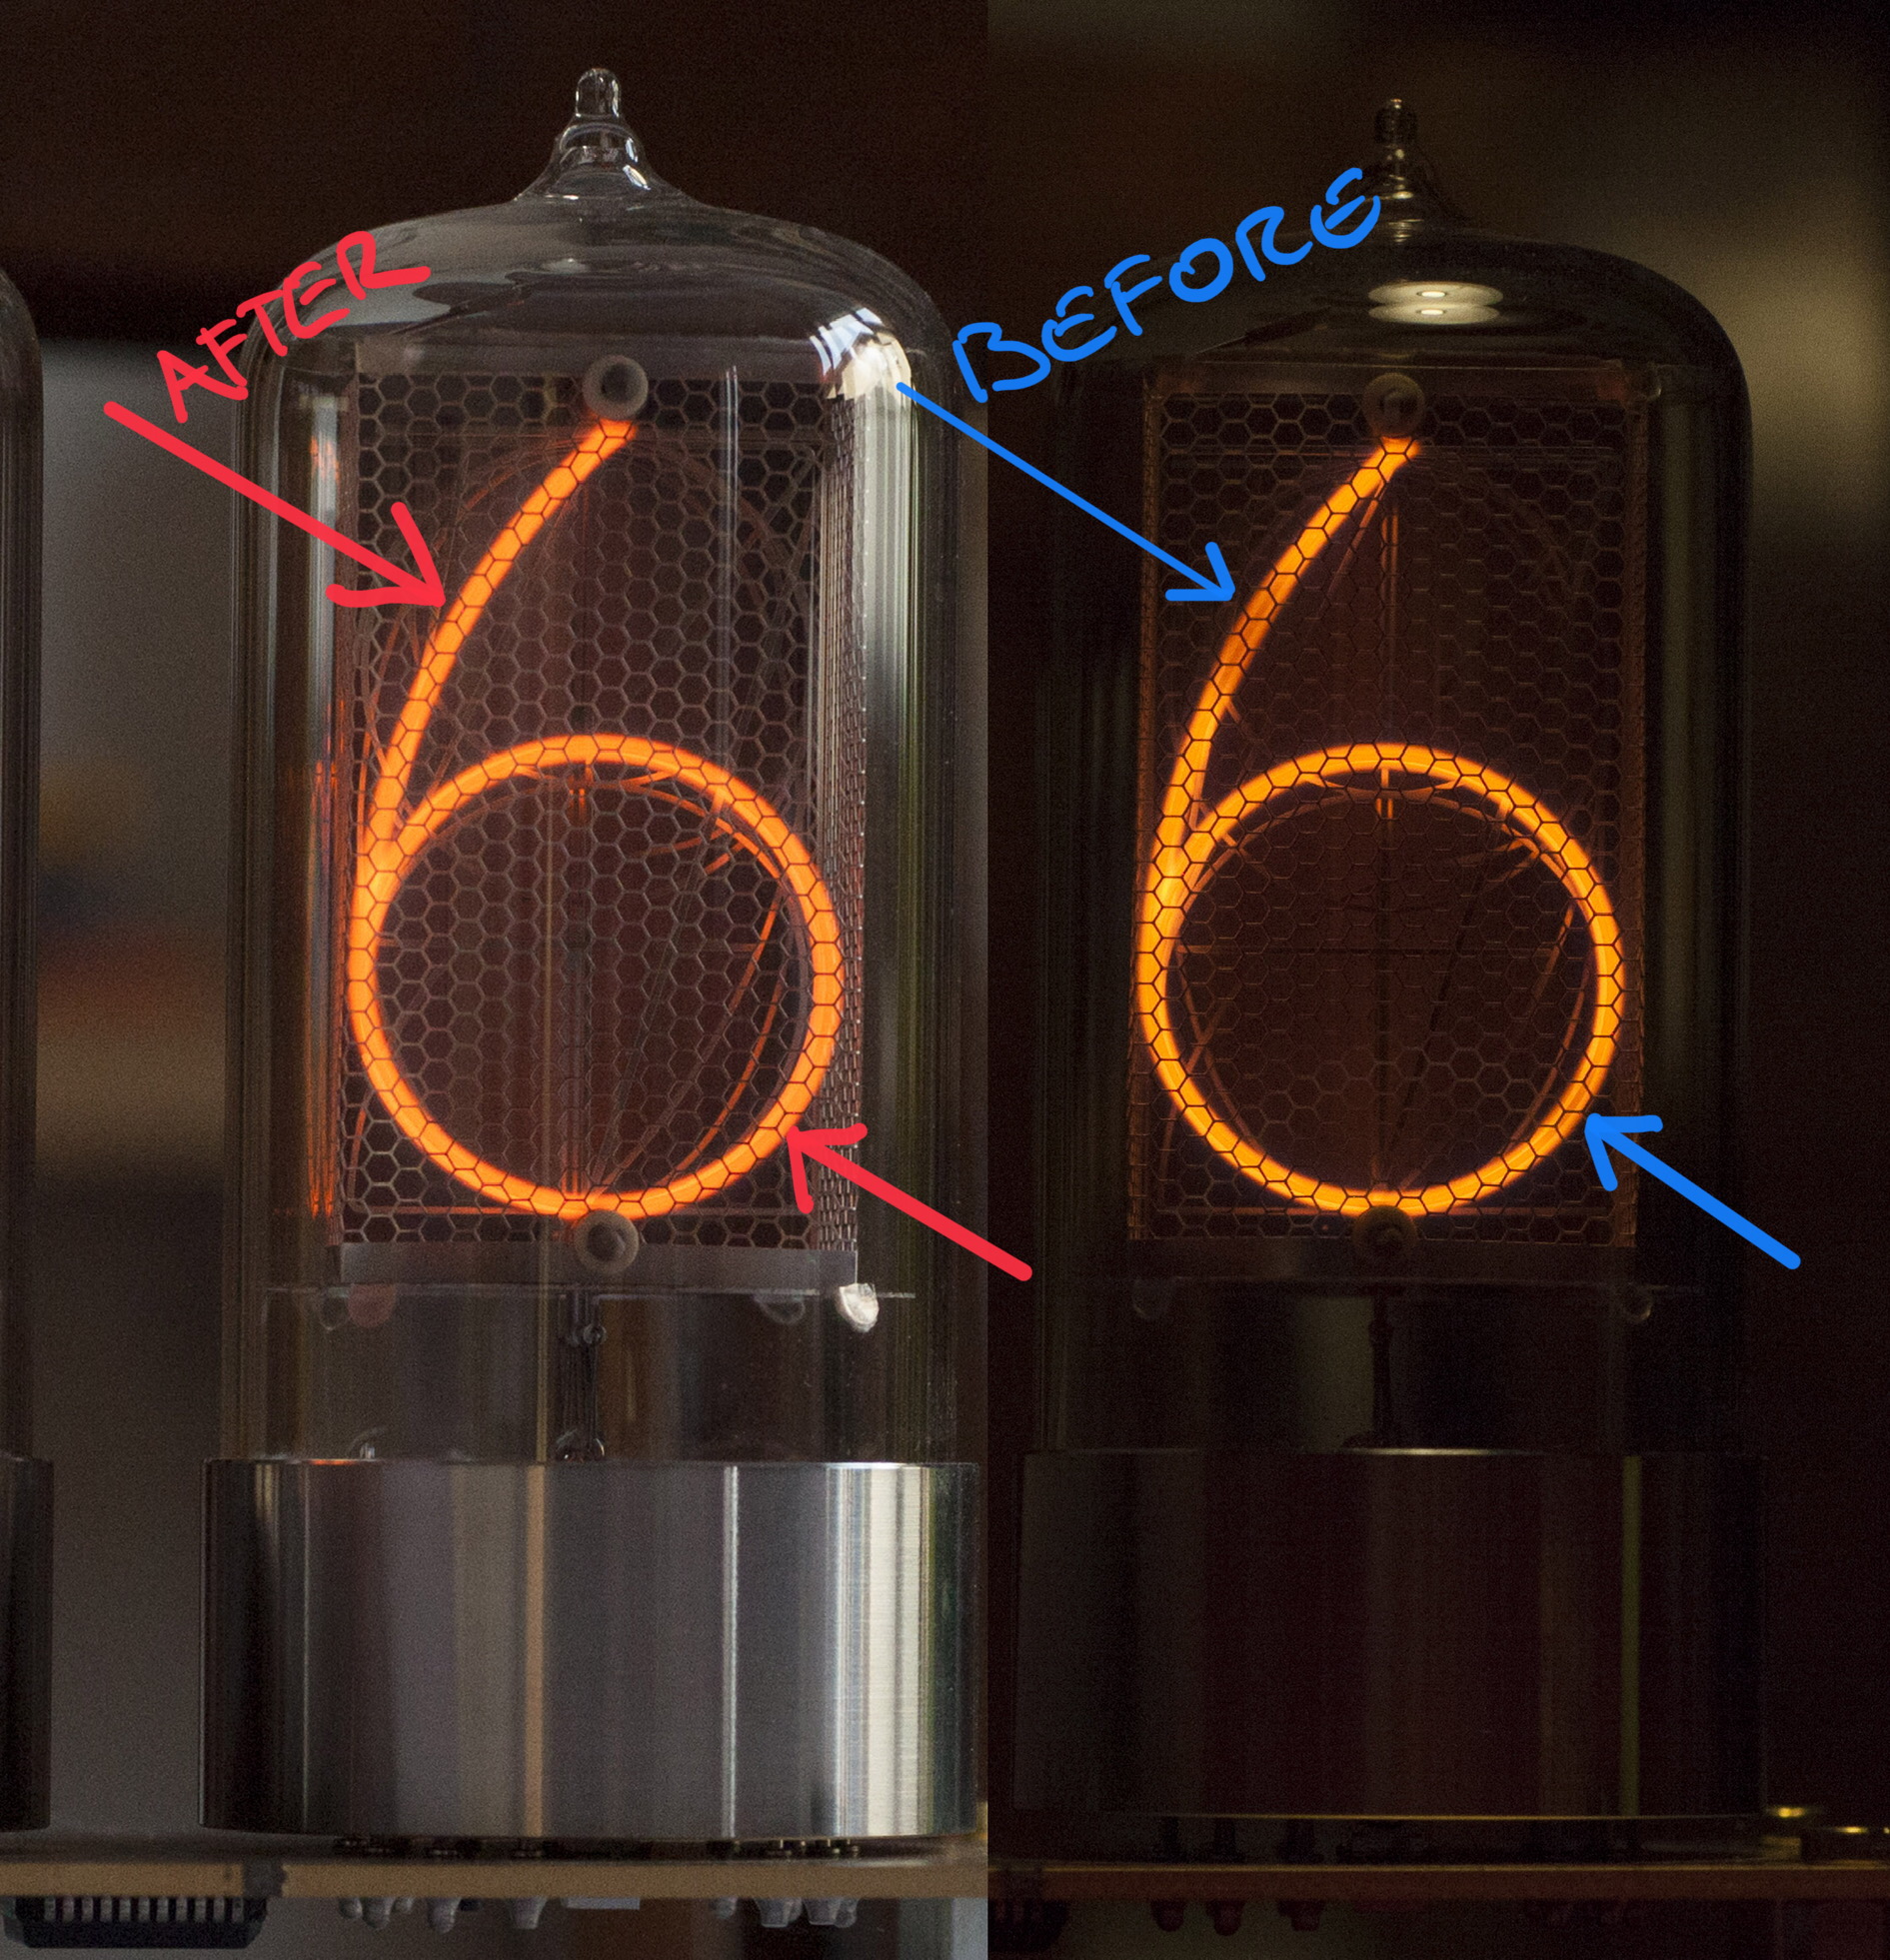
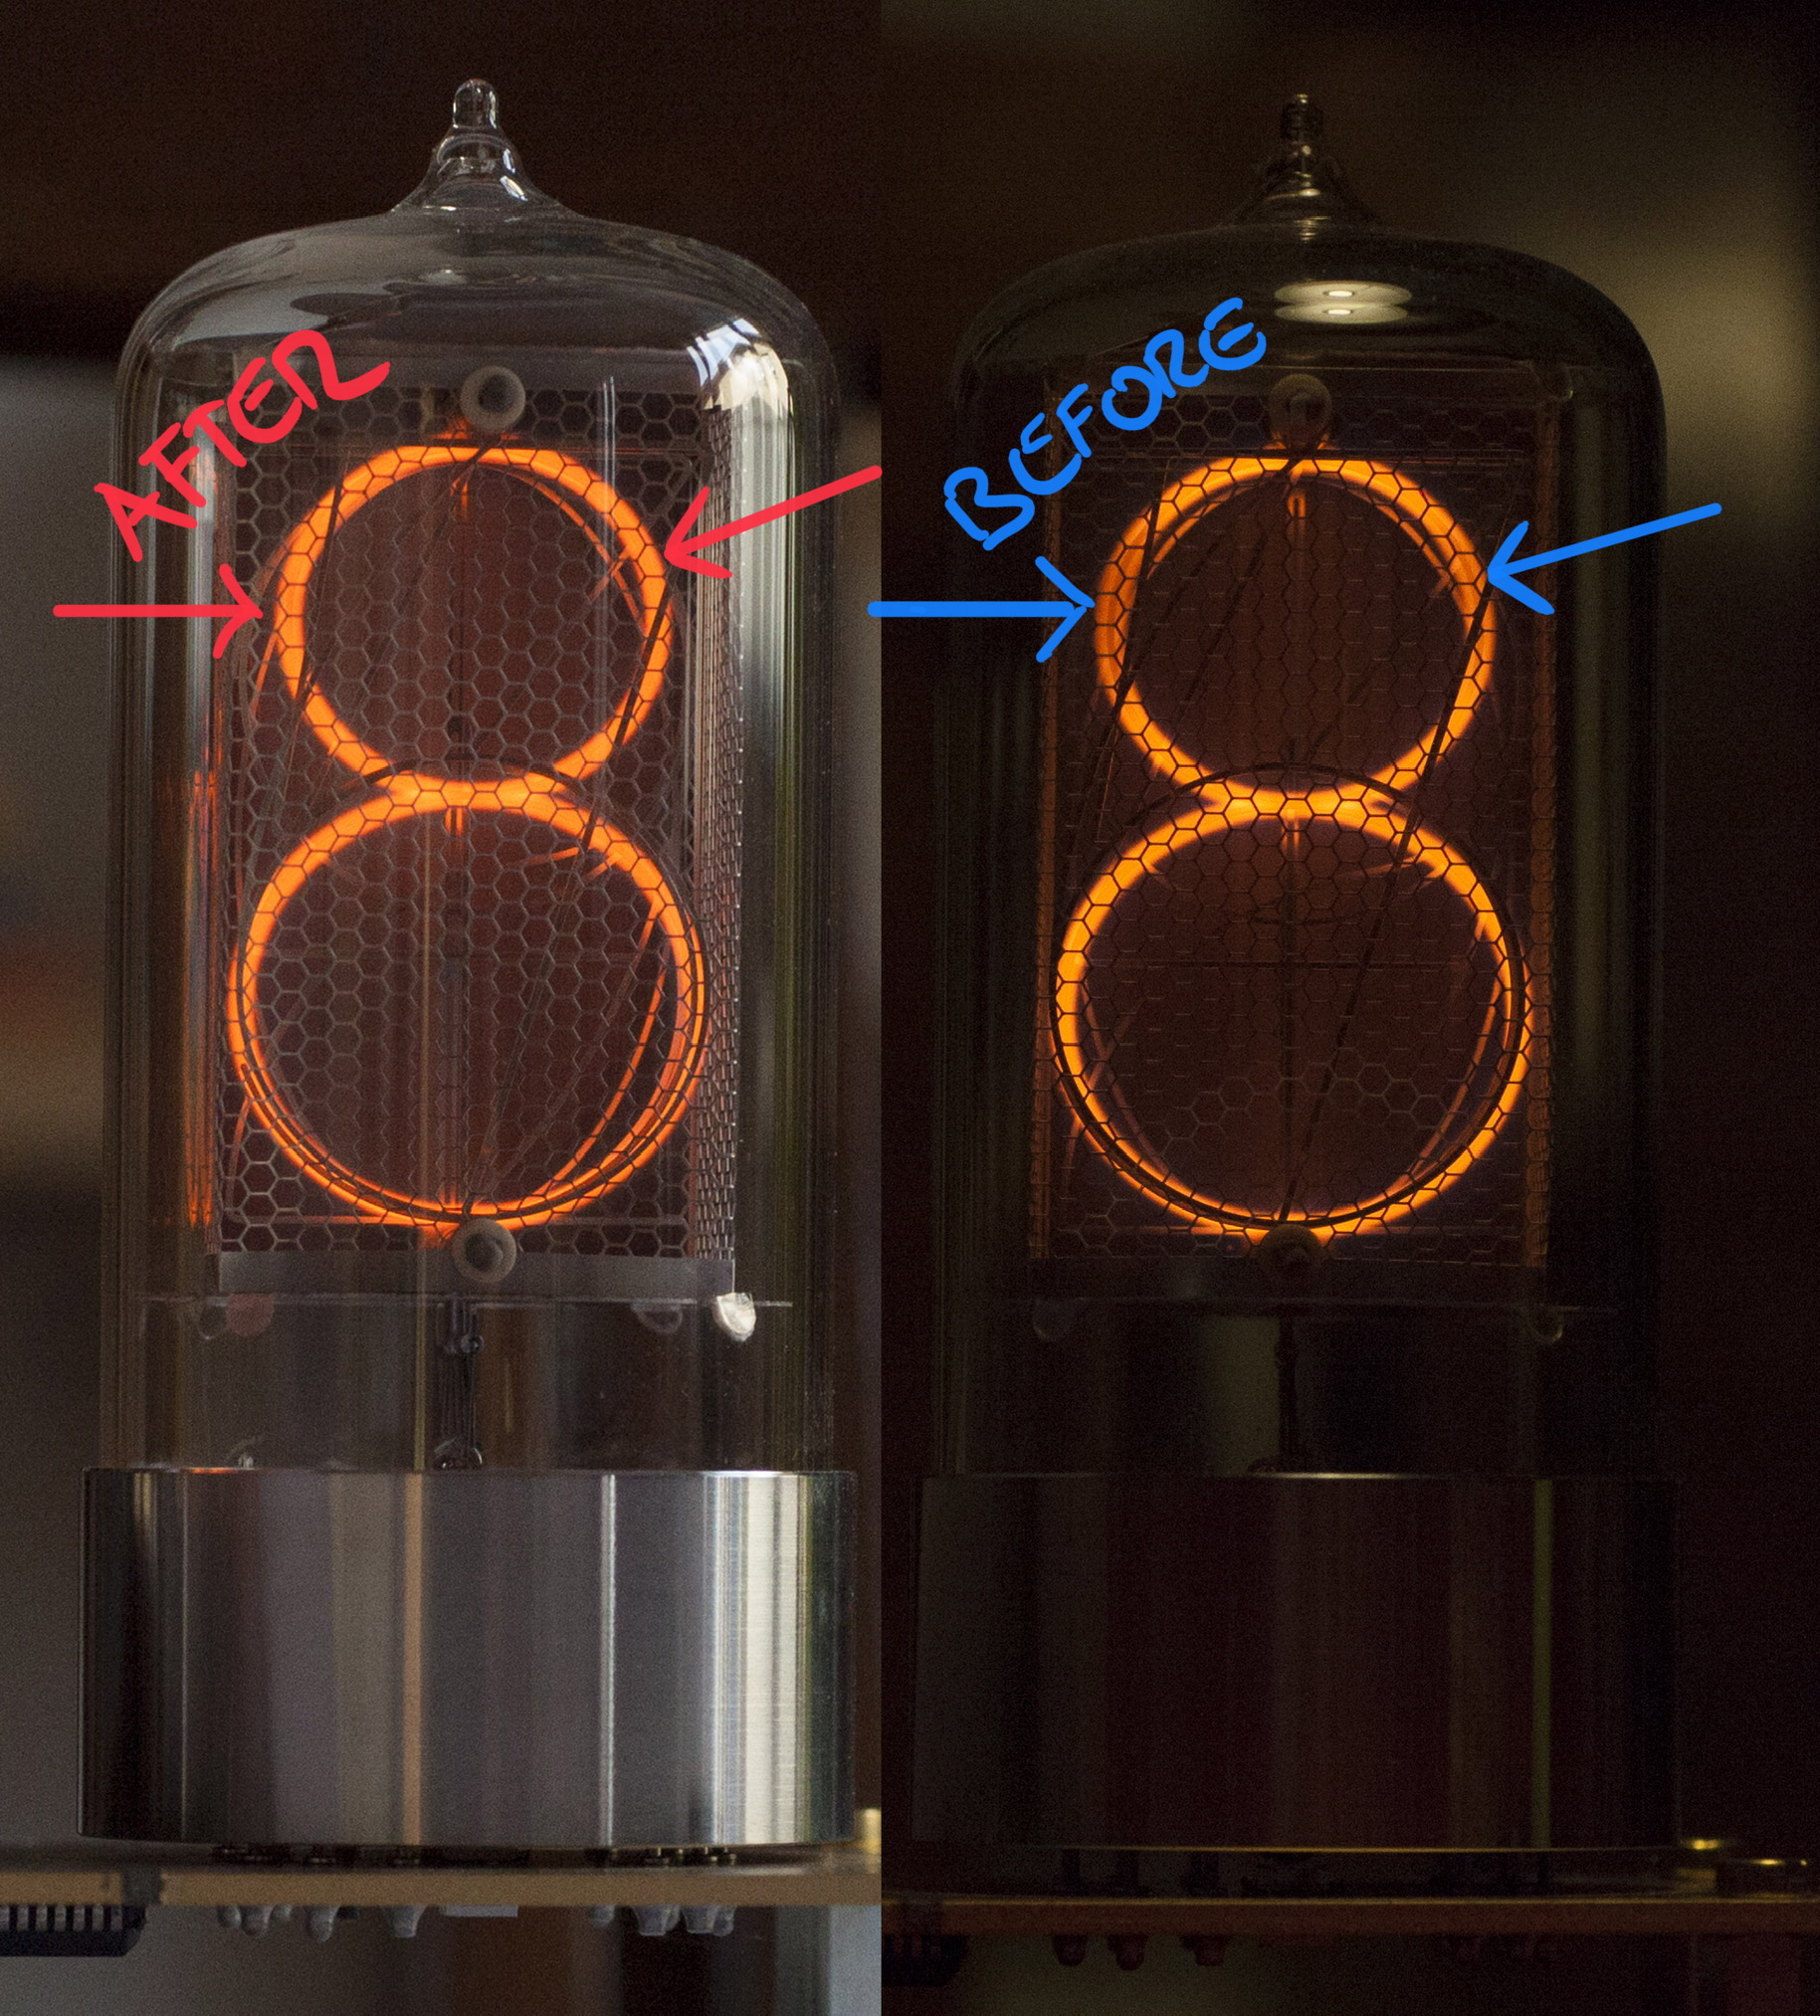
Light cathode poisoning
This is an example of a healed tube, before and after application of healing for 30 days. This is the ideal scenario, light cathode poisoning – the poisoned segments are still partially glowing. Such a defect will most likely heal in 30 days.
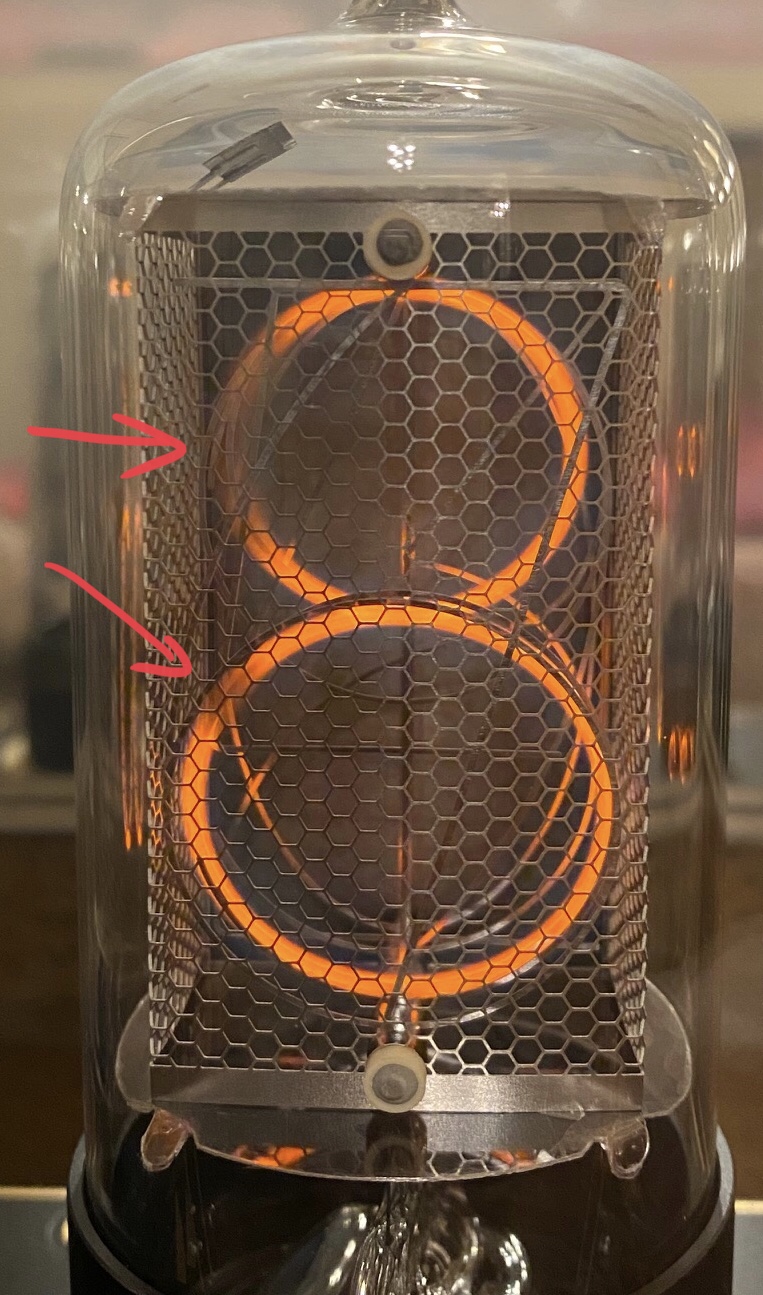
Heavy cathode poisoning
If the light poisoning is not healed, the tubes will most likely eventually develop a more serious form of cathode poisoning. Such poisoning still can be healed, but it might take several months.
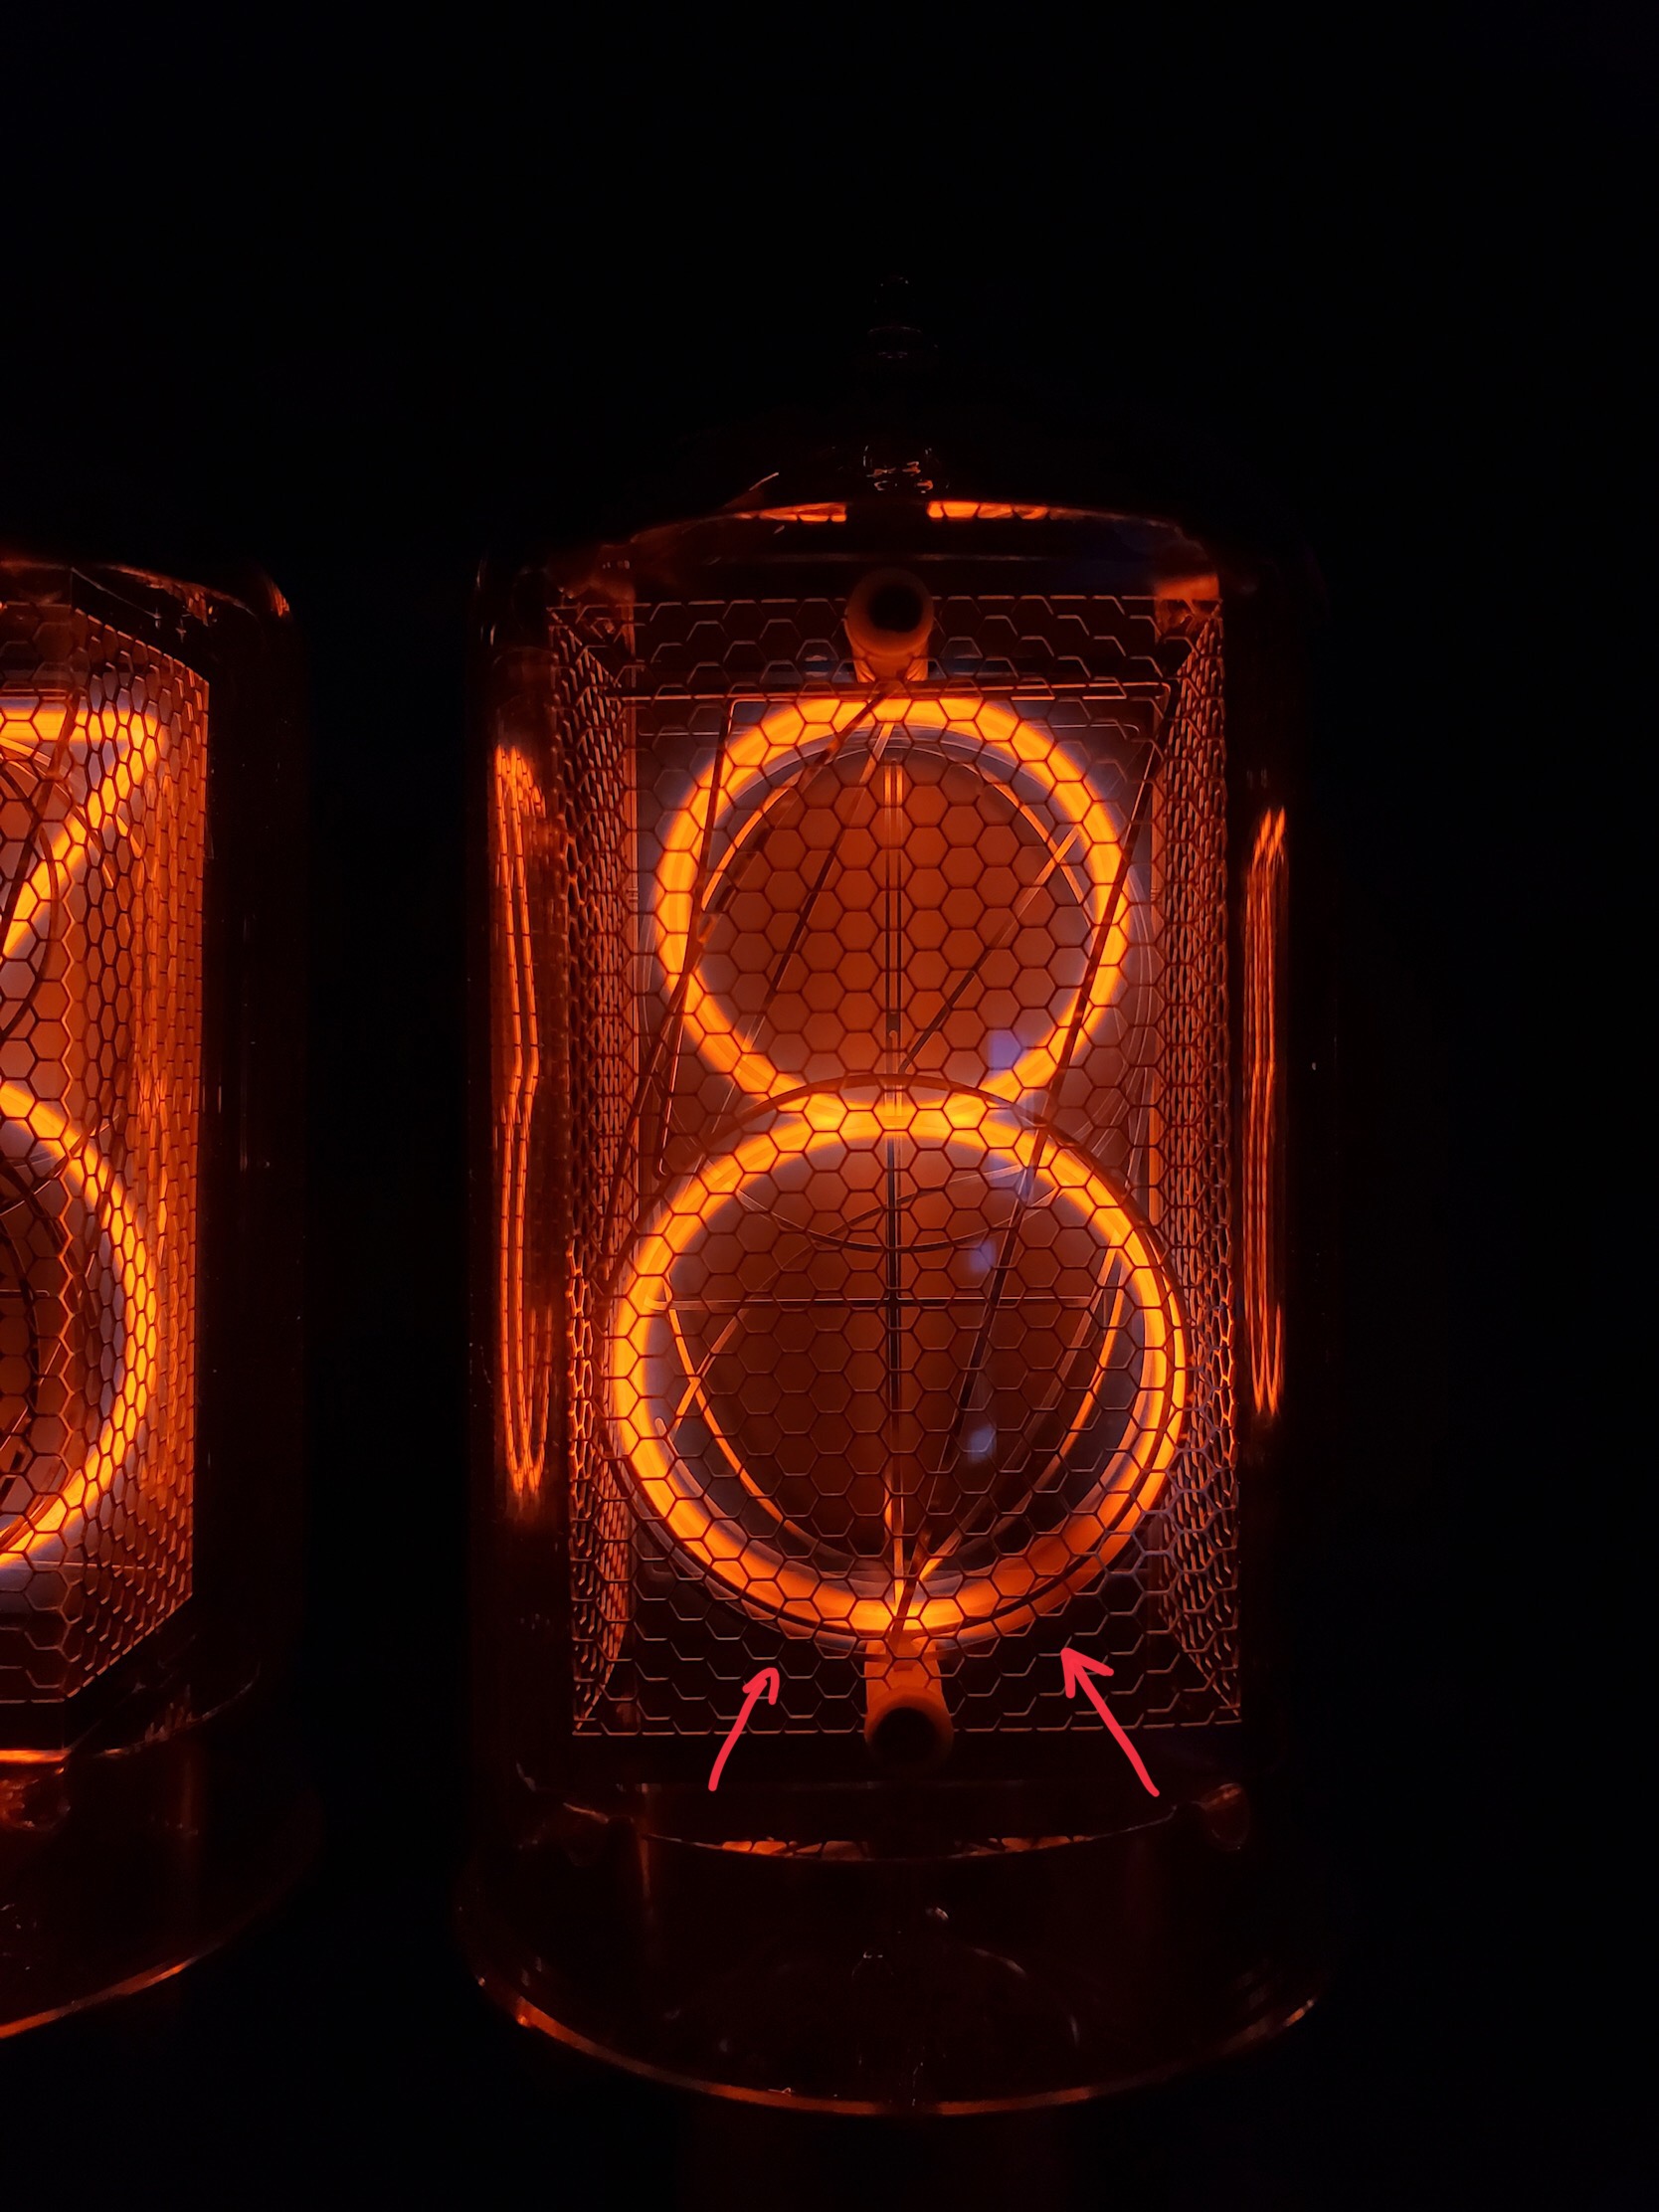
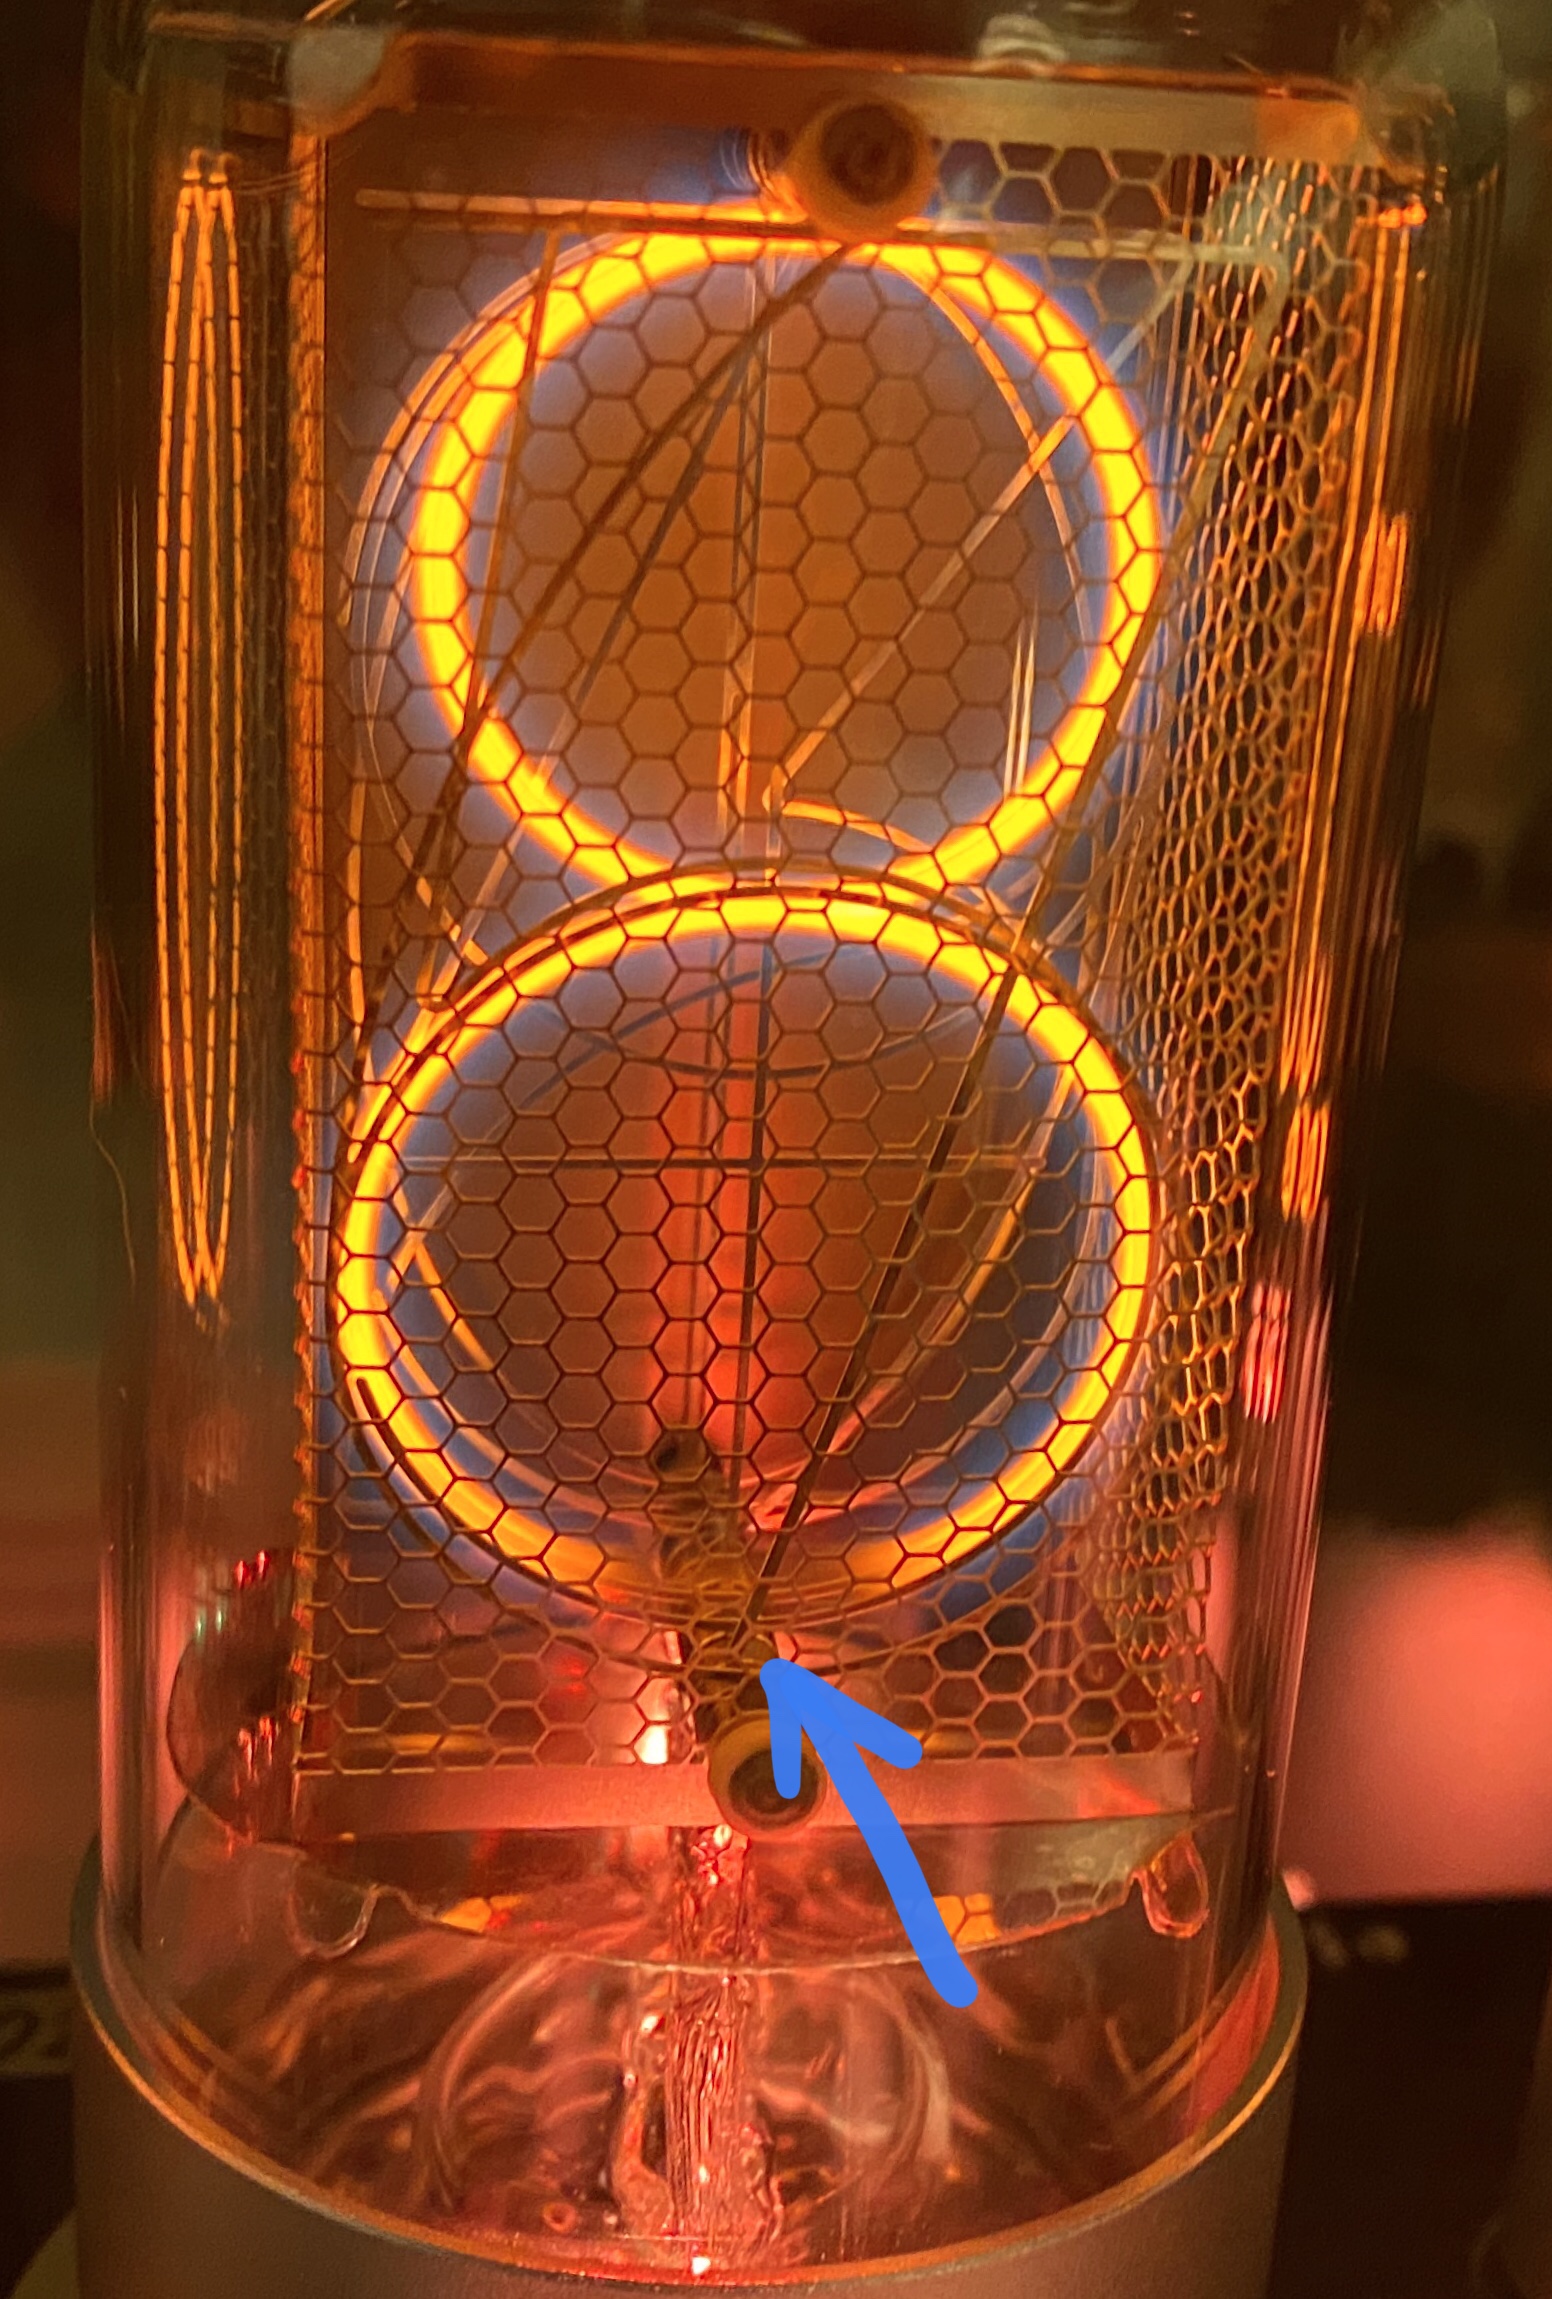
Other glow issues
Other issues with the glow that are not caused by cathode poisoning can appear – especially leakage of air into the tube. The symptoms are similar – a partially missing glow. The healing might help to recover the glow, but the chance is much lower than in case of standard cathode poisoning. If the problematic parts are located on the bottom of the digits, it is usually a leakage.
Healing activation
The healing principle is to display the affected digits for prolonged periods of time so they can clean themselves by glowing.
Log in to the configuration website and hit the settings button of your clock first. Then open the Healing tab.
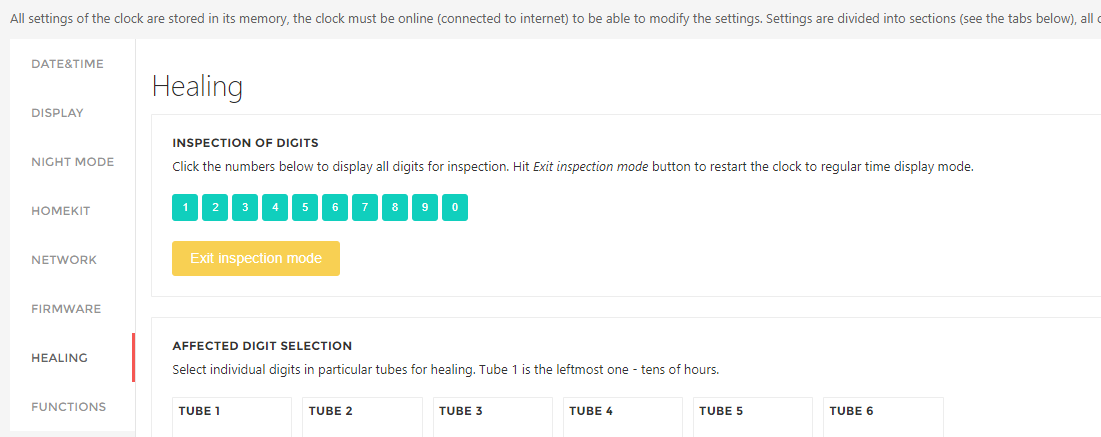
As a first step, test all the digits by clicking the buttons with numbers – hitting the button “1” will display “11:11:11” on the clock. This way you can see all digits clearly and search for poisoning patterns.
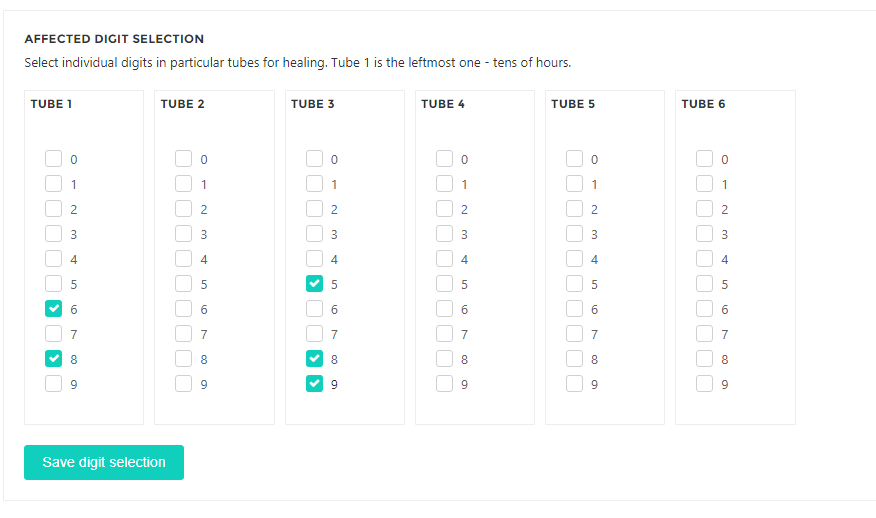
In case you find any digits with poisoning patterns, select these in the table below. The clock in the following picture has the leftmost tube set for healing on 6 and 8 and the third tube set for healing on 5,8,9. Click Save digit selection.
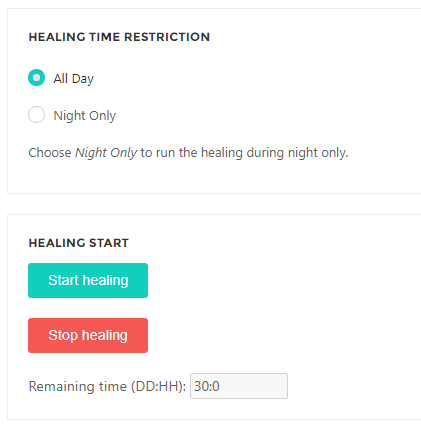
Now you can start the healing – first decide whether you want to run the healing all day or just during night mode. When healing is activated, the digits being healed are visible most of the time, so it can be confusing when reading time from the clock. Once you decide, hit Start healing button, the period of healing is set to 30 days – after 30 days, the healing will stop. You can stop the healing anytime by hitting the Stop healing button.
Firmware Updates
One of the most important features of our clocks is a remote firmware update. Whenever we implement a new feature, fix a bug in the firmware, or react to a vulnerability in the existing code, all existing clocks can be easily updated. The clock doesn’t need any attention from the customer in order to perform the firmware update – the update is made seamlessly in one or two minutes.
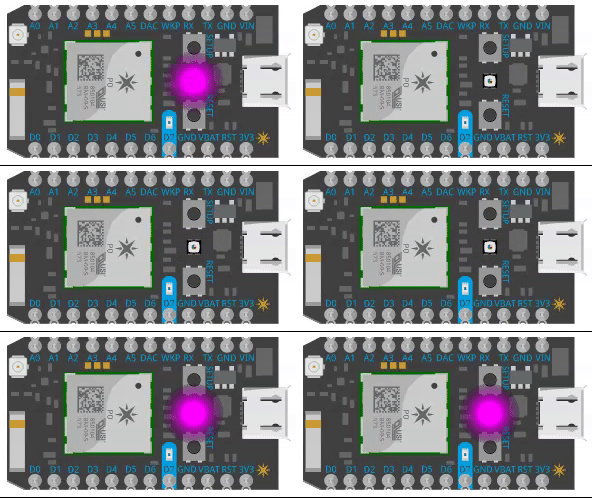
The clock can restart itself several times during the update and the System LED will flash in magenta color.
The clock will show a running zero on the display when downloading the firmware update binary files.
We used automatic firmware updates in the past, currently, we are adding an option for manually triggered updates. More information coming soon.
Mobile hotspot
In case you use your clock in offline mode without connection to the internet, the clock can’t update its firmware from the internet. So the only way how to get the update is to temporarily get the clock connected to the internet – the easiest way is to use a hotspot on your phone for this purpose.
There are two options for connecting the clock to the mobile hotspot – renaming your phone to a network that the clock knows. The second is to tell the clock credentials for the hotspot.
Renaming your phone to a network the clock already knows
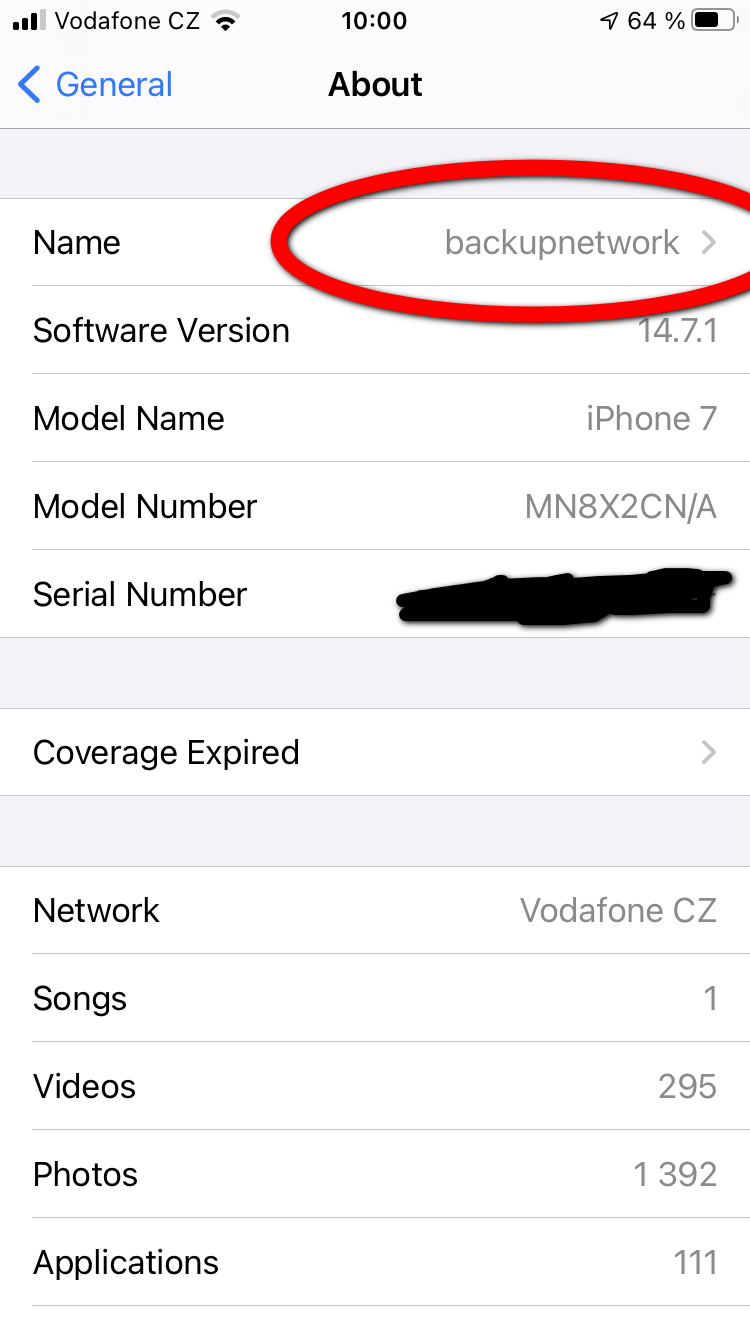
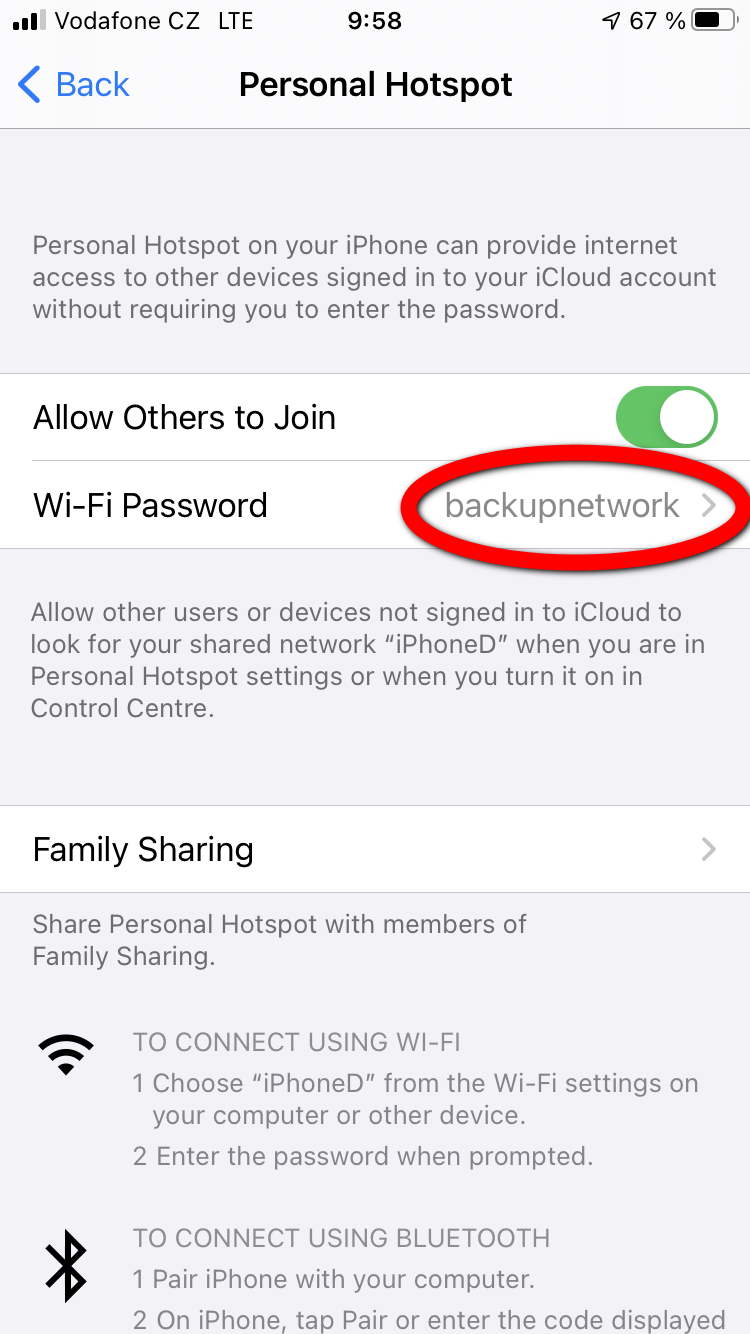
The clock that is in the default online mode constantly searches around for available Wi-Fi networks. Since firmware version 1.024, the clock can connect to a Wi-Fi network called backupnetwork with a password backupnetwork. Just rename your phone’s hotspot and change the password, and the clock will connect within a few minutes.
Detail of the hotspot configuration:
Telling the clock credentials to your phone hotspot
This option takes longer to set up, so it is worthwhile only when you repeatedly connect the clock to the hotspot.
Connect device B to the clock and transfer credentials for the A to the clock
The clock will connect to the internet using the hotspot on A and download the update (if the update is available).
Once the update finishes, switch the clock back to offline mode.
Listening Mode
The Listening mode is a feature that helps the clock to receive WiFi credentials, so it can connect to your WiFi router.
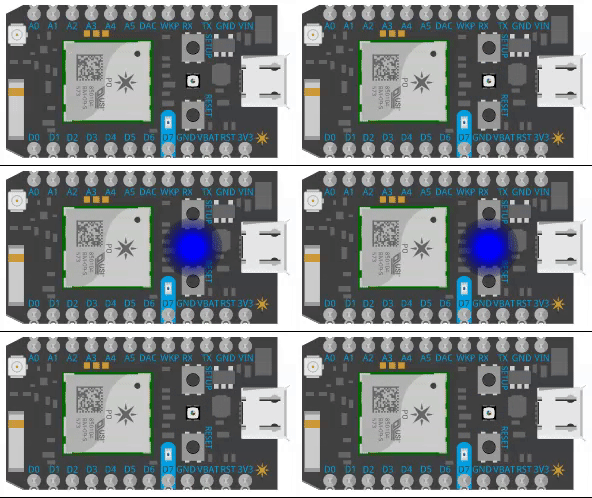
When the clock is in Listening mode, it disconnects from a WiFi router (if it was connected already) and starts its own WiFi access point. Once the clock is switched to Listening mode, you can see it in a list of WiFi networks as ZEN-XXXX where XXXX is the serial number of your clock and you can observe a blue flashing pattern on the System LED. Also, digit 1 should be running from left to right.
Switching the clock to the Listening mode
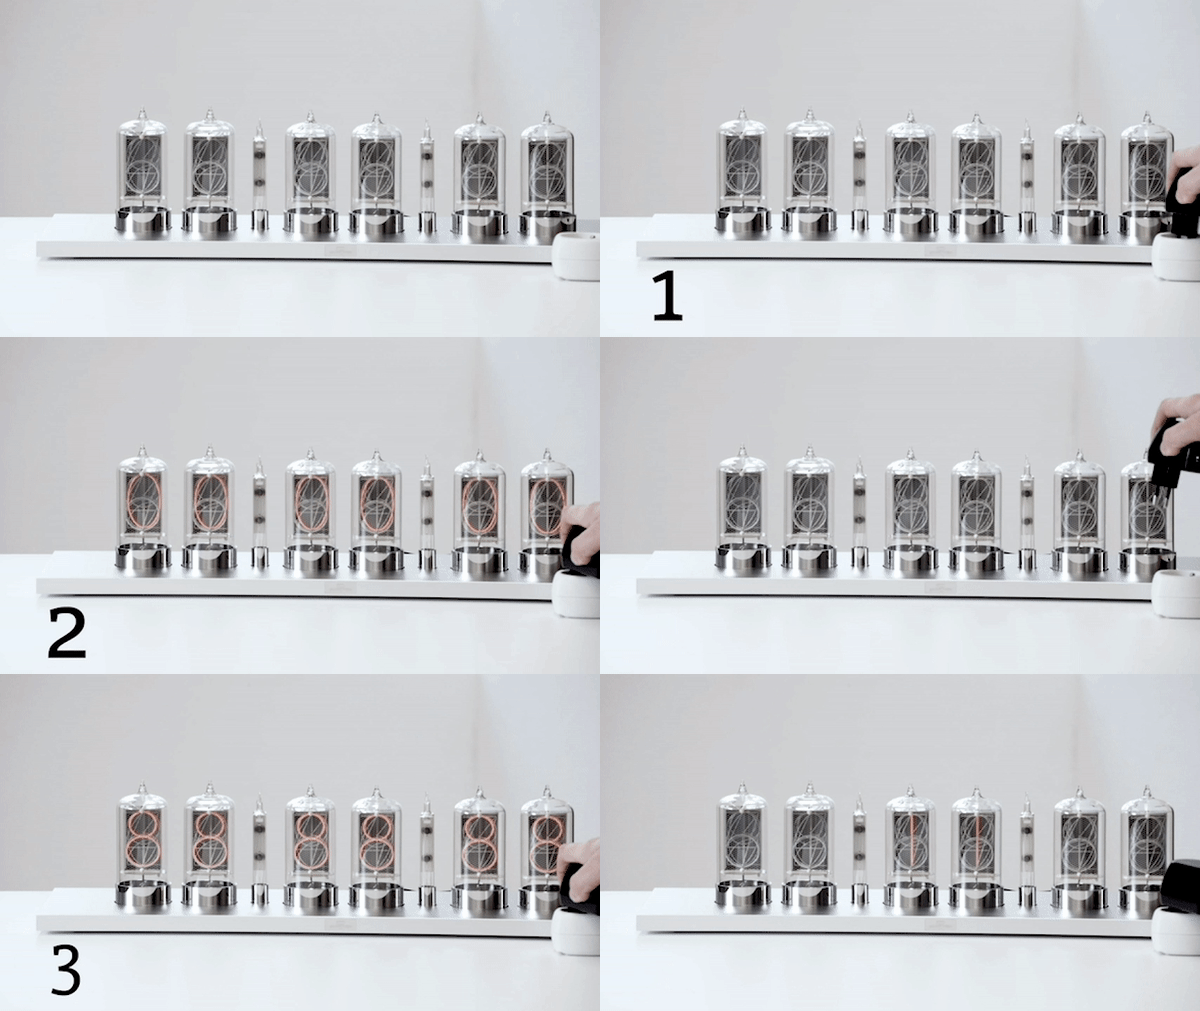
The clock is switched to the Listening mode by powering it off during a startup sequence and powering it on again. This is done by this sequence:
Unplug the clock’s power adapter from the power outlet but keep the adapter plugged into the clock.
Plug the power adaptor into the power outlet, wait for the startup sequence (00:00:00 -> 11:11:11 -> 22:22:22 etc.. displayed on the clock), unplug the power adaptor during that sequence. If the clock switches to time mode, it is too late, you need to start from #1.
Plug the power adaptor into the power outlet, the clock now starts in Listening mode and you can see digit 1 running from left to right.
Exiting the Listening mode
Just power cycle the clock – unplug the power adaptor and plug it back. The clock will start in a regular Time mode.
System LED
The purpose of the System LED is to indicate internet connection status and possible problems with the connection.
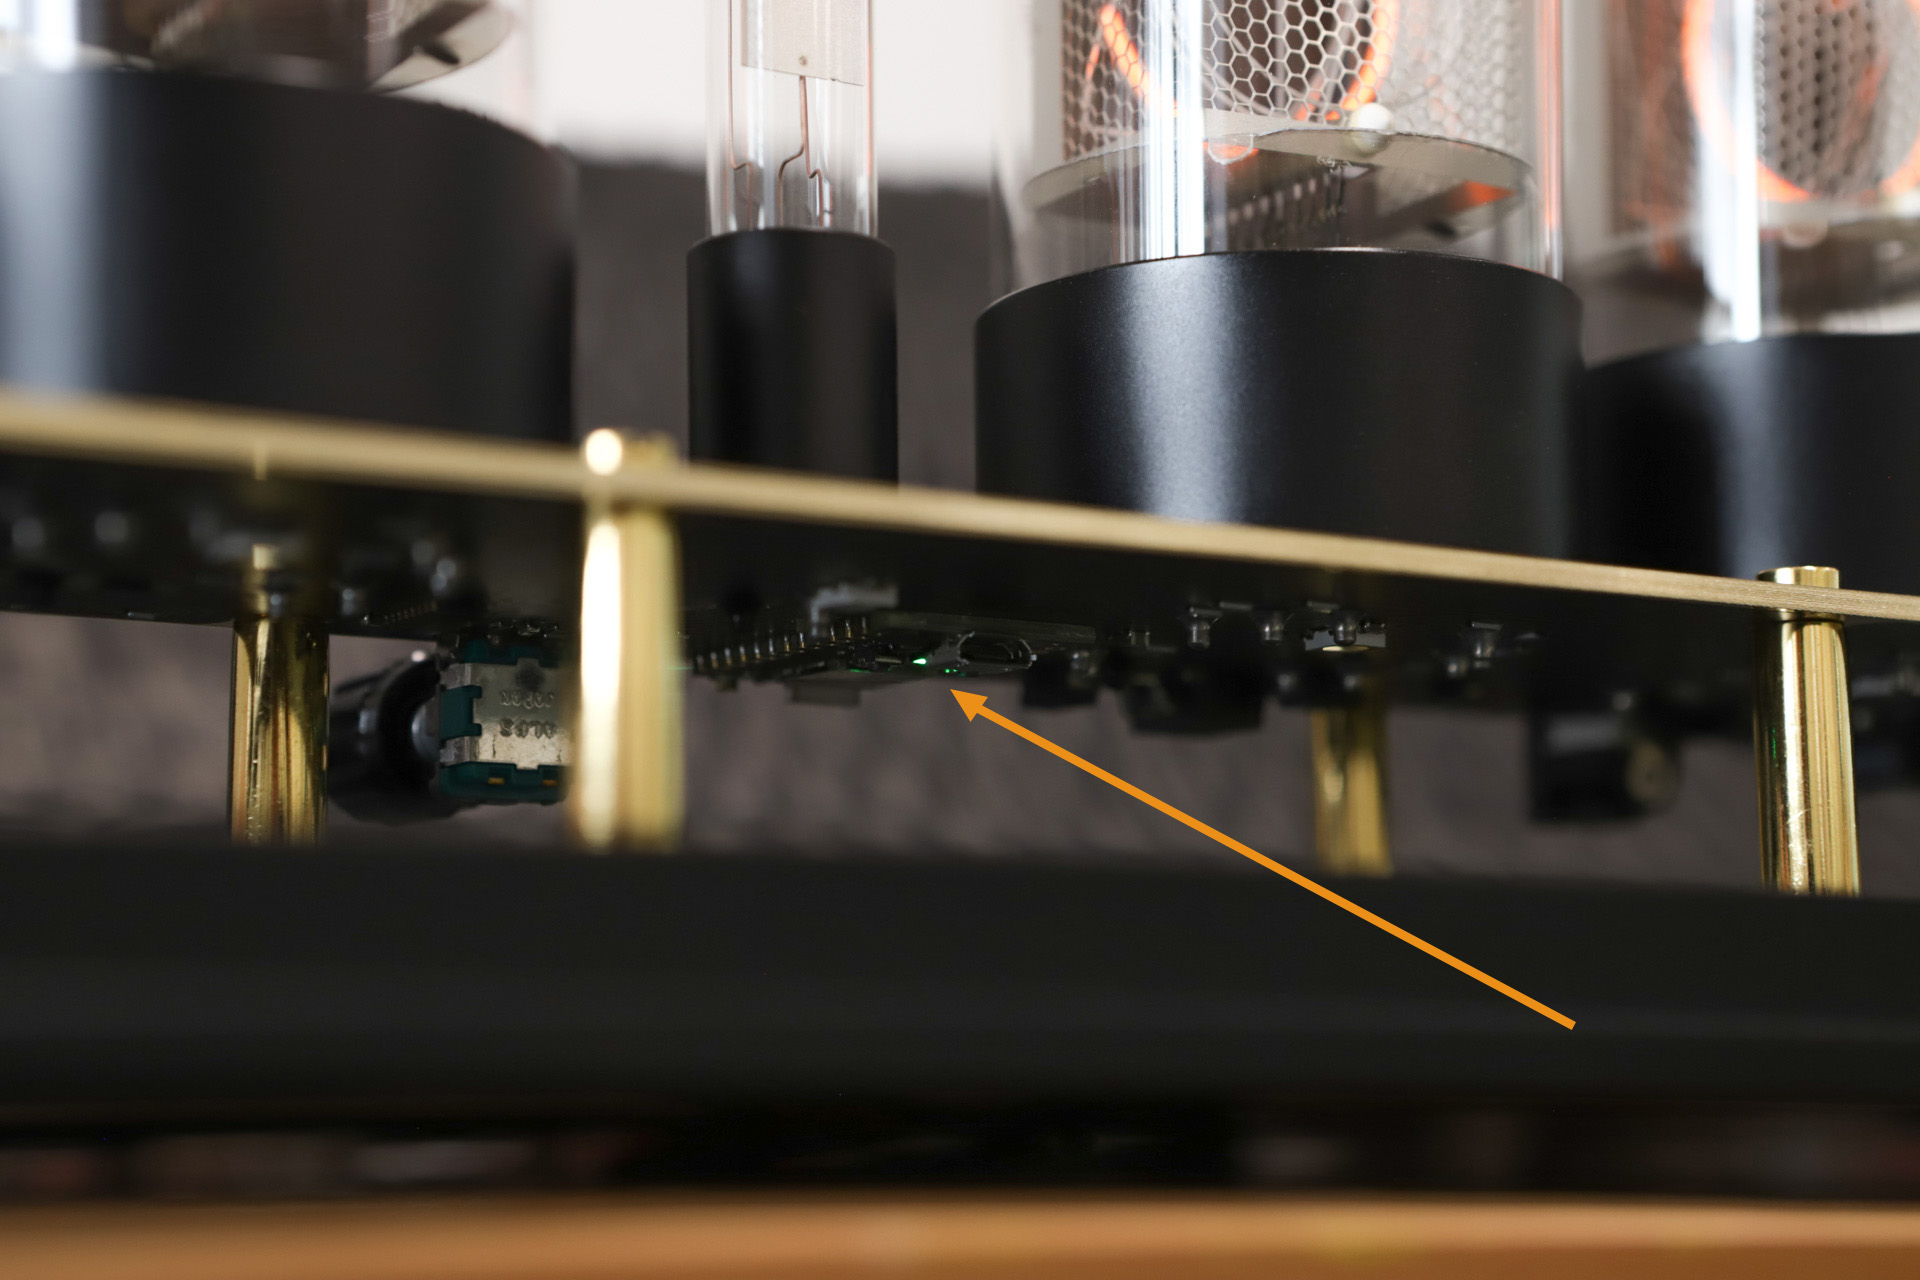
Location of the System LED on Zen Nixie Clock
The System LED on the Zen Nixie Clock can be found on the bottom of the electronics board, under the second tube from the left.
System LED configuration
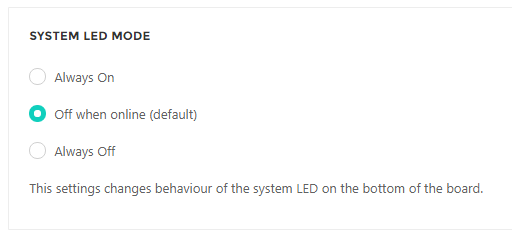
Always On: System LED is always on, showing an internet connection status all the time. The cloud-connected status is indicated as a breathing cyan pattern. Off when online: Default option – System LED is off when the clock is connected to the cloud, in other cases, it signals internet connection status. The cloud-connected status is indicated by turning the LED off. Always Off: System LED is always off.
Normal operation
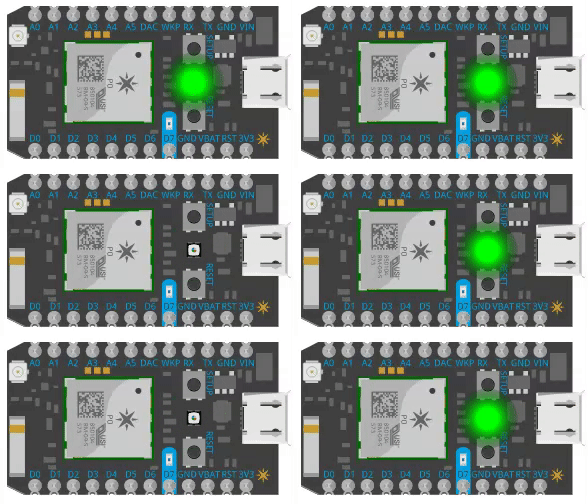
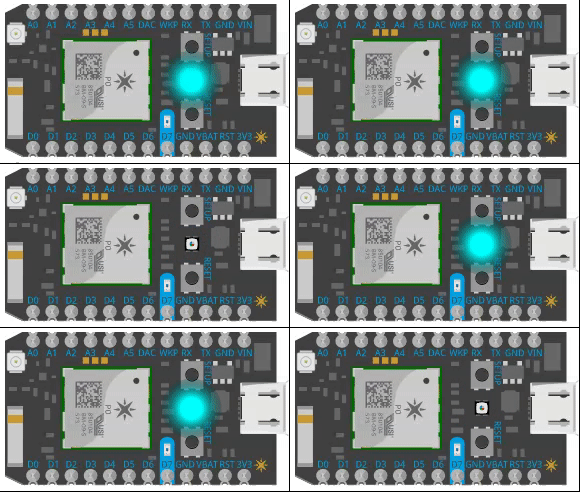
When the clock is powered on, the System LED turns white for a second, then blue for several seconds, and then finally starts flashing green (looking for known Wi-Fi). When Wi-Fi is found, the color changes to cyan (aqua) – at this moment the clock is trying to reach the cloud. When the connection to the cloud is established, the LED turns off. Whenever the status LED is off, you know that the clock has a connection to the cloud.
Listening mode
The listening mode is used when you need to transfer Wi-Fi credentials to the module, it is activated manually by the user.
When in listening mode, the System LED is flashing blue.
Firmware Update
Occasionally, the clock receives a firmware update, it usually takes a minute and during the update, the System LED flashes magenta (purple). After the update, the clock is restarted and switched back to normal mode.
Connecting to WiFi
When the clock is searching for a known WiFi, the LED will be flashing green. This normally takes around 10 seconds, then the connection to WiFi is established and the clock switches to Connecting to cloud state.
Connecting to Cloud
Once the WiFi connection is established, the clock starts connecting to the Cloud server. The LED flashes cyan (aqua) during that process. Once the connection to the Cloud is established, it turns off.
Errors
From time to time, you might observe the LED flashing – below are a few typical situations:
Flashing green: The clock is searching for known Wi-Fi that cannot be found – the router might be off, the SSID of the router might have changed or the router is not visible to the clock.
Flashing cyan (aqua): The clock is trying to establish a connection to the cloud, it is already connected to Wi-Fi, but cannot reach the cloud. This might be caused by an internet connection outage or any other issue between your router and the internet.
More information
A more detailed description of System LED behavior can be found on the website of the Wi-Fi module manufacturer:
Sometimes there is no Wifi network to connect the clock to (e.g. a cottage or a yacht) and it is not possible to operate the clock in online mode. In such a case, you can use Direct Connect mode to configure the parameters of the clock.
Tip
Direct Connect is a direct connection from your device to the clock over WiFi, without using a WiFi router or internet connection.
The clock itself behaves like an access point (AP) allowing you to connect to its WiFi network. To use Direct Connect mode, first get either our iOS app or Android app.
Open the app and switch to the My Clocks tab. There is no need to have a user account to use Direct Connect mode. Hit the Direct Connect button and follow the instructions to switch your clock into Listening Mode.
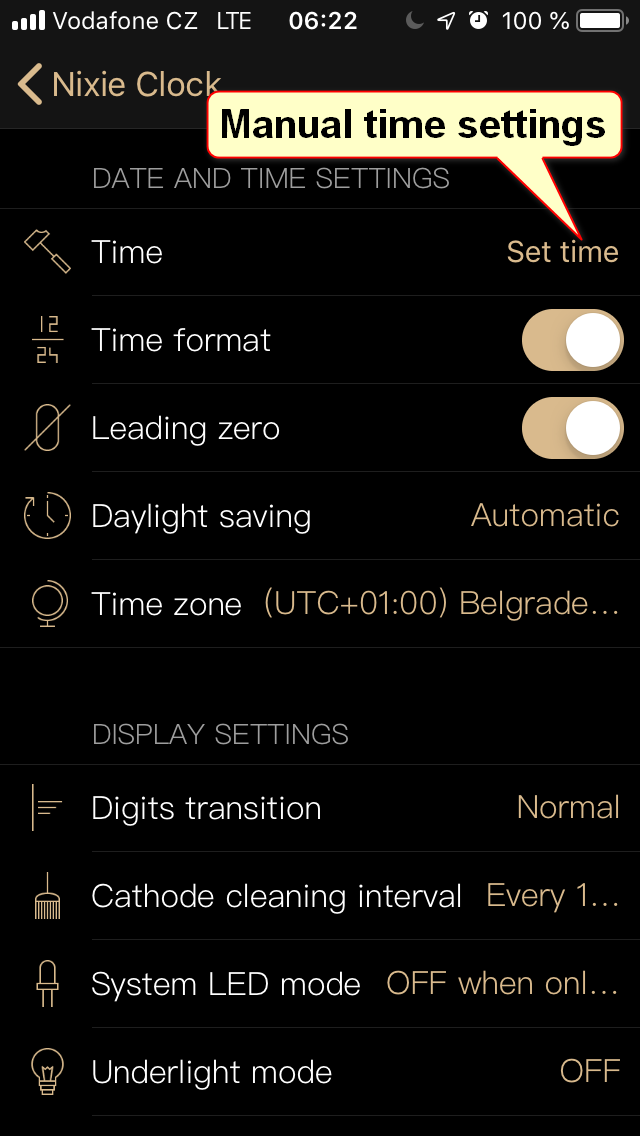
The configuration parameters in Direct Mode are identical to regular online mode. However, there are some differences. You can notice a “Set time” button, this serves to transfer current time from your mobile device to the clock. This is especially helpful when the clock is in Offline mode, because in this case the clock has no other source of time to sync with. If you set the time via Direct connect and the clock subsequently reconnects to the internet, its time is synced from the internet.
Another new button is “Disconnect from the cloud” – when you hit this button, the clock will be switched to Offline mode which means that it will disconnect from your WiFi router (if it is connected) and operate without connection to the internet. In this case, it is necessary to manually sync the time occasionally to keep it accurate.
Night Mode
The Zen Nixie Clock can be programmed to switch between Day mode brightness and Night mode brightness, every hour in a week can be addressed separately.
Tip
If you set the brightness in any of the modes to off, the clock continues to run, only the nixie tubes are turned off. The clock is still connected and accessible for settings. Power consumption is roughly 1W per nixie tube.
Example 1 – Clock located in a living room
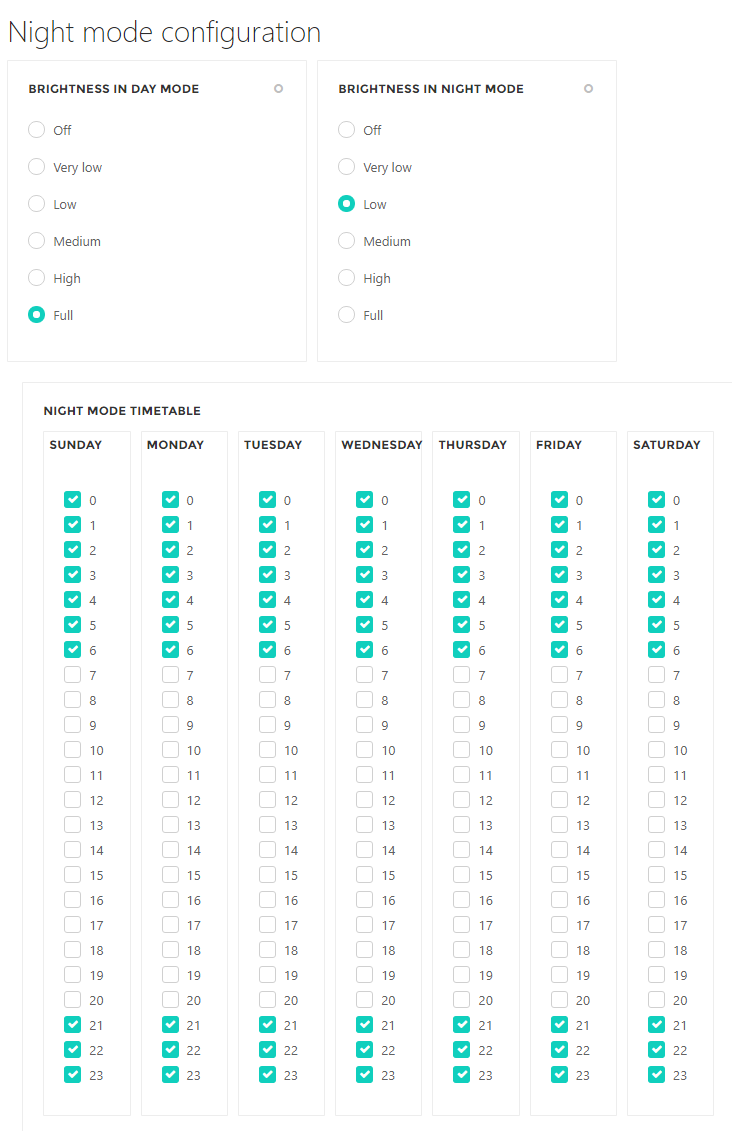
Let’s assume we have a clock in a living room, we want it to be at full brightness during the day (Brightness in day mode set to Full) and at reduced brightness in the evenings and at night (brightness in the night mode set to low). The following configuration will switch the clock to night mode at 21:00 and back to day mode at 6:59.
Example 2 – Clock located in an office
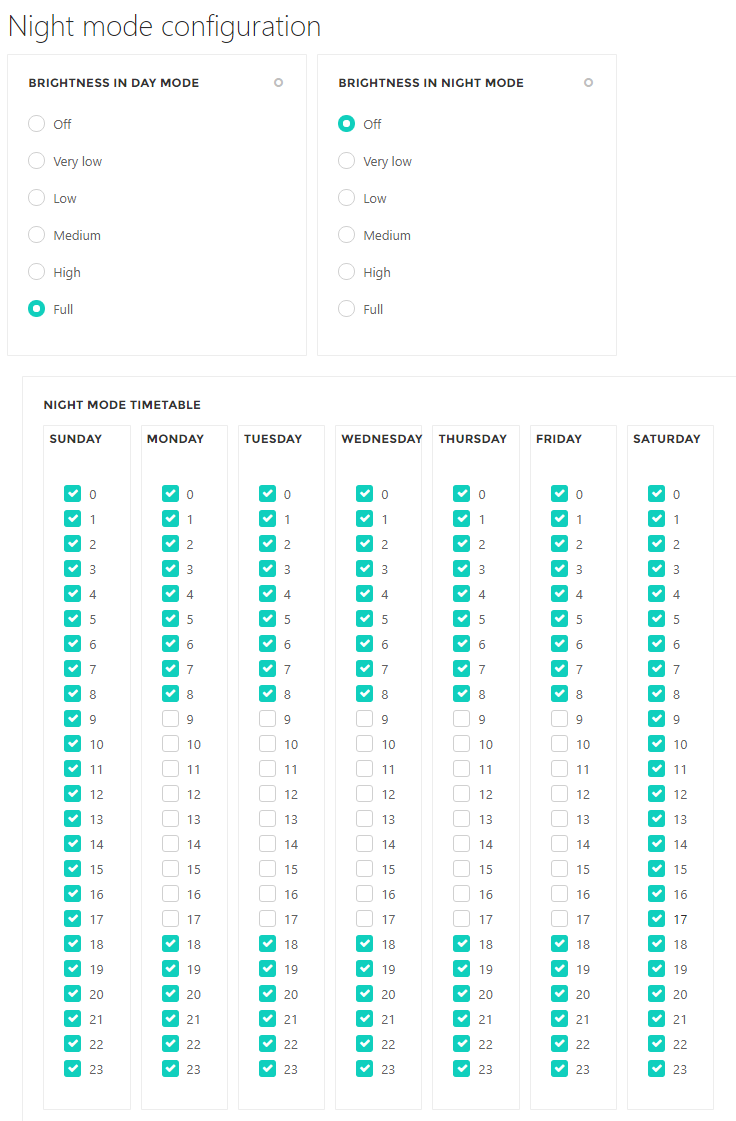
Let’s assume we have a clock in our office, we want it to be at full brightness when we arrive at 9:00 in the morning (Brightness in day mode set to Full) but we want to turn it off when we leave the office at 18:00 (brightness in the night mode set to off). The display will be completely off during weekends. The following configuration will set the clock according to our needs:
Technical data
Dimensions: 580×133×200 mm (22.8”×5.2”×7.9”) Weight: 7.15 kg (15.7 lbs) Power adaptor voltage range: 90-240 VAC 50-60Hz (with the plug matching the country of destination) Power input: 5.5/2.1 mm DC plug, positive center Input voltage: 12V DC Wi-Fi standards: 2.4GHz IEEE 802.11 b/g/n Case material: Black anodized aluminum with fine texture Cover material: Optiwhite glass without a green tint on the edges Tube material: Glass, black anodized aluminum base Power consumption: 7.5 W (12W with LED underlight on)