Tento návod zatím není ve vašem jazyce – část zobrazujeme v jazyce: English.
Quick start
Quick start for the second-generation Puri (Puri 4 V2 and Puri 6 V2): connect the power and set the time. The other chapters of this manual describe everything else.
Power
Connect the clock to a USB-C Power Delivery adapter rated 20 W or more that supports 12 V or 15 V. Check the adapter label – many small phone chargers offer only 5 V and 9 V.
Setting the time
In time mode, press ⊙ to enter time configuration.
Set the time with ⊖ / ⊕.
Press ⊙ again to confirm.
When you power the clock on for the first time, it starts in time configuration straight away. Details in Setting the time.
The clock is controlled with three buttons: ⊖, ⊙ and ⊕. In Simple mode, the mode the clock ships in, the buttons are all you need. In Expert mode they work the same way.
Buttons
What they do
Press ⊙
Starts time setting; in time setting, saves the time
Press ⊖ or ⊕
In time setting, moves the time one minute back or forward. Otherwise the display just blinks to confirm the press.
Hold ⊖ or ⊕
In time setting, the time runs, faster and faster. Otherwise, after 3 seconds, switches between 12h and 24h format.
While the clock shows the time, press ⊙. The hours and minutes start blinking.
Set the time with ⊖ / ⊕. Each press moves the time by one minute. Hold the button and the time runs, faster and faster, up to about 80 minutes per second. Release it shortly before the time you want and finish with single presses.
Press ⊙ again to confirm. The seconds start from 00 at that moment.
Good to know:
The time is always set in 24h format, even when the clock shows 12h. On Puri 6 the seconds tubes stay dark while you set the time.
If you don't press any button for 30 seconds, the clock leaves time setting and keeps the previous time.
When the clock is powered on for the first time, or after a hard factory reset, it starts in time setting straight away.
In Expert mode the clock can take the time from the internet instead. Changing the time with the buttons switches that off; pressing ⊙ without changing the time leaves it on.
12h / 24h format
In time mode, hold ⊕ for 3 seconds to switch between 12h and 24h format. ⊖ works the same way.
The hour tubes briefly show 12 or 24, the new format, and the clock returns to the time. The clock has no AM/PM indicator.
Simple and Expert mode
The clock ships in Simple mode for a quick start and easy setup: Wi-Fi is off and the clock is set with the buttons only.
For advanced features – automatic daylight saving, brightness, visual effects, internet time sync – switch to Expert mode. It turns on the clock's Wi-Fi and a configuration website; see Expert mode.
Switching between Simple and Expert mode
Wait until the clock shows the time.
Hold ⊕ and ⊖ together for 5 seconds. Don't press ⊙ – holding all three buttons starts a factory reset.
The display goes dark except for one tube near the middle, which shows 2 for Expert mode or 1 for Simple mode.
A moment later the clock restarts in the new mode.
Release the buttons before 5 seconds to cancel. The clock remembers the mode when it is unplugged. A factory reset, soft or hard, returns it to Simple mode.
Which mode is the clock in?
Watch the tubes when the clock starts:
Expert mode: the tubes light up one after another from left to right, each rising out of a soft glow of all its digits.
Simple mode: the whole display fades in at once, spreading from the centre outwards.
Expert mode
Expert mode turns on the clock's Wi-Fi and its configuration website, which you open in the browser of your phone or computer. In Simple mode, the mode the clock ships in, Wi-Fi is off and the clock is set with the buttons only.
Hold ⊕ and ⊖ together for 5 seconds. The clock restarts in Expert mode; the same hold switches it back to Simple mode. Details in Simple and Expert mode.
In Expert mode the clock connects to your Wi-Fi network. You give it the network name and password once, through a setup network that the clock opens itself, and the clock remembers them.
The clock works with 2.4 GHz Wi-Fi networks (IEEE 802.11 b/g/n) protected with a password. Open networks without a password, and networks that need a login page, such as hotel or guest networks, are not supported.
Setup network
Network name
puri6- followed by the clock's serial number, for example puri6-42 (Puri 4: puri4-42)
Switch the clock to Expert mode. With no Wi-Fi saved, the clock opens the setup network straight away and the Wi-Fi LED flashes once every 2 seconds.
On your phone or computer, open the Wi-Fi settings and connect to the clock's setup network, for example puri6-42, with the password 123456789.
The setup page usually opens by itself. If it doesn't, open a browser and go to http://192.168.4.1.
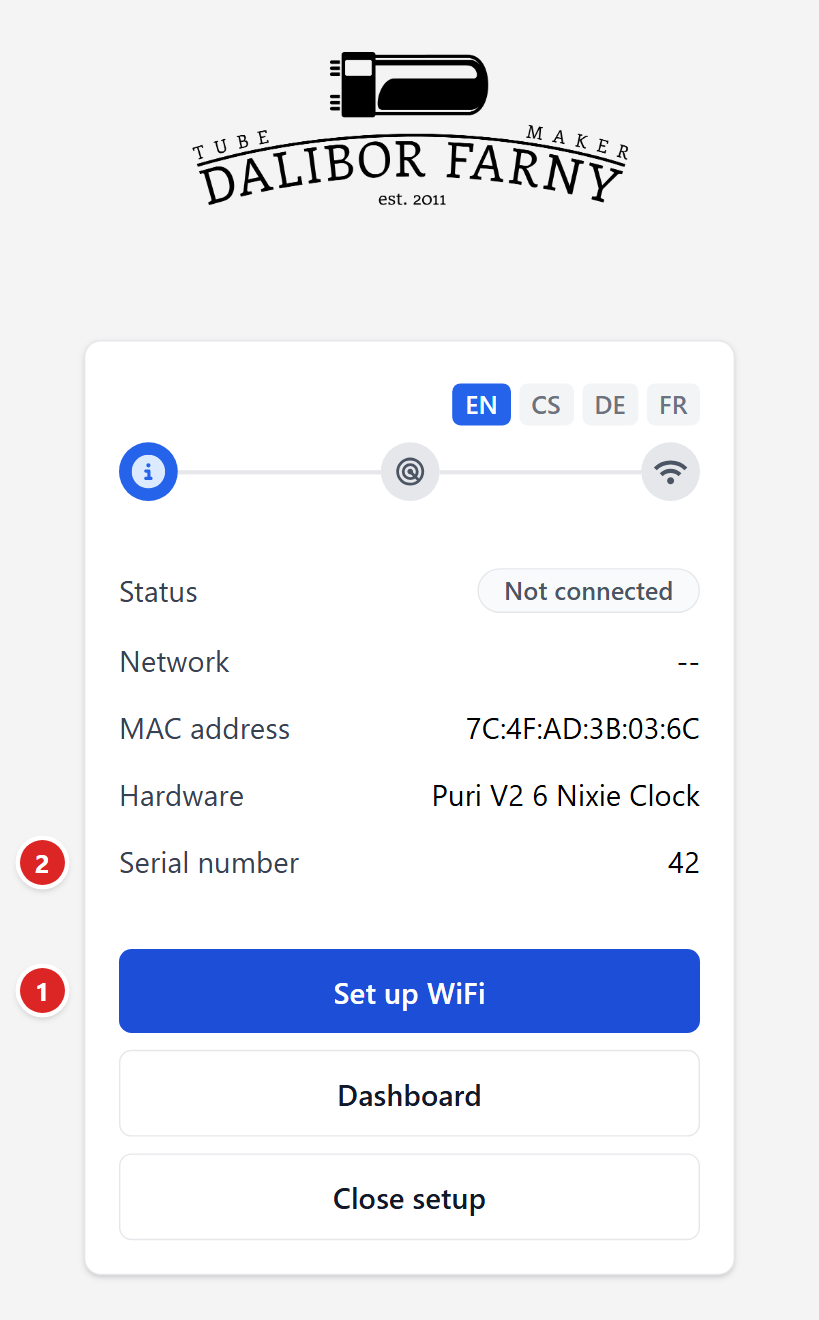
The setup page. (1) Set up WiFi starts the setup. (2) The clock's serial number – the same number as in the name of its setup network, here puri6-42.
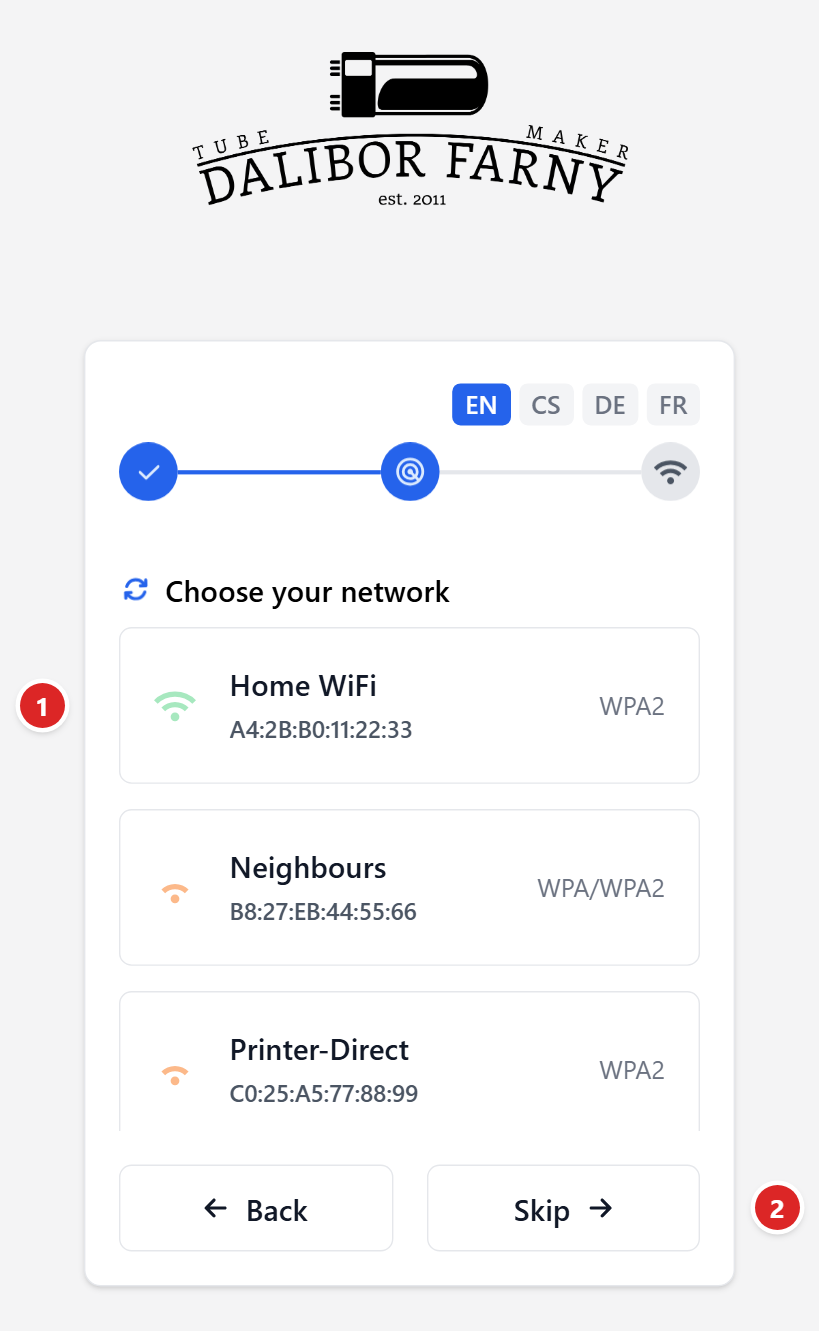
Tap Set up WiFi. The clock lists the Wi-Fi networks it can see.
Choose your network. For a hidden network, tap Skip and type its name.
(1) Tap your home network. (2) Skip – for a hidden network that is not in the list; you type its name yourself.
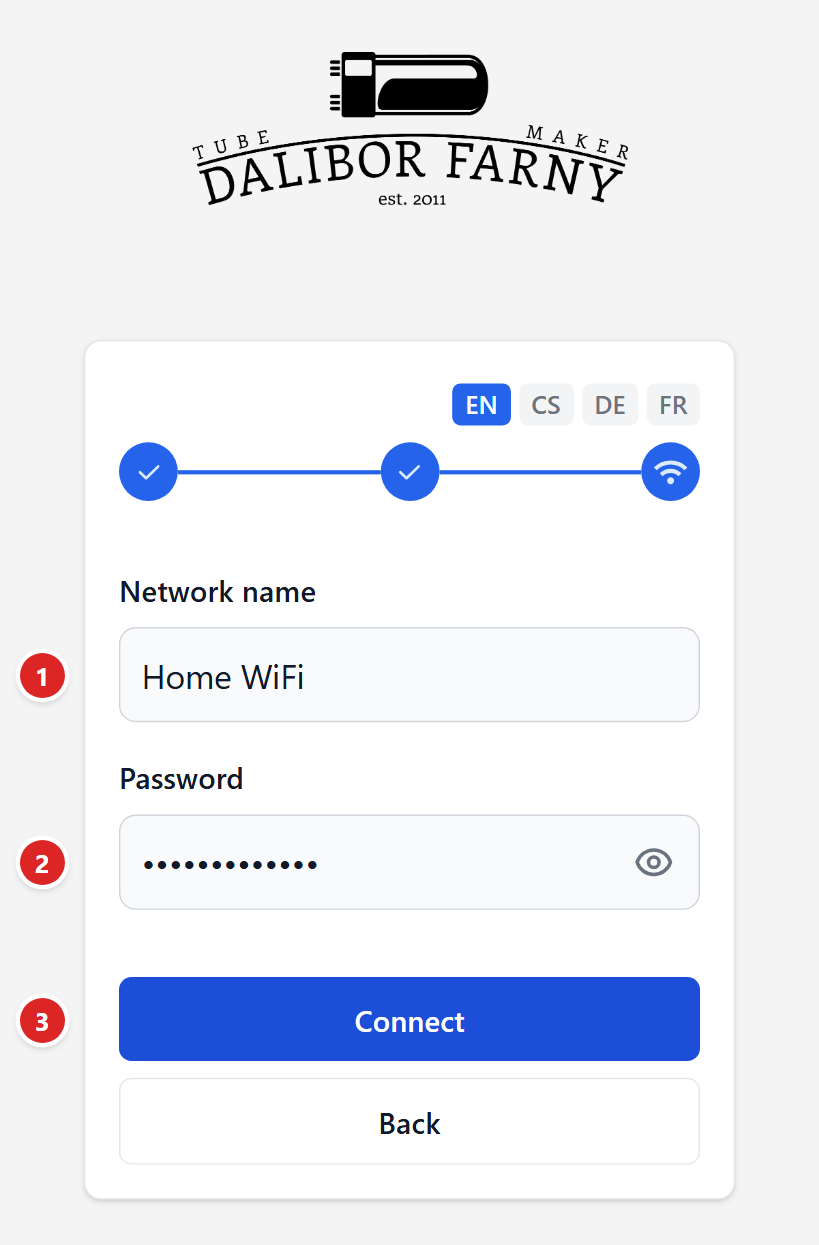
Enter the Wi-Fi password and tap Connect.
(1) Your home network. (2) The password of your home Wi-Fi – not 123456789, that one is only for the clock's setup network. (3) Connect.
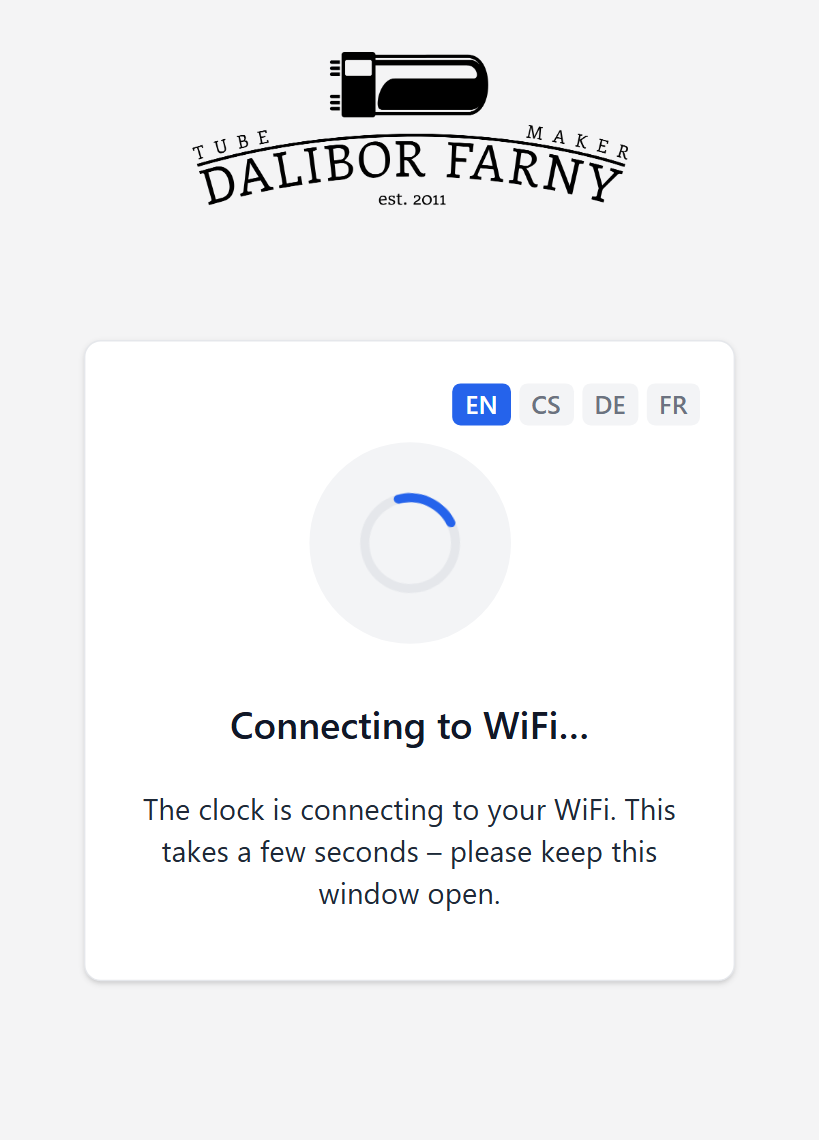
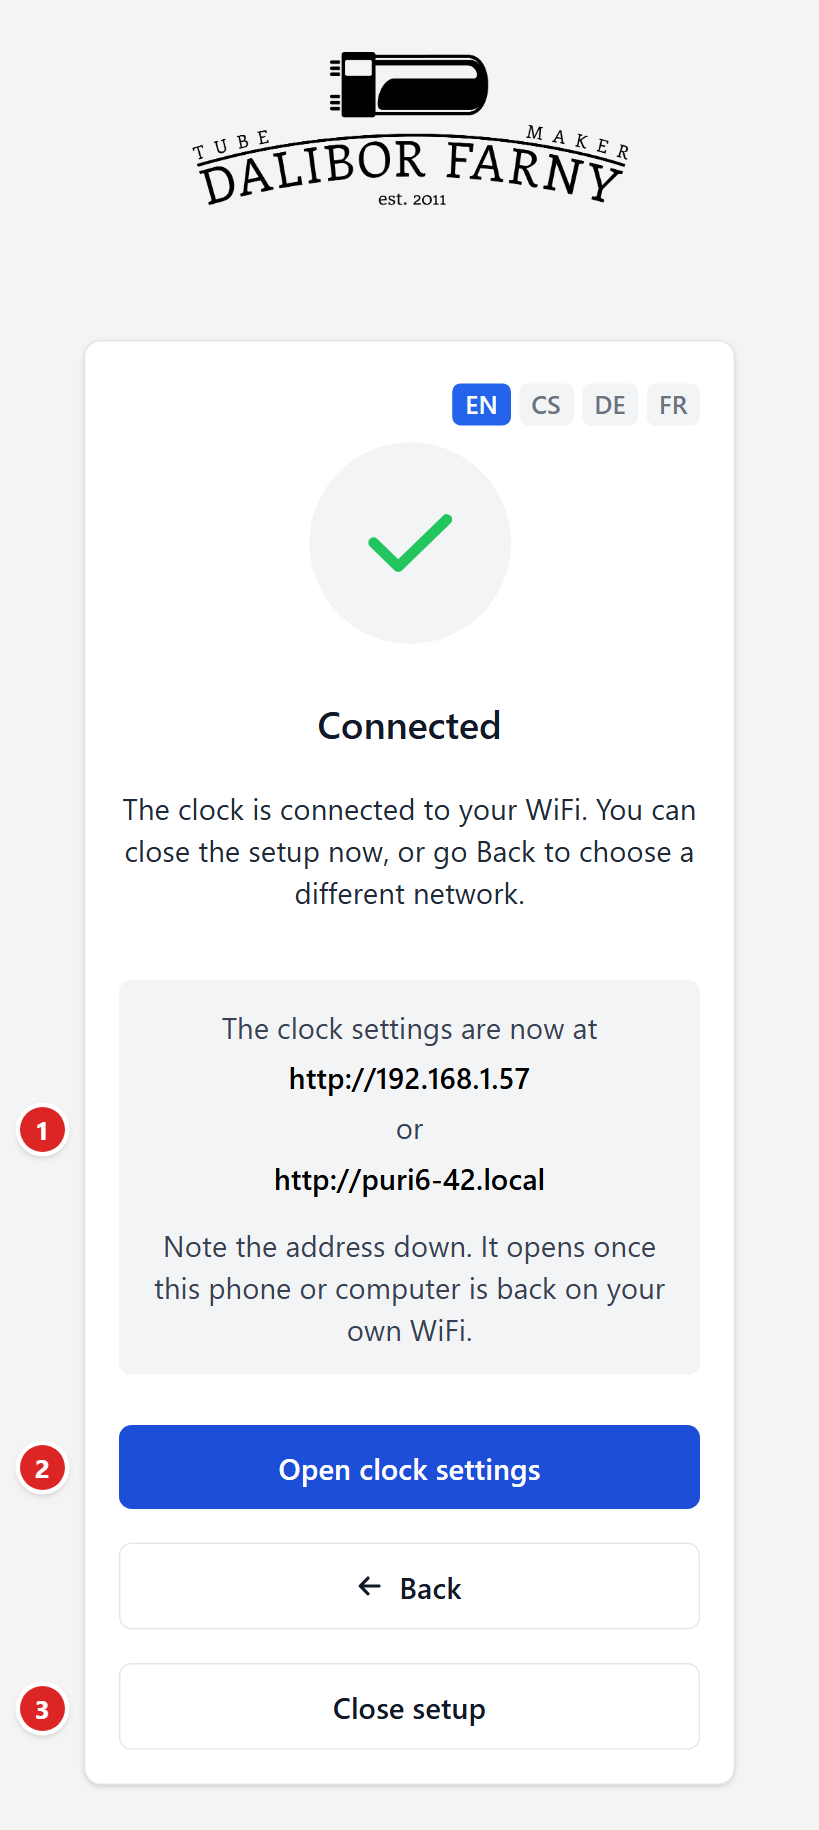
Wait a few seconds while the clock connects. When it succeeds, the page says Connected and shows the address of the clock settings, for example http://192.168.1.57 and http://puri6-42.local. The Wi-Fi LED starts breathing slowly.
The clock is connecting to your Wi-Fi. Keep the page open.(1) The address of the clock settings – note it down. (2) Open clock settings – works once your phone is back on your home Wi-Fi. (3) Close setup – closes the clock's setup network.
Tap Close setup. The setup network closes and your phone or computer returns to your usual Wi-Fi.
Tap Open clock settings. The configuration website opens in a new browser tab, where you create its password.
The page keeps showing the address, so you can bookmark it or write it down.
When you connect the clock this way, it switches on Automatic time from the internet by itself. Only set your time zone, see Date and time.
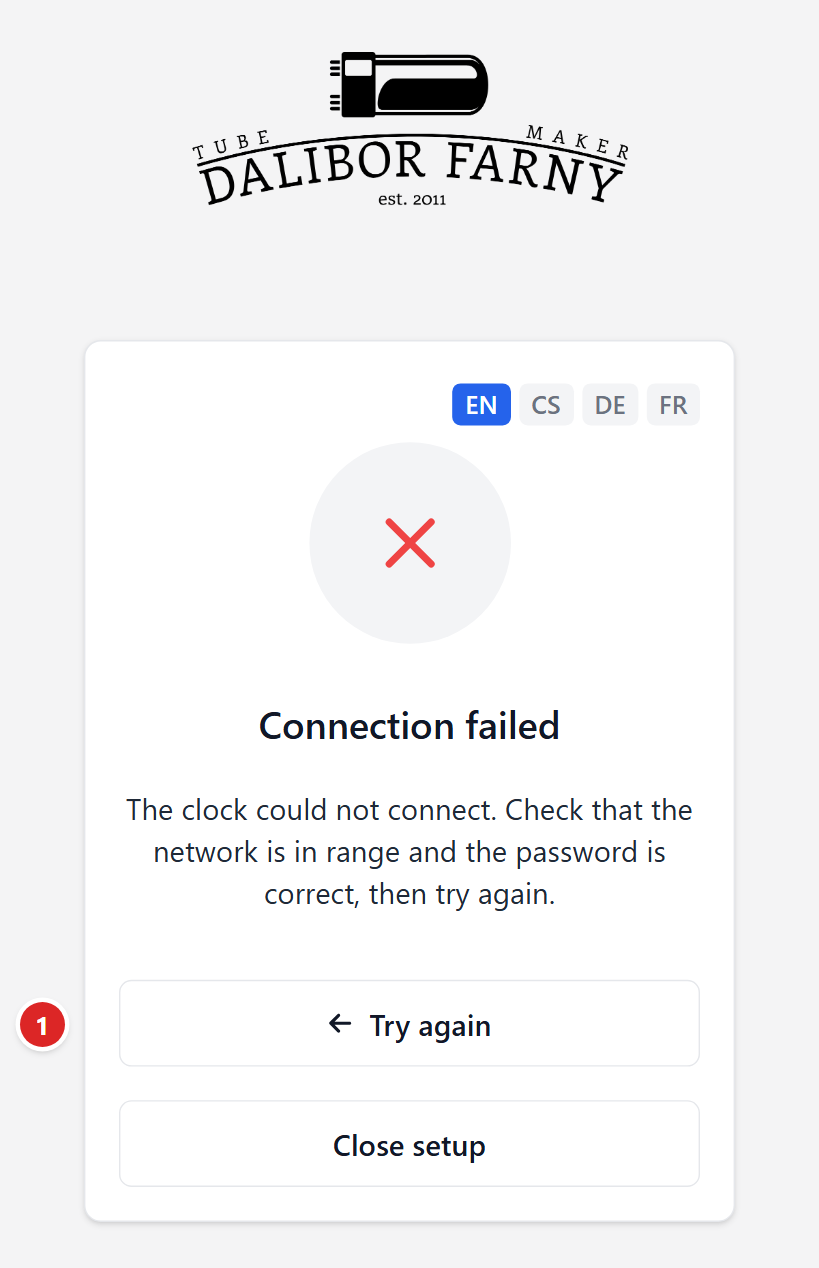
If the connection fails, the page says Connection failed or Connection timed out. Tap Try again, check the password and try again.
(1) Try again – choose the network and enter its password once more.
When the Wi-Fi is not available
When the clock cannot connect to its saved network within 30 seconds of starting (the router is off, or its name or password has changed), it opens its setup network again, so you can enter the new details. Meanwhile the Wi-Fi LED flashes twice every second.
The setup network closes after 5 minutes if no phone or computer is connected to it. With a saved network, the clock then keeps trying to reconnect to it. With no saved network, unplug the clock and plug it back in to open the setup network again.
If the clock's old network no longer exists, for example after a move, you don't need the configuration website: the clock opens the setup network by itself, see When the Wi-Fi is not available.
The clock remembers one Wi-Fi network. A newly entered network replaces the previous one.
Wi-Fi LED
The Wi-Fi LED shows whether the clock is connected to your Wi-Fi. It is used only in Expert mode; in Simple mode it stays off.
Wi-Fi LED
Meaning
Off
Simple mode, Wi-Fi is off
One short flash every 2 seconds
No Wi-Fi saved yet – the clock's setup network (for example puri6-42) is waiting for you (Connecting the clock to Wi-Fi)
Two short flashes every second
A Wi-Fi network is saved, but the clock is not connected to it – it is connecting, or the network is not available
Slow breathing (one breath in 4 seconds)
Connected to Wi-Fi
Note
If the LED keeps flashing twice for more than a minute, check that your router is on and that its name and password have not changed. See Connecting the clock to Wi-Fi.
Configuration website
The configuration website runs on the clock itself. Open it in the browser of a phone or computer connected to the same Wi-Fi network as the clock. It works only in Expert mode, after you have connected the clock to Wi-Fi.
Opening the website
When you connect the clock to Wi-Fi, the setup page shows the address and the Open clock settings button. Later, type one of these addresses into your browser:
http://puri6-NNN.local, where NNN is the clock's serial number, for example http://puri6-42.local (Puri 4: http://puri4-42.local). It is the same name as the clock's setup network. Some Android phones don't support .local addresses; use the IP address there.
http:// followed by the clock's IP address, for example http://192.168.1.57. The setup page shows it after connecting; your router's list of connected devices shows it too.
Bookmark the address, or add it to your phone's home screen.
Password
The password keeps other people in your network away from the clock settings and firmware updates.
First visit: the website asks you to create a password of at least 8 characters. Type it twice and tap Create password and sign in.
Later visits: enter the password and tap Sign in. With Stay signed in the device stays signed in for 30 days; otherwise the website signs you out after 30 minutes without activity.
After 5 wrong passwords, wait a minute before the next attempt.
Change password is at the bottom of the Recovery tab, Sign out at the bottom of the menu.
Why a password?
The password is not our idea of making things complicated – the law requires it. Since August 2025, every radio device sold in the EU that connects to the internet must protect its settings and software against unauthorised access (Radio Equipment Directive, Delegated Regulation (EU) 2022/30). The UK and some US states have similar rules.
Without a password, anyone on your Wi-Fi – a guest, or a hacked device in your home – could change the clock's settings or install different firmware into it. That's why the clock asks you to create your own password the first time you open the website. Only you know it.
Important
Forgot the password? Do a hard factory reset: hold all three buttons for 15 seconds. It erases the password together with all settings and the saved Wi-Fi network; then connect the clock to Wi-Fi again and create a new password. A soft reset keeps the password.
Layout
The menu on the left (on a phone, behind the menu button) lists the tabs. Every change is applied and saved in the clock as soon as you make it; there is no Save button.
Restart, forgetting the Wi-Fi network, factory settings, password
At the bottom of the menu:
Statistics – the clock's model, serial number, firmware version, Wi-Fi signal and power supply readings.
Theme – light, dark, or following your device.
Language – English, Čeština, Deutsch or Français. The language is saved in the clock, so the website and the setup page open in it on every device.
Sign out.
When the browser loses the connection to the clock, for example while the clock restarts, the website shows Connecting… and reconnects by itself.
Date and time
The Date and time tab sets how the clock keeps and shows the time. Set the Time zone first. With Automatic time from the internet on, the clock then keeps the exact time, including daylight saving changes. The clock switches it on by itself when you connect it to Wi-Fi through the setup page.
Basic settings
Setting
Options
What it does
Time on the clock
–
The date and time the clock is showing now
Automatic time from the internet
On / Off
Takes the time from internet time servers and corrects it every 30 minutes. Needs a working Wi-Fi connection. Off from the factory, switched on when you connect the clock to Wi-Fi through the setup page.
Time format
12-hour / 24-hour (default 24-hour)
12- or 24-hour display. The same setting as holding ⊕ for 3 seconds.
Time zone
list of time zones (default UTC)
Your local time zone.
Daylight saving time
Automatic / Always standard time / Always daylight saving time (default Automatic)
Automatic follows the daylight saving rules of the time zone. The other two always show standard time, or always daylight saving time.
Whether the hours show a leading zero (09:15 or 9:15) is set in Display.
Note
Changing the time with the buttons switches Automatic time from the internet off, so the next sync does not overwrite your time. Switch it on again here.
Set the time manually
These cards are shown only while Automatic time from the internet is off, for example when the clock has no internet access.
Use the time of this browser – one tap sets the clock to the time of your phone or computer.
Enter date and time – pick a date and time and send them to the clock. The time is taken as the local time of your phone or computer.
After a manual sync, the clock shows the time according to its Time zone setting, so check that the time zone is correct.
Display
The Display tab sets how the digits look and change, and how the clock cares for its tubes.
Nixie tubes
Setting
Options (default in bold)
What it does
Cathode poisoning prevention
Every minute for 1 s, Every 10 min for 10 s, Every 30 min for 30 s, Daily at 3:00 for 50 min
How often the clock runs its cleaning cycle and for how long.
Digit transition
Instant, Fading, Flipping, Cross-fade
How one digit changes into the next: at once, fading out and in, running through the digits like a slot machine, or blending.
Colon
Off, Always on, Blinking, Fading
How the separator tubes between the hours, minutes and seconds behave: dark, lit, blinking (2 seconds lit, 2 seconds dark), or blinking with a soft fade.
Leading zero (09:15)
On / Off
Off leaves the first hour tube dark before 10 o'clock, for example 9:55 instead of 09:55.
During the cleaning cycle a wave runs across the tubes and lights every digit in turn. Digits that stay dark for a long time slowly lose their glow (cathode poisoning); the cleaning cycle prevents that. See also Healing.
System
Setting
Options
What it does
Status LED
On / Off
Switches the clock's status LEDs on or off.
Modes
The Modes tab chooses between the clock and a countdown, and what each tube shows.
Mode
Clock (default) – shows the time.
Countdown – counts down to a date and time you choose.
The cards below change with the mode.
Clock format
Current clock format shows the format in use. To change it, type a new one into Change clock format and confirm. The button next to the field returns the default format.
The format has one character per tube, read from the left. The separator tubes take a : or . character, so the separators must stand on the separator tubes:
Clock
Default format
Separator tubes
Puri 6
HH:mm:SS
3rd and 6th character
Puri 4
HH:mm
3rd character
Code
Shows
HH
hours
mm
minutes
SS
seconds
dd
day of the month
MM
month
yy / yyyy
year, 2 or 4 digits
doy
day of the year (001–366)
ds, cs, ms
tenths, hundredths, thousandths of a second
0–9
this digit, always
-
this tube stays dark
:
separator tube, both dots (as set under Colon in Display)
.
separator tube, one dot
Examples for Puri 6:
Format
Shows
HH:mm:SS
21:45:08
dd.MM.yy
11.10.26
HH:mm:--
21:45 with the seconds tubes dark
Countdown
Set the target in Change countdown date and time; the time is taken as the local time of your phone or computer. Countdown to shows the current target, and Change countdown format sets what the tubes show, with the same codes as the clock format.
The countdown stops at zero and stays there; the clock gives no signal. With the default format the countdown shows hours, minutes and seconds, so it suits events less than a day away.
Night mode
The Night mode tab sets the brightness of the tubes, and a lower brightness for the night.
Settings
Setting
Options
What it does
Night mode
Off, Same every day, Different for each day
Off: one brightness all the time. Same every day: the same night hours every day. Different for each day: separate night hours for each day of the week.
Daytime brightness
5–100 %, default 100 %
Brightness outside the night hours. With night mode off, the card is called Brightness.
Night-time brightness
5–100 %, default 100 %
Brightness during the night hours.
Night hours: From / To
whole hours, default 22:00 – 06:00
Start and end of the night.
Brightness changes show on the tubes straight away; the switch between day and night happens within 10 seconds of the set hour.
Night hours
The night starts at the full hour From and ends at the full hour To. It may run past midnight, for example 22:00 – 06:00.
If From and To are the same, the night never starts.
Different for each day: each day's hours apply to that calendar day. Monday 22:00 – 06:00 dims the display on Monday from midnight to 6:00 and from 22:00 to midnight. Tap Copy Monday to all days to use Monday's hours for the whole week.
Network
The Network tab shows the clock's Wi-Fi connection and opens the setup network.
WiFi connection
Card
Shows
WiFi connection
Connected, Connecting…, Disconnected, Connection failed, Connection lost or Network not found
Network name
name of the Wi-Fi network
IP address
the clock's address in your network
Local address (mDNS)
the clock's name in your network, for example puri6-42.local
WiFi signal
signal strength in dBm; values closer to 0 are better, below about −80 dBm the connection may drop
WiFi setup
Setup portal, Network name and IP address – whether the setup network is running, its name (for example puri6-42) and address.
WiFi setup portal – switch on to open the setup network, for example to change the Wi-Fi network.
Open WiFi setup – opens the setup page; shown while the setup network is running.
Healing
The Healing tab lets you check the tubes and restore digits that have lost their glow.
A digit that stays dark for months can lose part of its glow (cathode poisoning). The regular cleaning cycle prevents this. Healing is for digits that are already affected: the clock lights them for many hours over several weeks.
Digit test
Tap a digit from 0 to 9 in Light digit and all tubes show it, so you can compare how evenly the digits glow. Tap it again, or tap Stop test, to return to the clock.
Digits to heal
There is one card for each tube, counted from the right: Tube 1 is the rightmost tube. On Puri 6 the cards are Tube 1, Tube 2, Colon tube 3, Tube 4, Tube 5, Colon tube 6, Tube 7 and Tube 8; on Puri 4 Tube 1, Tube 2, Colon tube 3, Tube 4 and Tube 5.
In each tube's card, select the digits that need healing (for a colon tube, its dots 0 and 1). Clear selection clears every selection and stops healing.
Cathode healing
Setting
What it does
When to heal
All day, or Only at night between the hours set in From and To (default 22:00 – 06:00)
Run healing
Starts or stops healing
Healing status
Time left, or Finished / Not running
While healing runs, each selected tube shows its selected digits in turn, changing every second; the other tubes keep showing the time. Healing runs for 30 days and then stops by itself. It continues after a power cut or restart. With Only at night, the clock shows the time normally during the day.
Firmware updates
The Firmware tab updates the clock's firmware over Wi-Fi. During an update the tubes show its progress in percent; when it finishes, the clock restarts with the new firmware.
Warning
Do not unplug the clock while the update runs.
Update status
Installed firmware shows the installed version. Progress and Status show how an update is going.
Update from the internet
Open the Version list. It shows the available versions with their release dates, newest first. Tap Refresh list to load it again.
Select a version.
Tap Install and confirm with Confirm.
The clock downloads the firmware, checks it and installs it.
Versions on offer
Include beta versions adds test versions to the list. They are meant for testing new features and may contain bugs. The switch turns off again when the clock restarts.
Update from a file
If you have received a firmware file (.bin) from us, tap Choose file (.bin) and choose it. The update starts as soon as you select the file, without asking for confirmation.
Firmware for a different clock model is rejected (This file is not firmware for this clock), so you can't install the wrong file by mistake.
If the update fails
The status shows what went wrong, for example Not connected to WiFi, Update server not available or Download failed. The clock keeps running the firmware it had. Check the Wi-Fi connection, refresh the list and try again.
Recovery
The Recovery tab restarts the clock or returns parts of it to the factory state. Every action asks for confirmation first.
Action
What it does
What stays
Restart clock
Restarts the clock
Everything
Forget WiFi network
Erases the saved Wi-Fi network and opens the clock's setup network (Connecting the clock to Wi-Fi). The website disconnects.
All settings, Expert mode
Restore factory settings
Returns all settings to factory defaults, including the language (English) and the time zone (UTC). The next time the clock is powered on, it starts in time setting.
Wi-Fi network, Expert mode, the website password, the time until the next power-on
Update server → Server address is the address the clock loads firmware updates from. Leave it unchanged unless our support asks you to change it. An empty field restores the default address.
Change password at the bottom of the tab sets a new password for the configuration website. Enter the current password and the new one twice. Other devices then have to sign in again.
Tip
To reset the clock without the website, use the factory reset with the buttons. Only the button hard reset erases everything, including the website password, for example before you give the clock to someone else.
Factory reset
The factory reset works in both Simple and Expert mode.
Hold all three buttons ⊖, ⊙ and ⊕ together. The display shows how long you have been holding them:
0–5 s: the digits go out one by one from the right. Release now and nothing happens, the time comes back.
5–15 s: zeros light up one by one from the left. Release now for a soft reset.
15 s: all zeros are lit and the clock does a hard reset straight away, without waiting for you to release the buttons.
The display then fades out and the clock restarts.
Soft reset
Hard reset
How
Release between 5 and 15 s
Hold for 15 s
Settings
Back to factory defaults
Back to factory defaults
Saved Wi-Fi network
Kept
Erased
Website password
Kept
Erased
Time
Kept, the clock shows the same time as before
Erased, the clock starts in time setting
Mode after the restart
Simple mode
Simple mode
Tip
Use the hard reset before you give or sell the clock to someone else, or when you have forgotten the website password. It erases everything, including your Wi-Fi network and its password, and the clock starts like a new one.
Battery replacement
The clock keeps the time with a CR2032 coin cell battery while it is unplugged. The battery typically lasts 5–10 years. It sits under a magnetic cover on the bottom of the base.
Unplug the USB-C cable and turn the clock upside down on a soft cloth.
Pull off the magnetic cover. It is held only by magnets, so no tools are needed. The battery is right underneath.
Lift the battery out with a thin flat object, for example a pocket knife or a small flat screwdriver.
Insert a new CR2032 battery the same way round as the old one.
Put the cover back, the magnets hold it in place.
Note
The clock loses the time when you replace the battery. Set it again with the buttons, see Setting the time. If Automatic time from the internet is on, the clock takes the time from the internet once it is connected to Wi-Fi; pressing ⊙ to confirm the blinking time does not switch it off.
Do not throw the old battery away with household waste, take it to a battery collection point.
Do not dispose of this product, its power adaptor or its CR2032 battery with household waste. At the end of their life, return them separately to appropriate electrical equipment and battery collection points.